
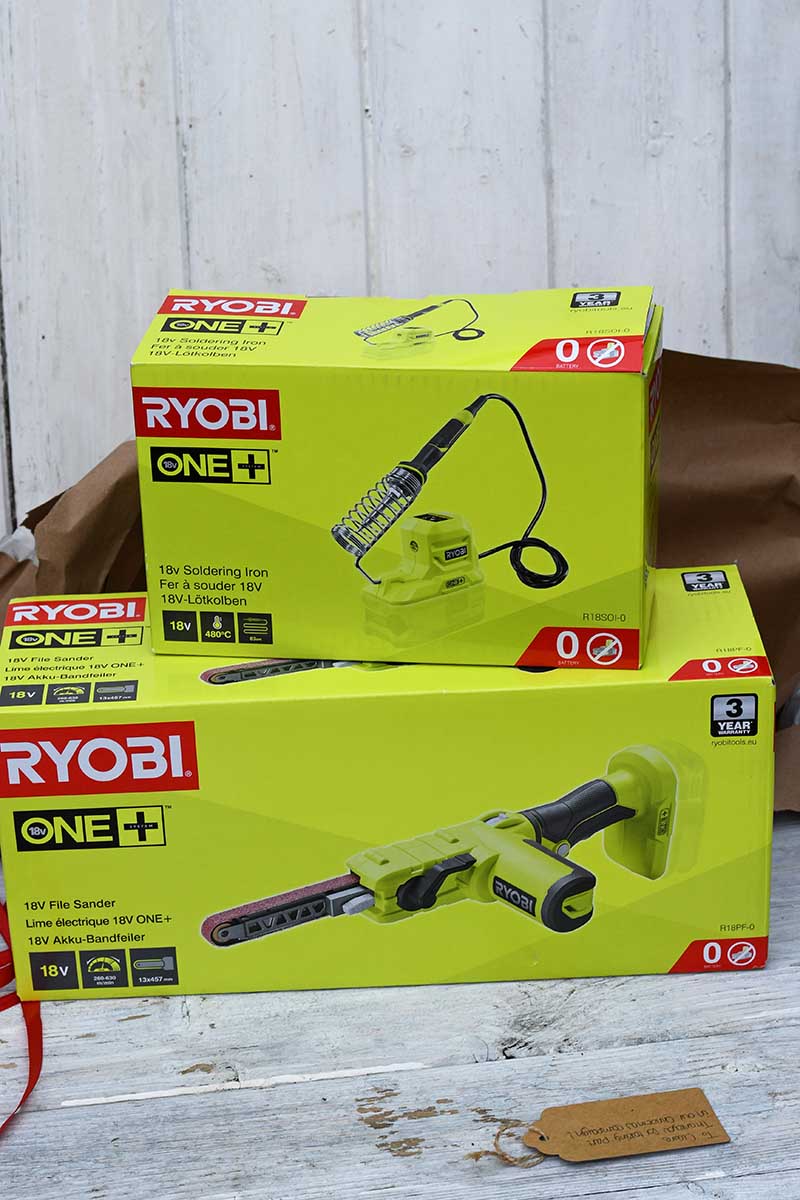
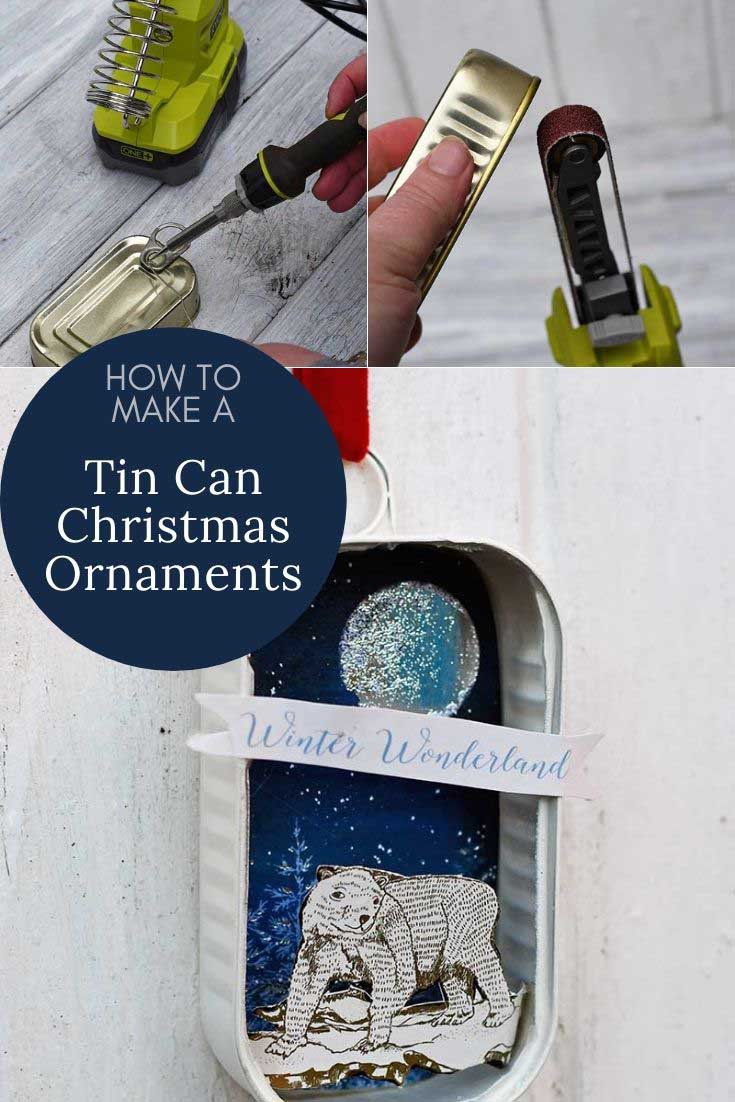
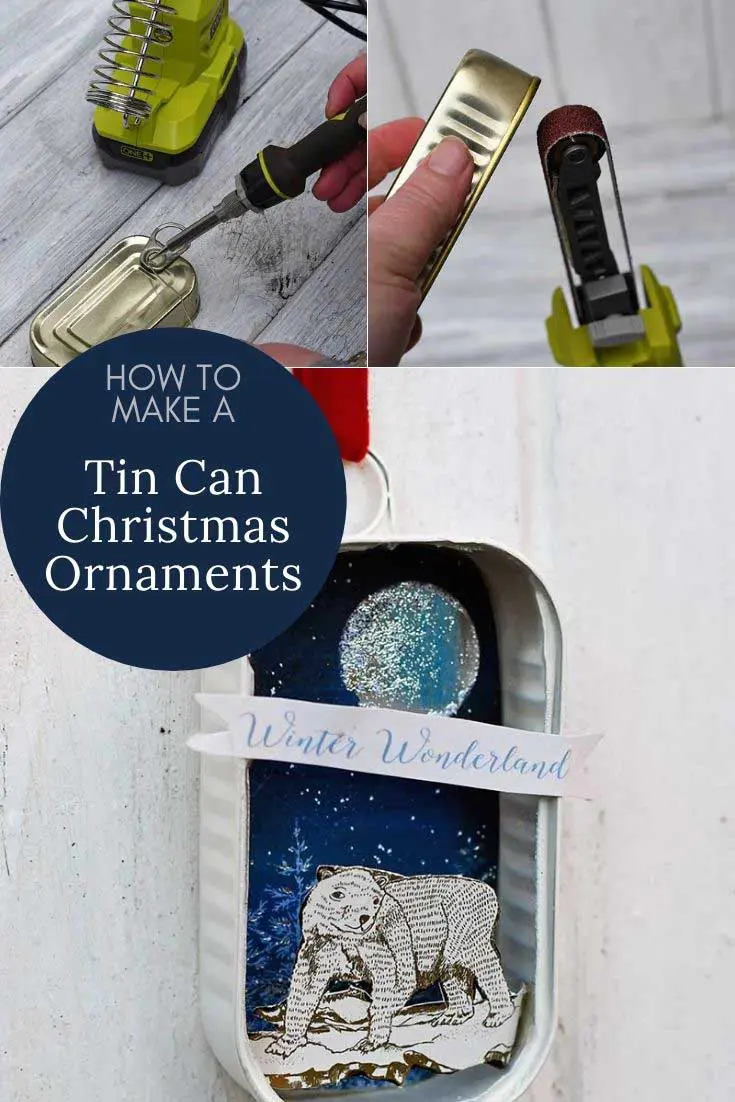
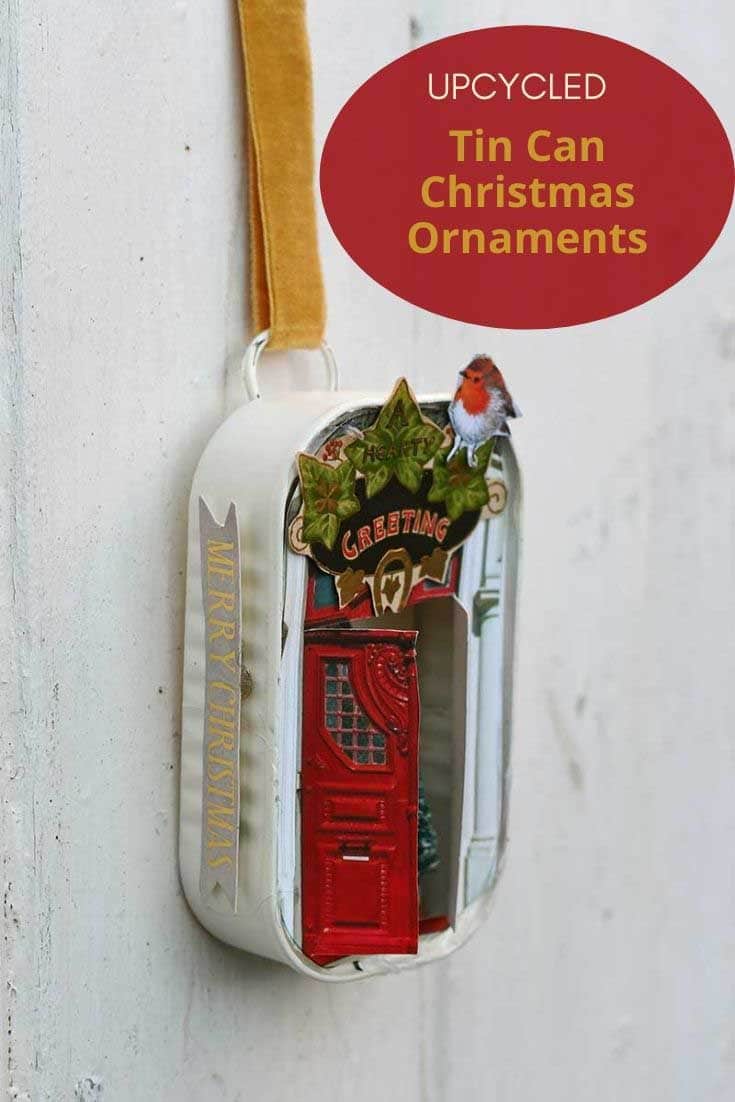
Yesterday, I received an early Christmas gift from Ryobi, two of their cordless power tools. I couldn’t wait to start playing with them and made two sardine tin can ornaments for my Christmas tree.
I was given two tools: a soldering iron and a slimline file sander. The file sander was the one I was most excited about. It’s a nifty tool, great for sanding and filing things in those hard-to-reach places.
I can see myself using this tool with many of my future craft and upcycling projects. These tools were all cordless as well, which made them even better.

Repurposing Sardine Cans Into Ornaments
I’ve wanted to make something with old sardine cans for a while.
I have upcycled many round food tin cans into planters but haven’t made anything with rectangular sardine cans before. This is surprising as I get through many tinned anchovies and sardines.
Every year I visit my parents in Portugal, I always buy a couple of tins of sardines, not just for the fish, but because I can’t resist the cute packaging. The Portuguese are the best at canning fish, but they also wrap it in the best packaging.
One of my favourite shops worldwide is in Lisbon, the Conservera de Lisboa, which sells nothing but tinned fish.
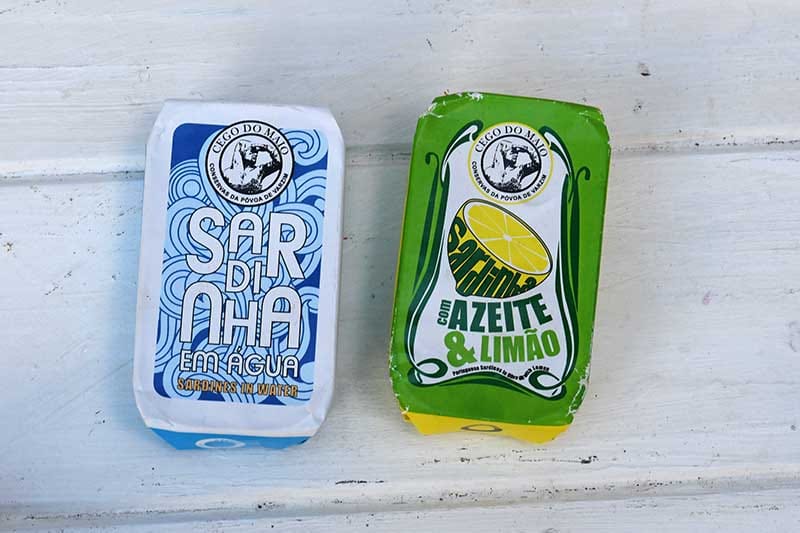

Don’t worry; you don’t need a fancy sardine tin for this upcycle; a standard tin from the supermarket will do. If you don’t have any, I suggest you buy yourself a can of sardines in olive oil (they are so cheap).
Then, make yourself a delicious and nutritious lunch of sardines on toast. Add smashed avocado (my son’s favourite) for something fancier.
After lunch, wash the empty can in hot soapy water before turning it into a lovely Christmas ornament or a tree.
Check out these other ideas for household waste crafts.
We’re a participant in the Amazon Services LLC Associates Program, an affiliate advertising program designed to provide a means for us to earn fees by linking to Amazon.com and affiliated sites. As an Amazon Associate, I earn from qualifying purchases.
What You Need To Make Tin Can Ornaments
- Rectangular sardine or anchovy tin cans
- Old Christmas cards or images from magazines or download some vintage Christmas pictures.
- Ryobi soldering iron (if you don’t have one, a hot glue gun can be used instead, but the soldering iron would be better).
- Ryobi Power File
- Cream spray paint
- Ryobi hot glue gun
- Scissors
- Velvet ribbon
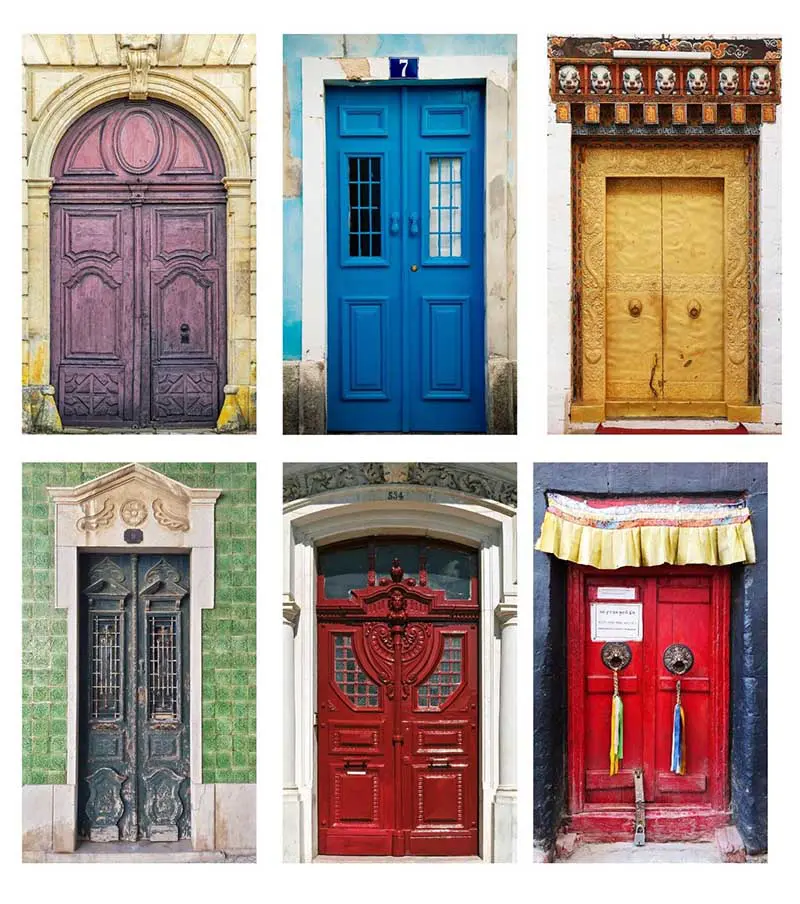
- Door pictures, I have made six to choose from, and they will fit a standard sardine tin. You can download them here.

How To Make Sardine Tin Can Ornaments
Preparing the tin cans
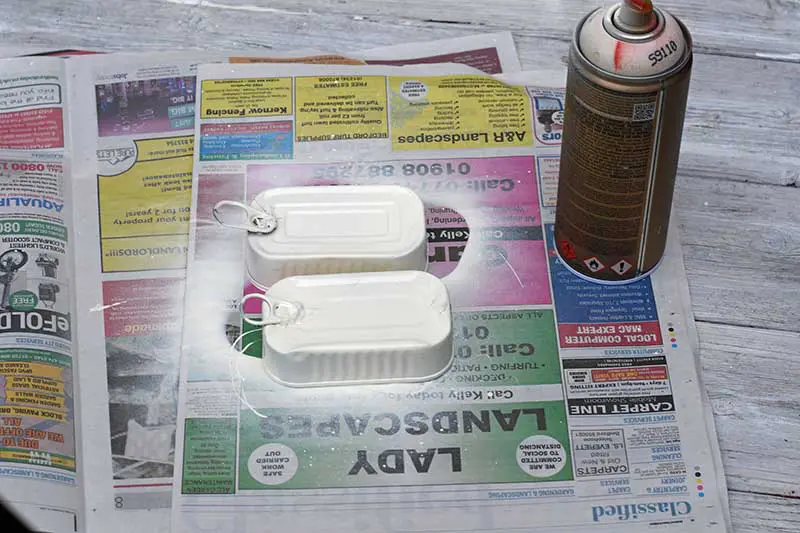
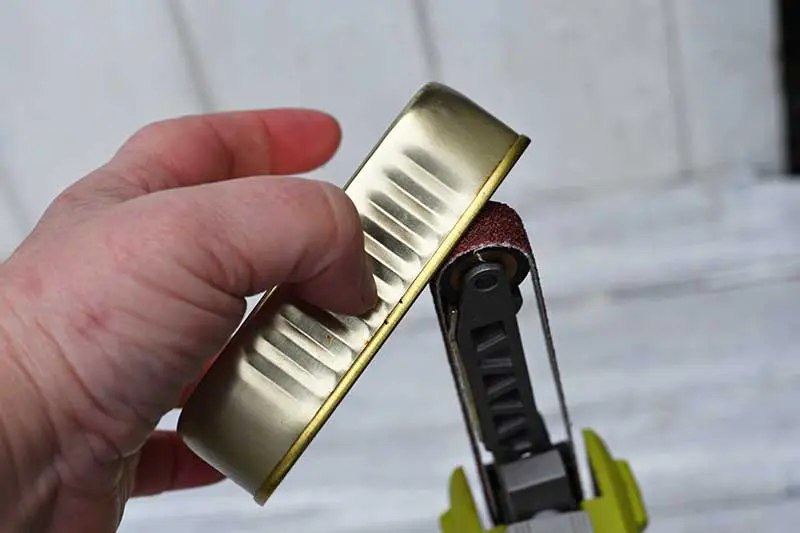
Step 1: Remove the ring pull from the lid of the sardine can. It should just twist off.
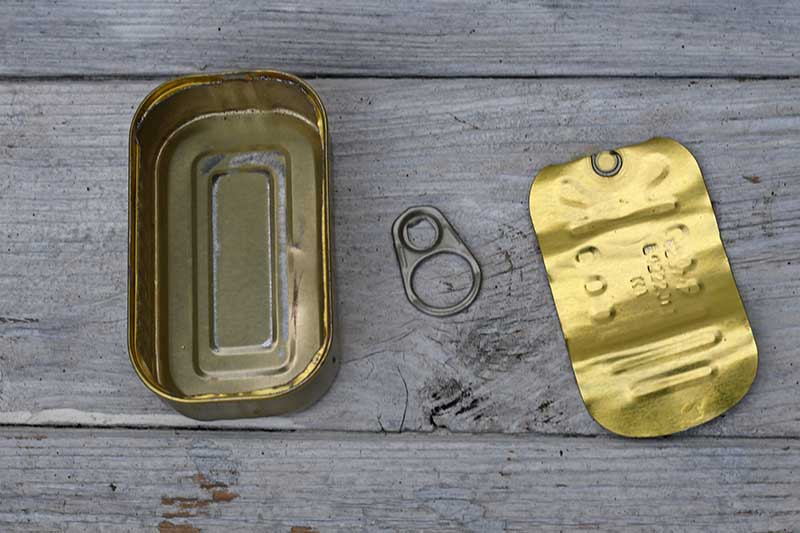
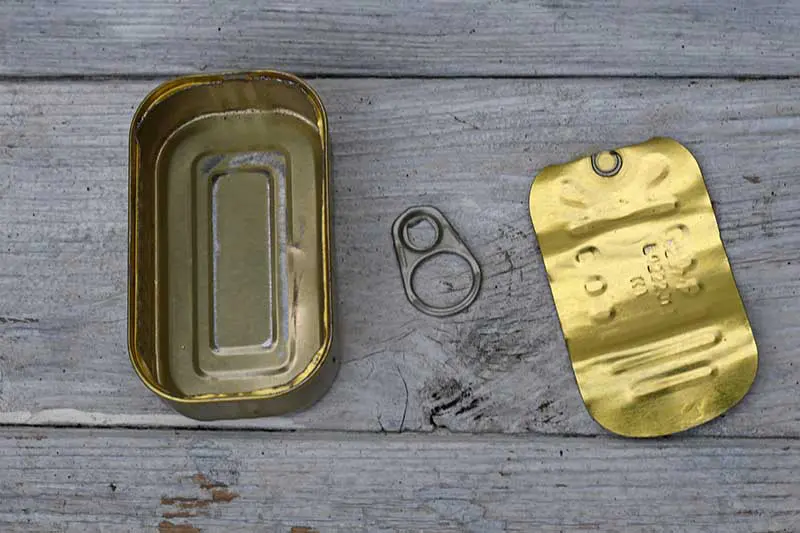
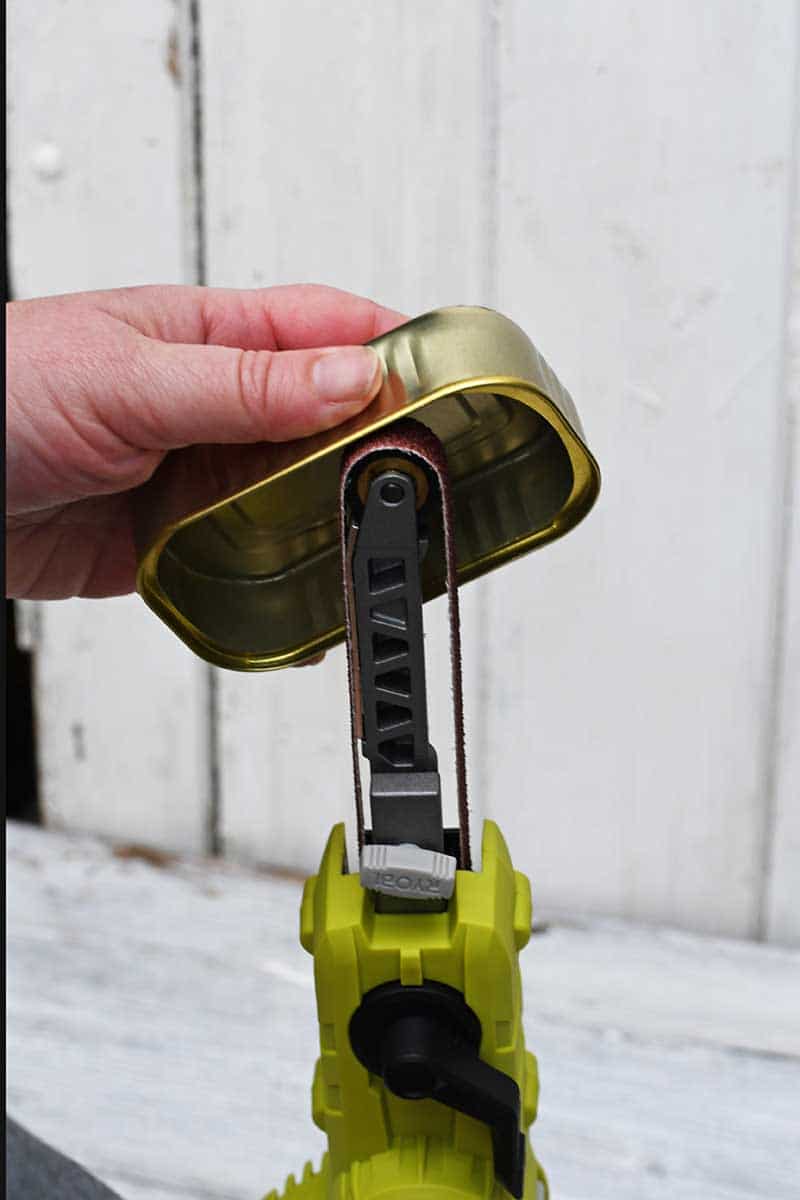
Step 2: The inside edge of the sardine tin will be sharp. This is when the power file comes into its own. Use the file to smooth off the sharp edges by running the can over the file. Like with all power tools, ensure you wear safety goggles, as little bits of metal are likely to fly off.
With the power file, it will only take a minute or two to blunt the sharp edges.

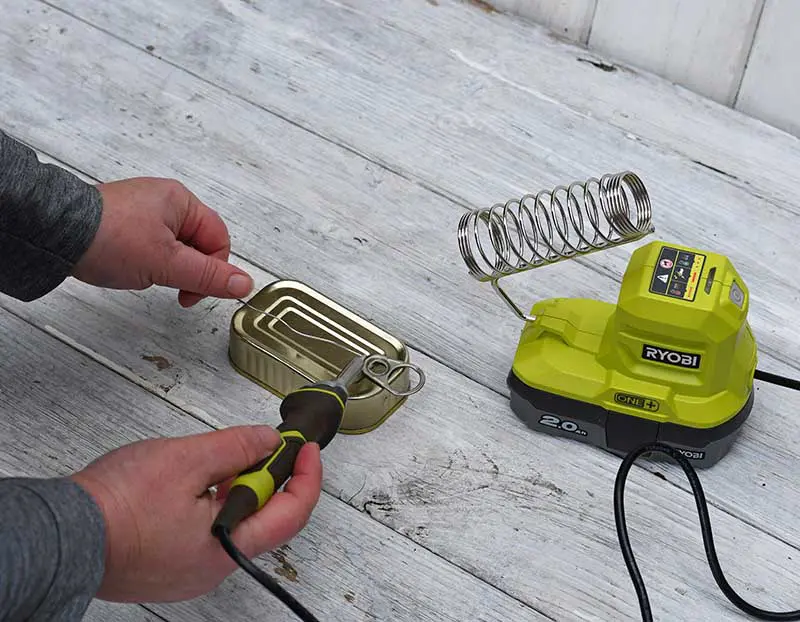
Step 3: Next, use the soldering iron to solder the ring to the back of the tin can. If you are not used to soldering, this can be tricky and may take some practice. My soldering skills certainly need to improve, but I have plenty of tin cans to practice on.
Another option is to use a glue gun to attach the ring pull, but it won’t be as strong as the solder.

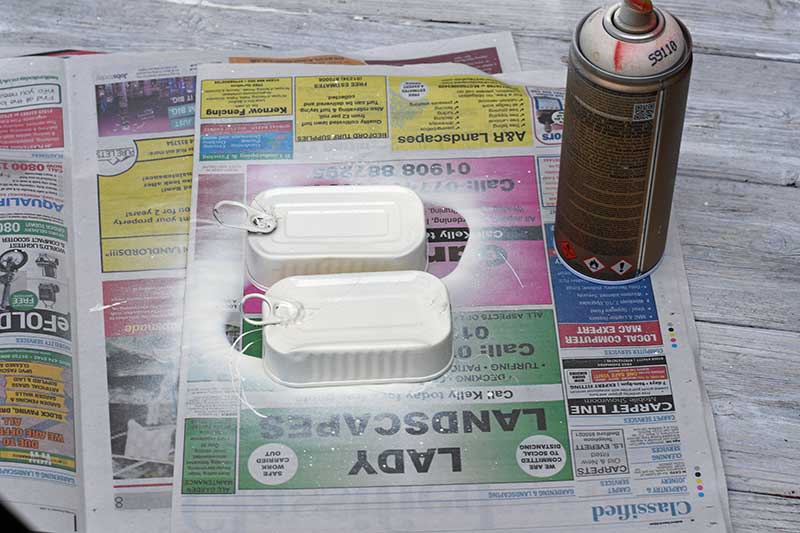
Step 4: Next, spray paint the tin can inside and out a nice creamy white colour.
Decorating The Tin Cans For Christmas
Step 5: This is the fun part and one in that the kids can get involved. Sort through all your old Christmas cards, and cut out any pictures or sayings that you think would be fun to use for an ornament.
I keep my Christmas cards yearly for upcycling, and friends even pass me on their old cards. Last year I used my cards to style a printer’s tray for Christmas and made personalized Christmas ornaments.
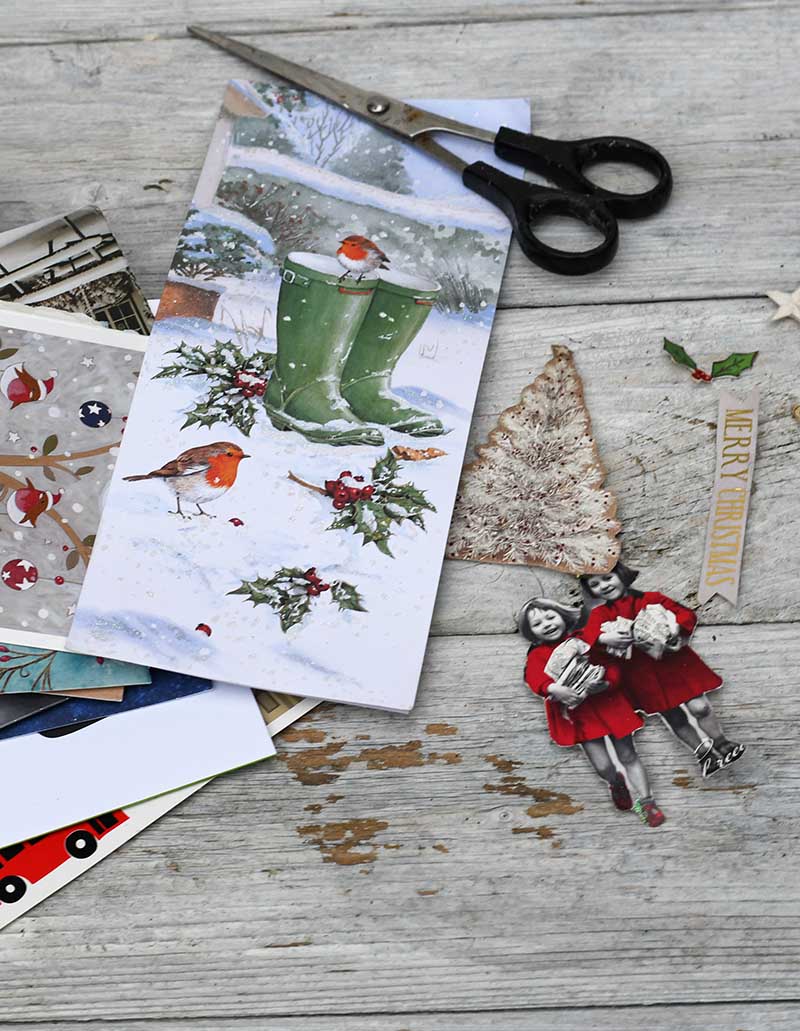


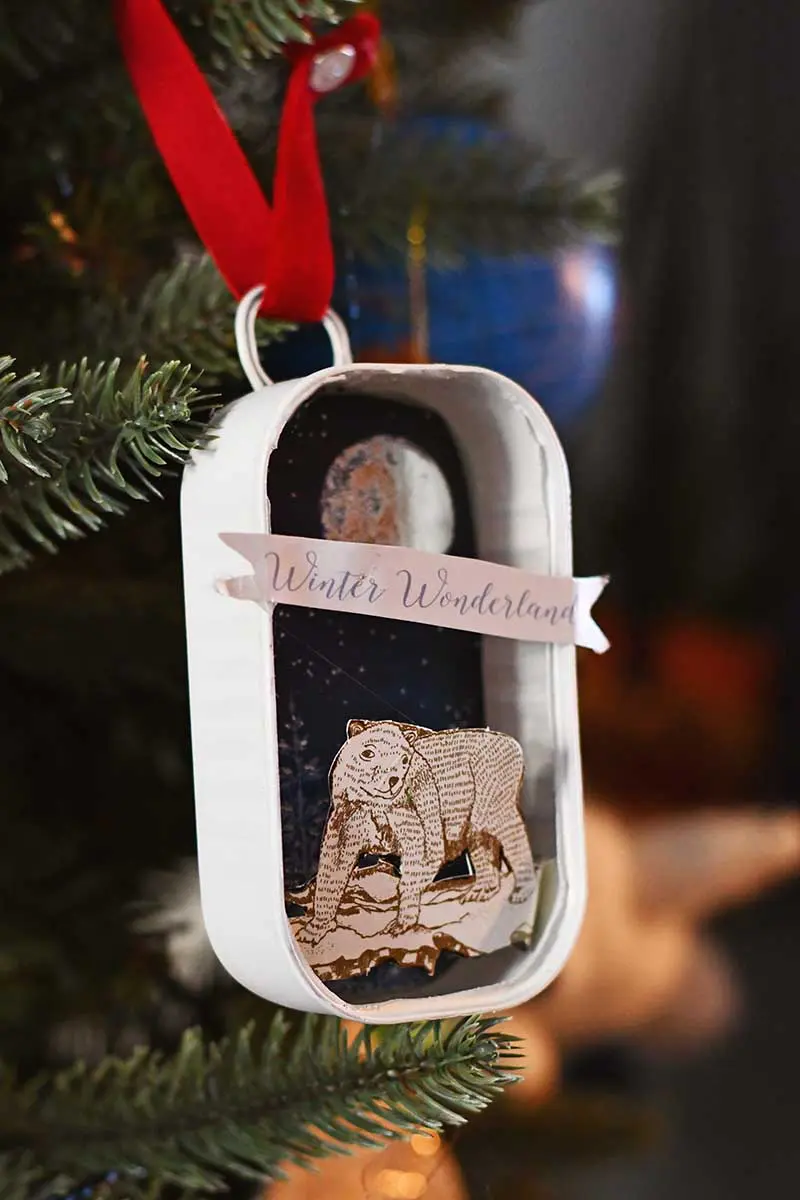
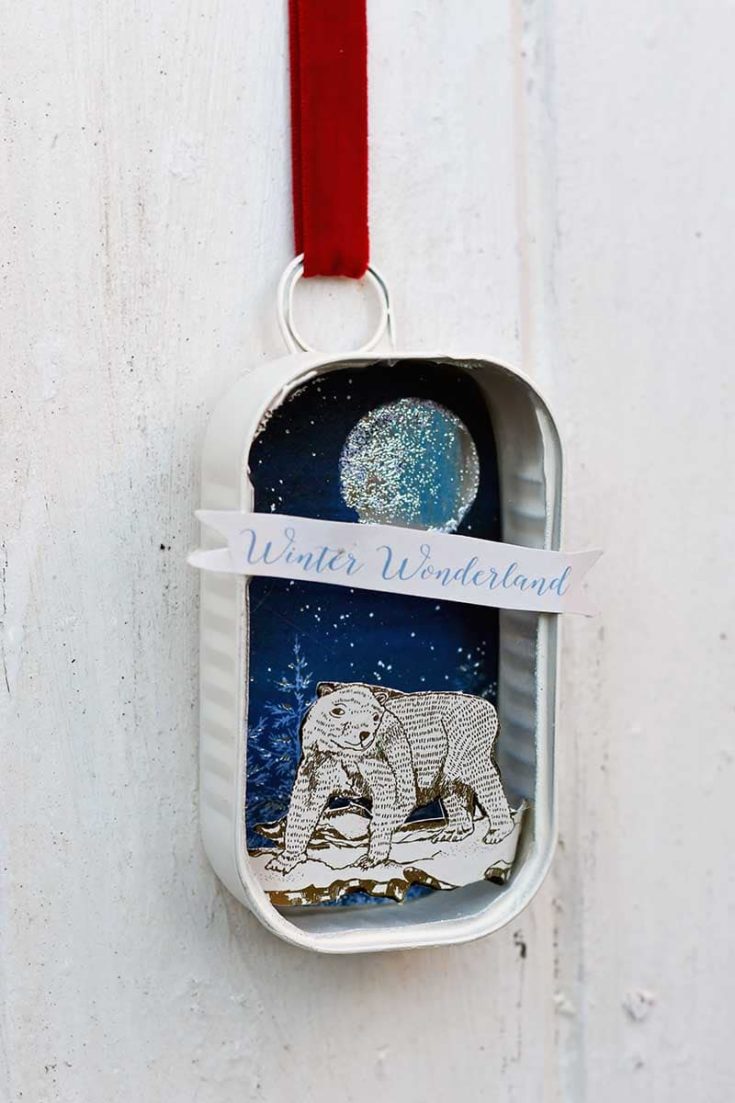
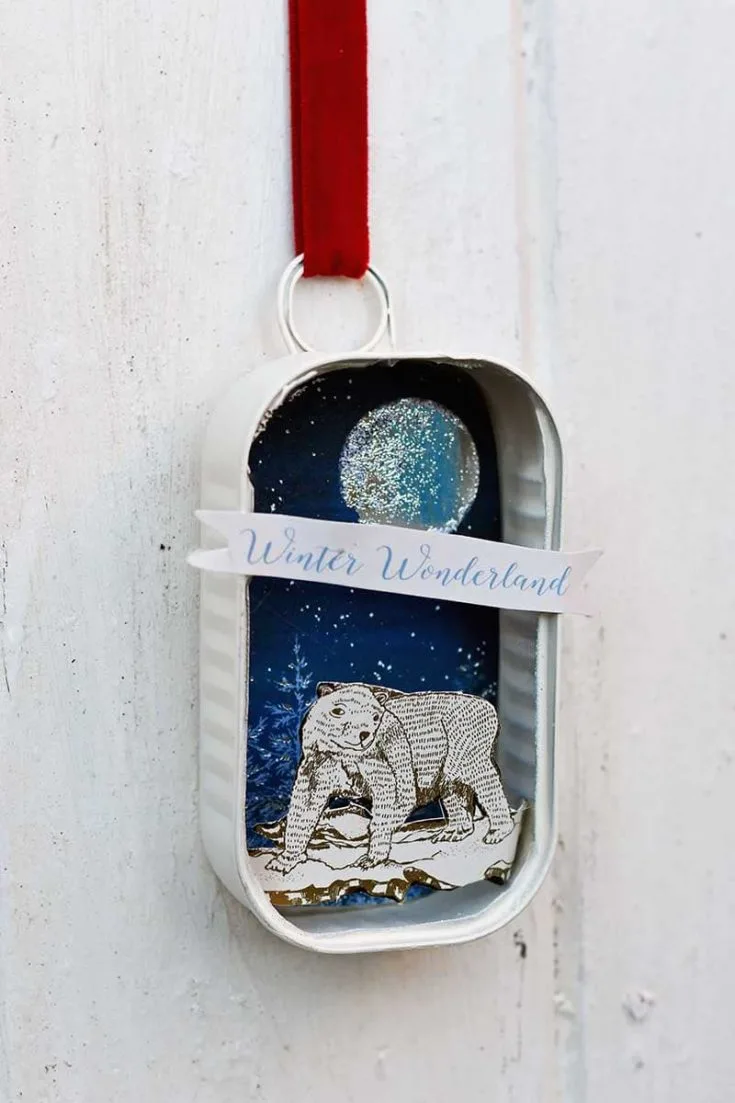
I made two very different tin can ornaments by sorting through the cards—one with a winter wonderland theme and the other with a Christmas door theme.
Making the winter wonderland ornament
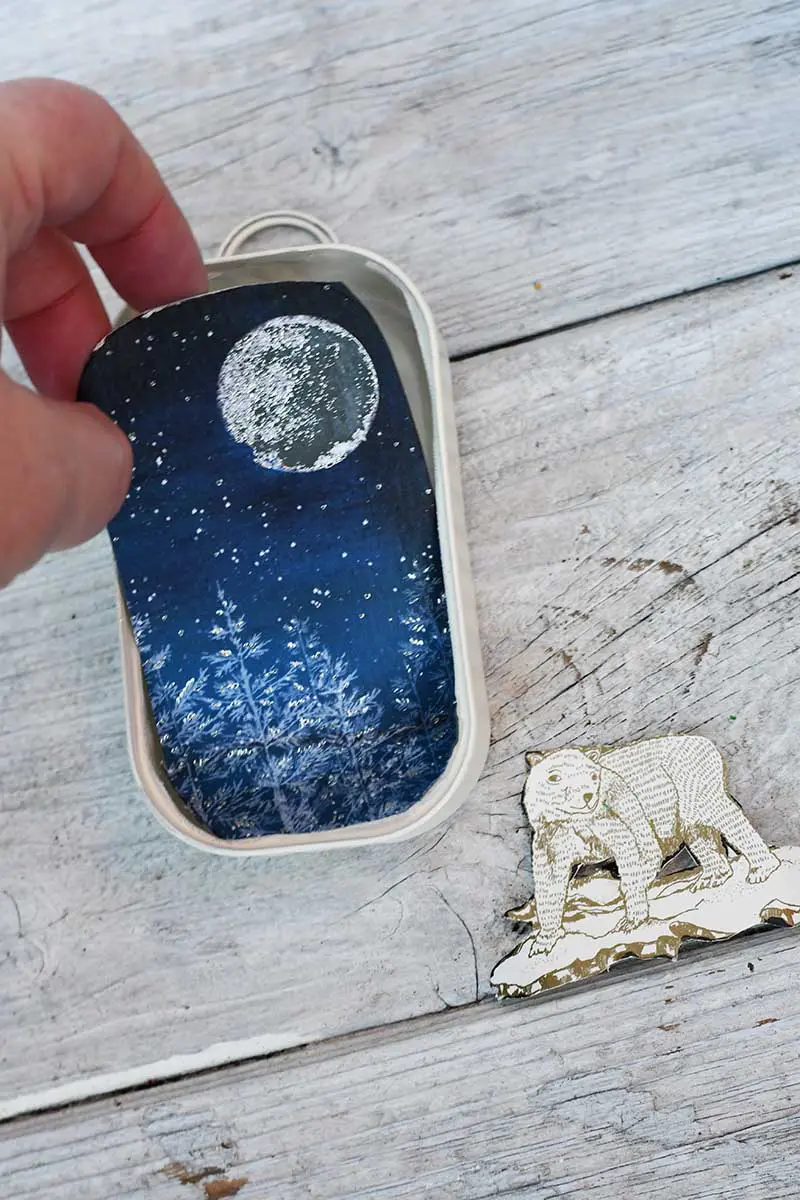
6. For this tin can ornament, I cut out a blue starry background from a Christmas card. Then, I placed the tin can over the Christmas card and drew around it. Next, I cut out this shape, cutting inside the line by about 1mm, so it would fit into the bottom of the painted tin.
I cut out the words “winter wonderland” and a cute polar bear from another card.
If you can’t find suitable images, search the web and print some. There are lots of polar bear images here you could use.
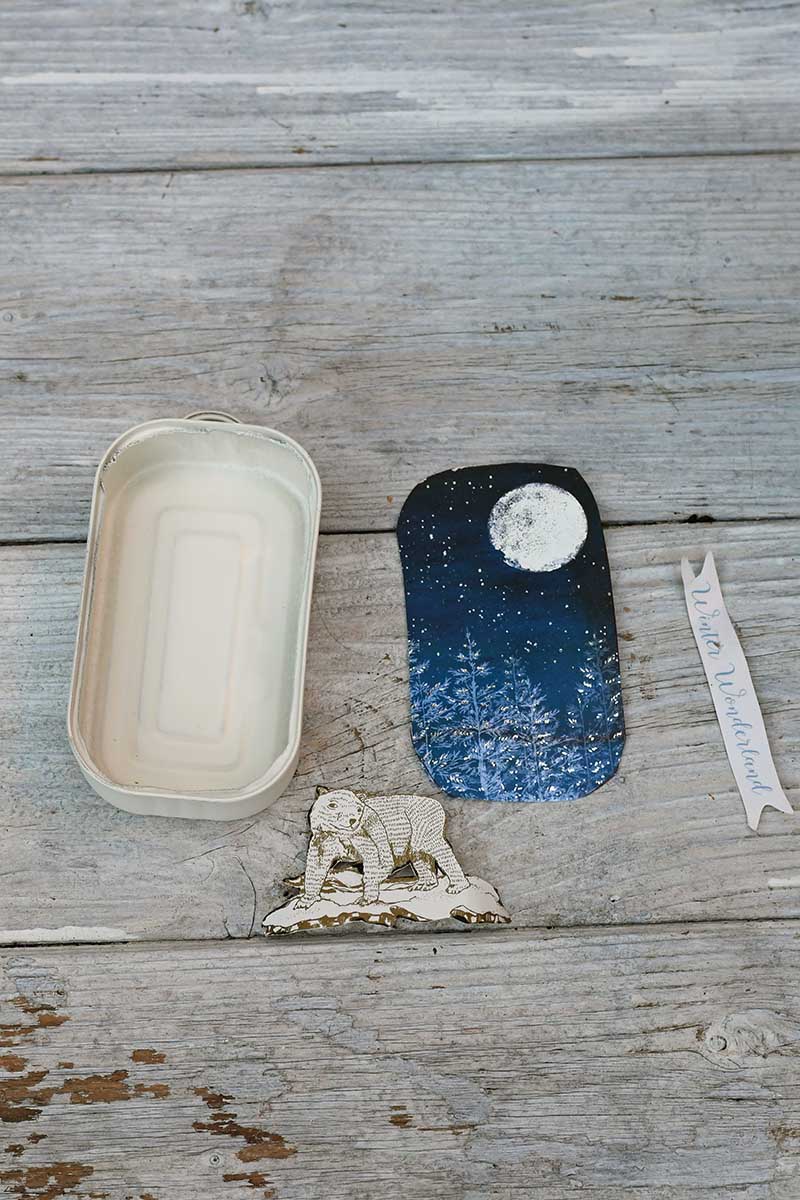

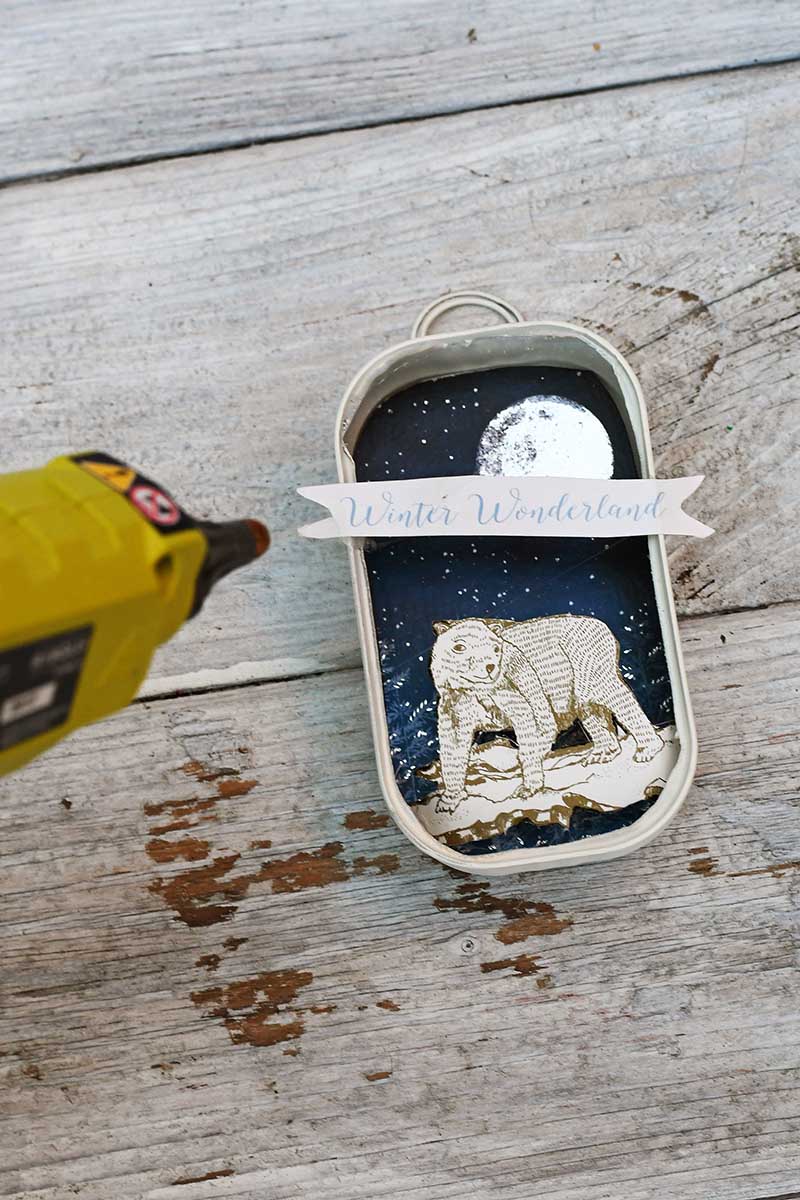
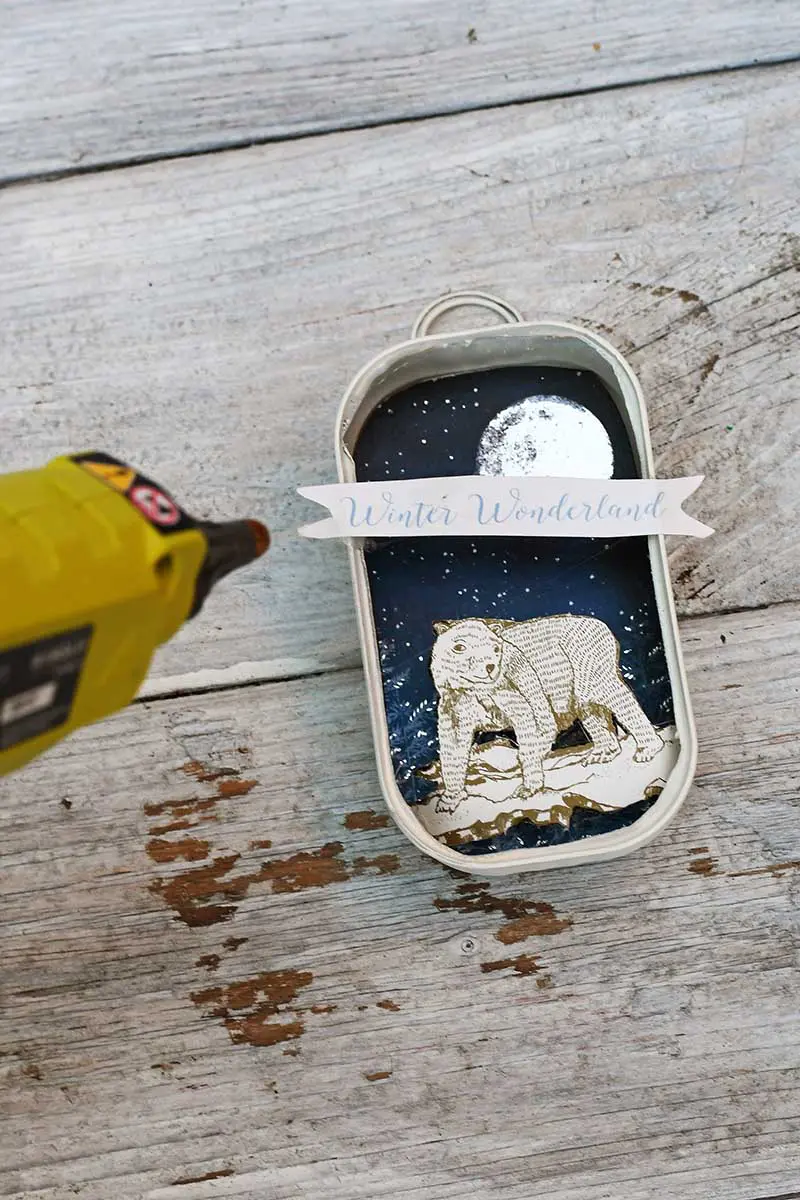
Place the blue background into the base of the tin. Then with the hot glue gun, stick the polar bear to the bottom of the container can so that it sits a few millimetres in front of the background.
Then stick the words across the front of the tin.
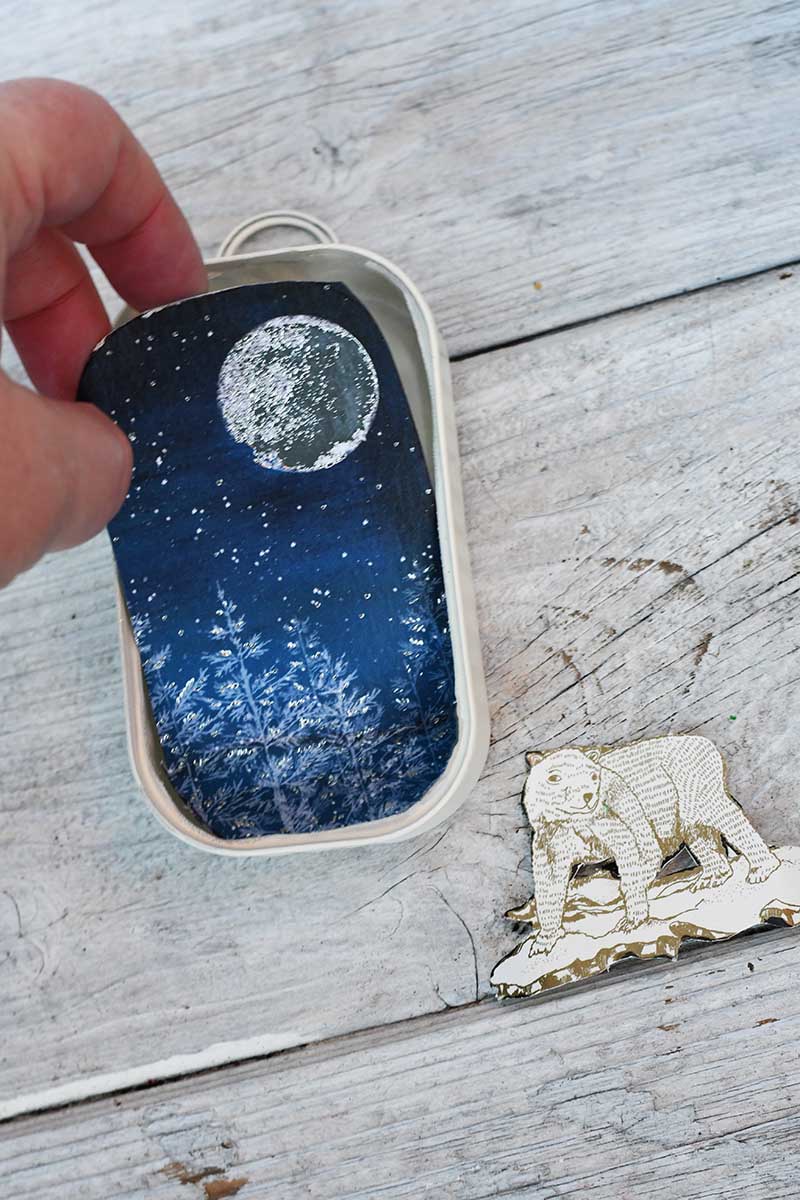
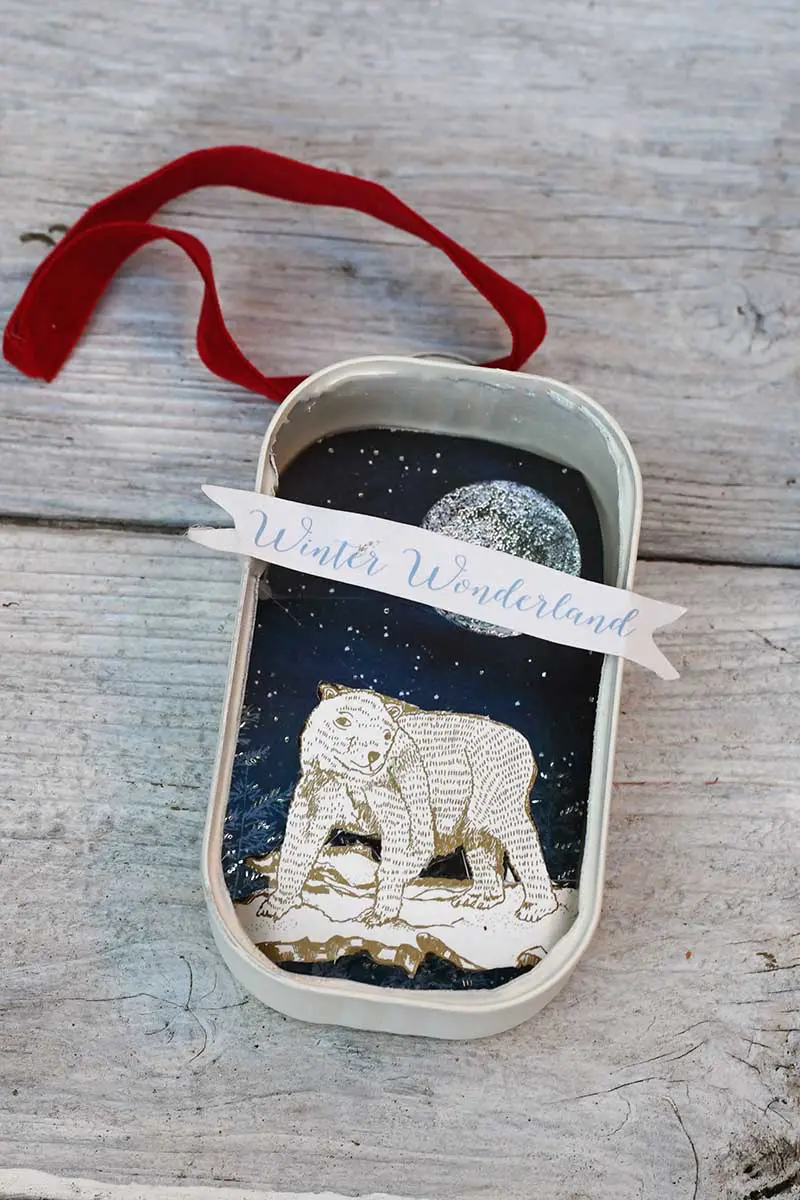
Finish off this winter wonderland tin can ornament by adding a red velvet ribbon to hang it from.


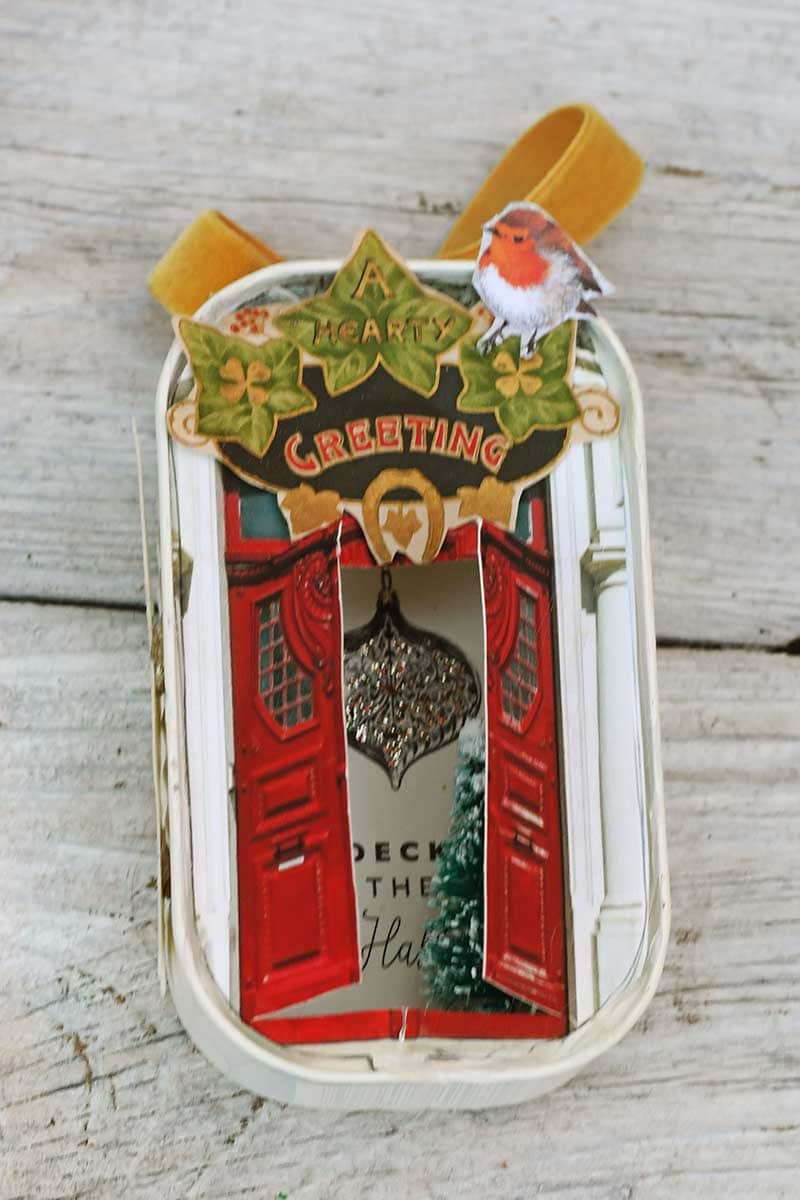
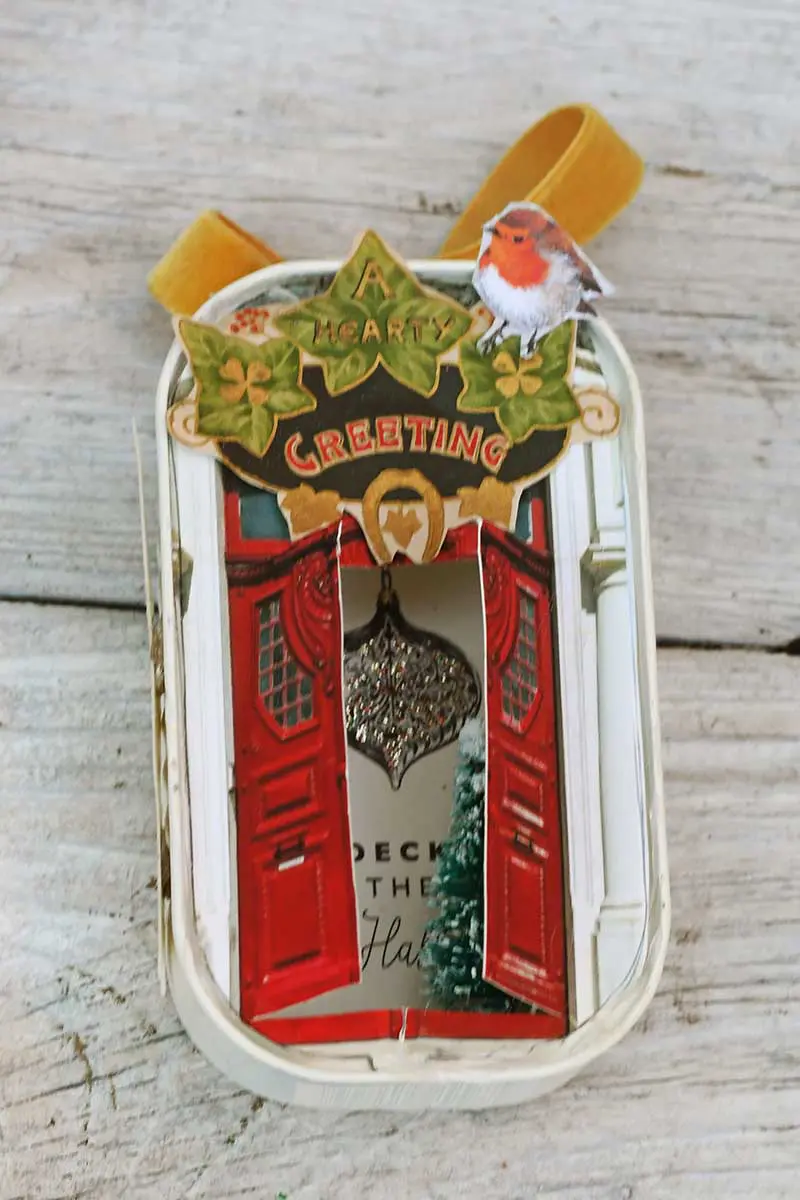
Making the Christmas Door Ornament
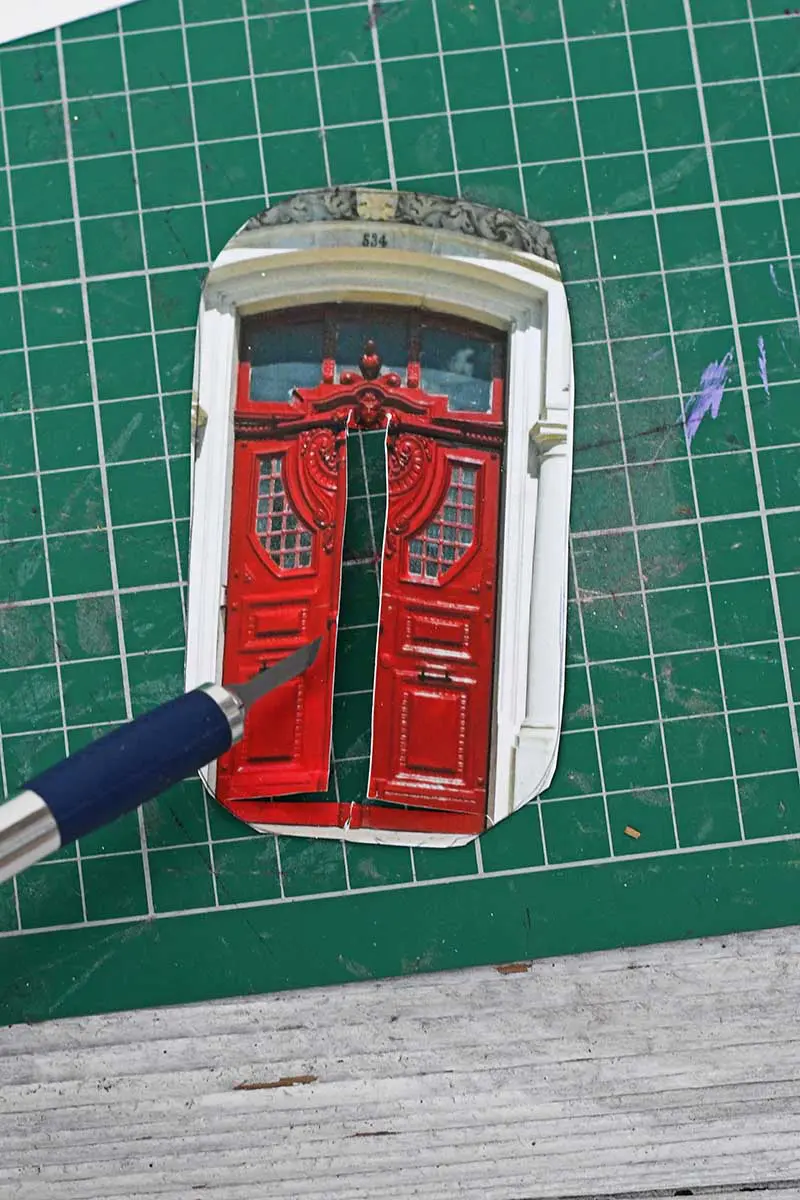
As this was a sardine can, I thought it would be appropriate to pick a red Portuguese door for this ornament. I downloaded the door (available in the materials list above) and printed it onto matte photo paper.
I drew around the tin can and cut out the door shape. Then, use a craft knife to cut the doors so they will open.


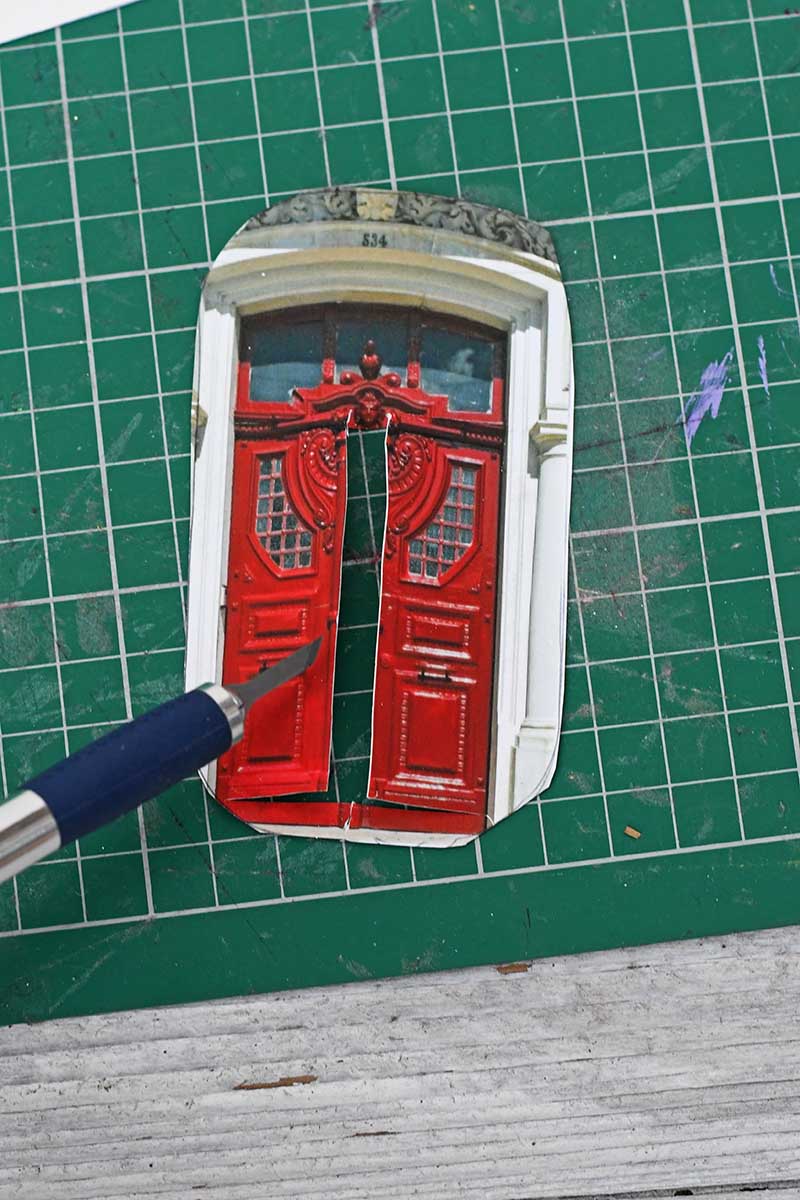
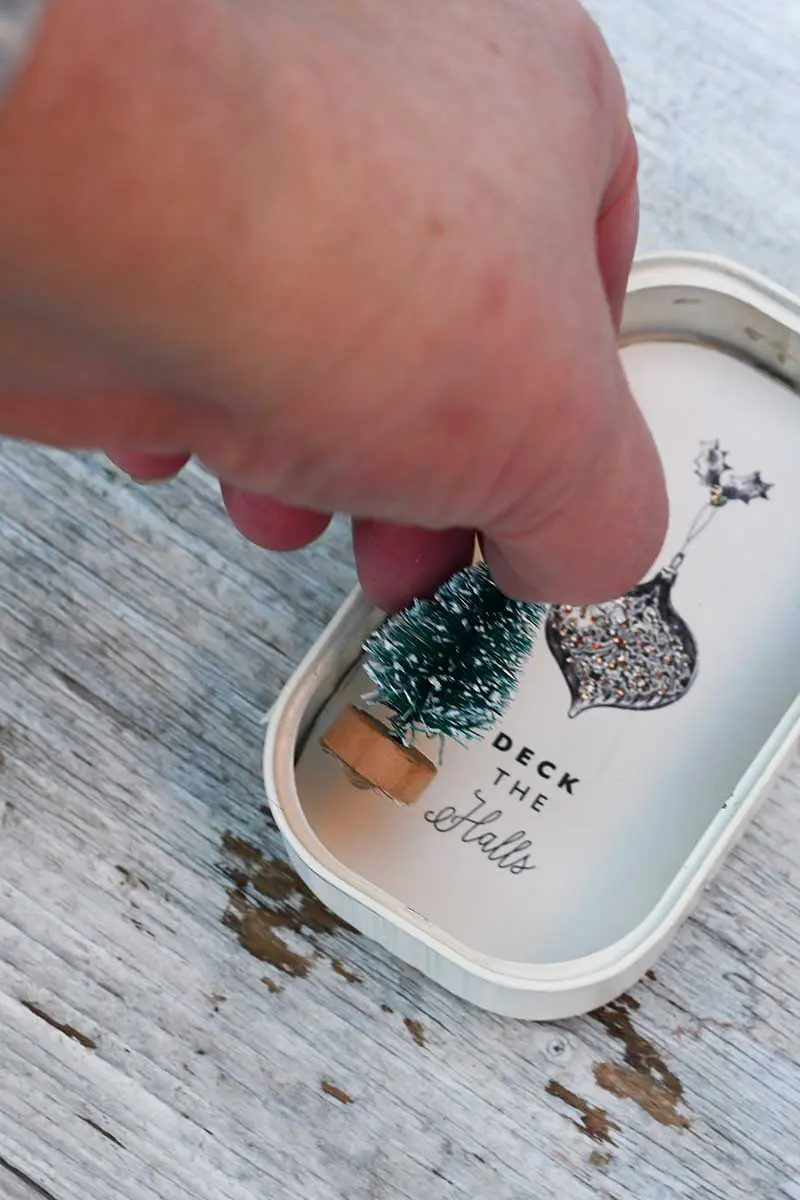
I thought a mini Christmas tree would look good with this tin can ornament; you will be able to see it when the door is opened. Photos of loved ones would be fun to place behind the door.
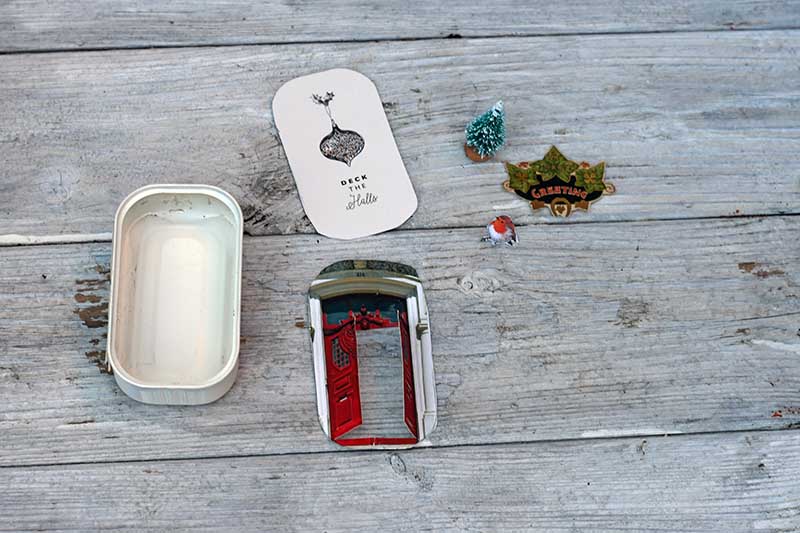
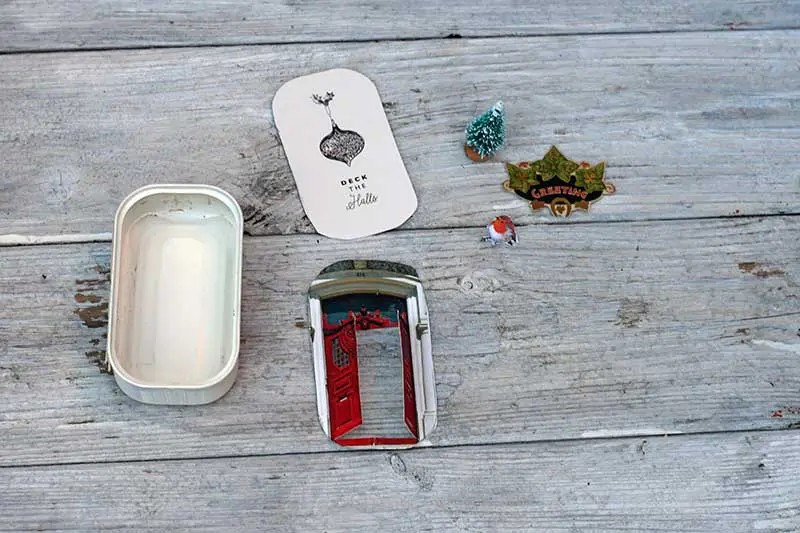
Place the background in the base of the tin can. Then use the glue gun to glue the mini Christmas tree to the bottom of the tin.

Then, stick the cutout door to the front of the tin can ornament using a hot glue gun. Add fun decorations to the front door using the Christmas card cutouts. This time I added a gold ribbon for hanging.


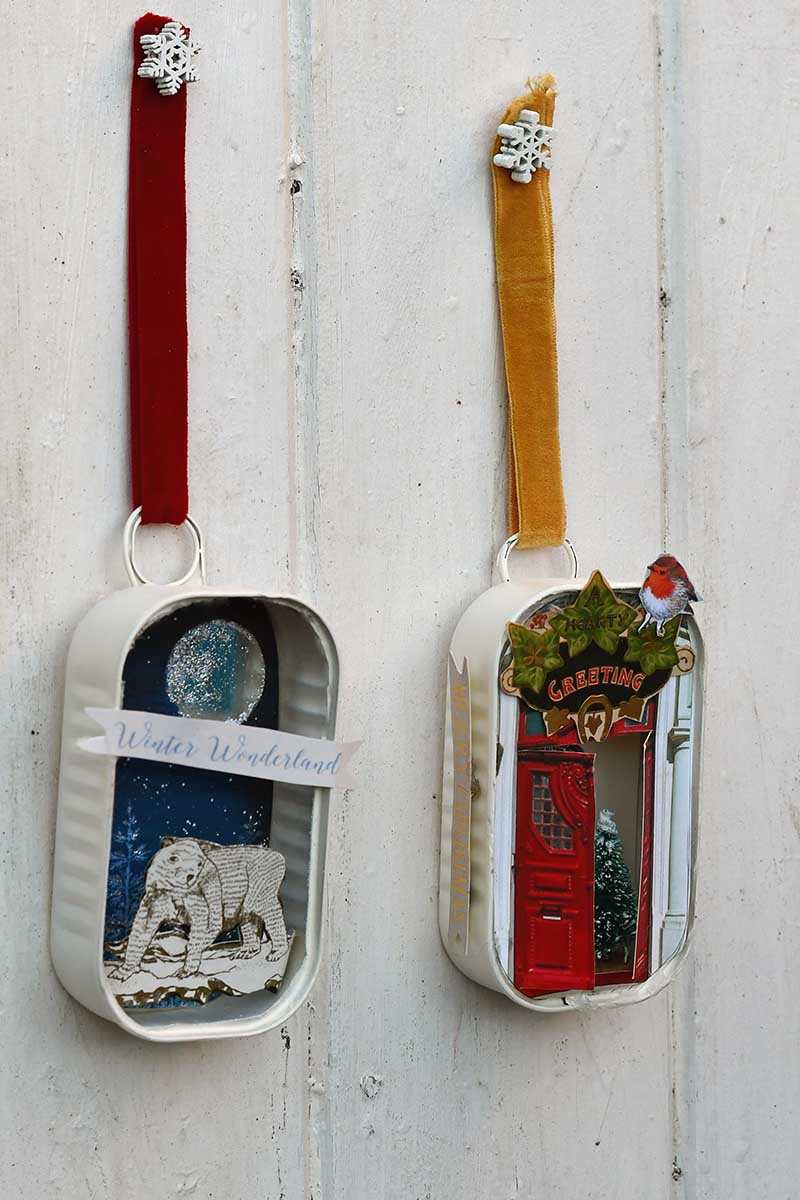

I can’t decide which of the two ornaments is my favourite. But what I do know is that both will be hanging on the tree. I can’t wait to use the Ryobi power tools again.
It won’t be long before I get the file sander out and smooth off some more tin cans. I fancy making a series of door ornaments, each one a different colour of the rainbow with a picture of a family member behind each door.
These ornaments will stay up all year round. This means I need to eat a lot more sardines on toast!

Another fun way to repurpose tin cans is to use them to make mini dioramas, like this vintage circus diorama.
You should check out the upcycled china plate Christmas trees I made last year with my Ryobi gift. Also, there are some beautiful tuna can ornaments with butterflies here.
Check out these ornaments if you want more ideas to recycle Christmas cards.
Tin Can Ornament
Make stunning Christmas ornaments for your tree by simply upcycling old sardine tin cans and old Christmas cards.
Materials
- Sardine can
- Christmas cards or images from Christmas magazines
- Red velvet ribbon
Tools
- Ryobi File Sander
- Ryobi Soldering Iron
- Ryobi Hot Glue Gun
Instructions
- First, remove the ring pull from the sardine can. Then use the file sander to smooth off the sharp edges on the inside of the tin can.

- Use the soldering iron to add the ring pull to the back of the tin can. Make sure the ring pull overlaps so that you can use it for a hanging loop.
- Next, spray paint the tin can cream. Make sure you spray both the inside and the outside of the can.
- Sort through your Christmas cards and magazines for suitable images. You can also look online. Draw around the tin can on a blue starry background. Place the background in the tin can.
- Find a suitable Christmas animal for the ornament. I found a lovely polar bear (links on the blog post). Glue the animal onto the base of the ornament so that it stands in front of the background.
- Glue some suitable festive words across the front of the tin can.
- Finish off by adding a red ribbon through the ring pull for hanging the ornament.
- There is also a tutorial on the blog for a Christmas door version of this ornament with free door downloads.
Recommended Products
As an Amazon Associate and member of other affiliate programs, I earn from qualifying purchases.

This tin can upcycle featured in the comprehensive list of upcycling ideas and resources. You will find more tin can upcycles and repurposed Christmas crafts, like these upcycled Christmas wine cork figures.
Mollie Arlene Vendetti
Thursday 9th of December 2021
I love this
Claire Armstrong
Friday 10th of December 2021
Thank you so much.
Tony
Tuesday 16th of February 2021
Excellent idea! I like it very much <3 thank you for such a detailed tutorial 🙂
Claire Armstrong
Tuesday 16th of February 2021
Thank you so much.
Donna @ Modern on Monticello
Wednesday 6th of January 2021
You always make the most interesting recycling projects! And usually so pretty too! Thanks for sharing. The #HomeMattersParty is back this week and I look forward to seeing what you have been up to over the holidays.
Claire Armstrong
Wednesday 6th of January 2021
Thank you so much. I hope you had a good holiday too.
Michelle Leslie
Thursday 31st of December 2020
How on earth do you always come up with such amazing ideas, Claire? It boggles my mind and what a nifty little tool that power file is. That would come in so handy when I make miniatures. I'm going to have to see if Ryobi stock them here in South Africa.
Claire Armstrong
Saturday 2nd of January 2021
Thank you, Michelle. Yes, I can't wait to use the tool again, it's so handy. Happy New Year!
Melynda Brown
Monday 21st of December 2020
One of my favorites from Funtastic Friday, pinned to the FF board! Thanks for sharing great such great content! Melynda@ScratchMadeFood!
Claire Armstrong
Tuesday 22nd of December 2020
Thank you so much and thanks for sharing.