
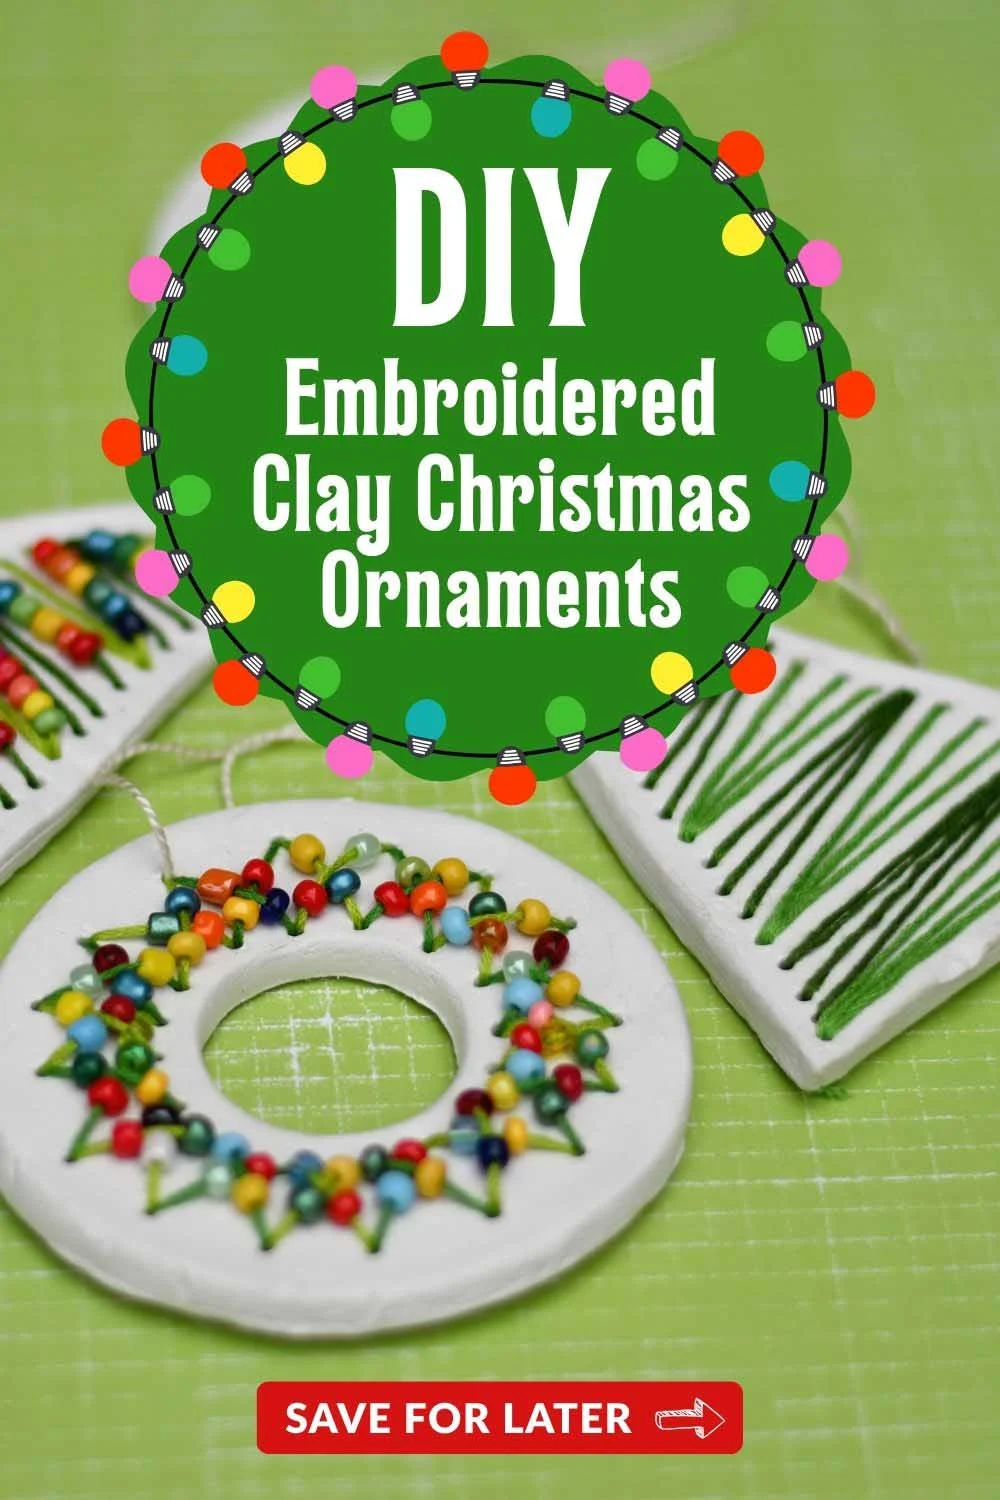
Looking for unique air-dry clay Christmas crafts? Try these embroidered clay ornaments! This easy tutorial shows you how to decorate clay shapes with embroidery thread and beads for a colourful, handmade touch.
Last year, I discovered just how beautifully embroidery and clay work together when I made my embroidered clay pendants. They were simple, relaxing to make, and turned out far better than I expected. Since then, I’ve also enjoyed stitching on paper with my embroidered paper ornaments, and I loved how a few colourful threads could completely transform a flat surface.
This Christmas, I decided to combine the two ideas and create a set of embroidered clay ornaments. These decorations are made from air-dry clay, stitched with embroidery thread, and finished with optional glass beads for added sparkle. The combination of matte clay, bright thread, and shiny beads gives them a lovely handcrafted charm.
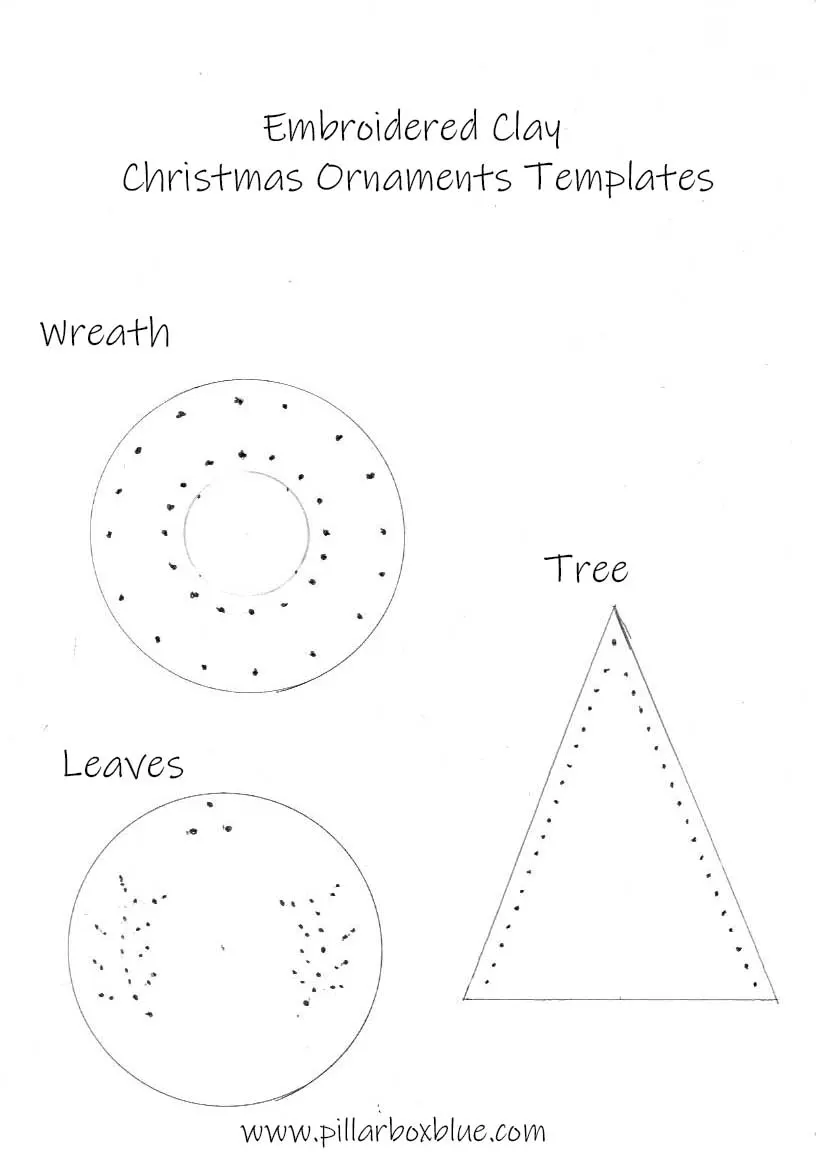
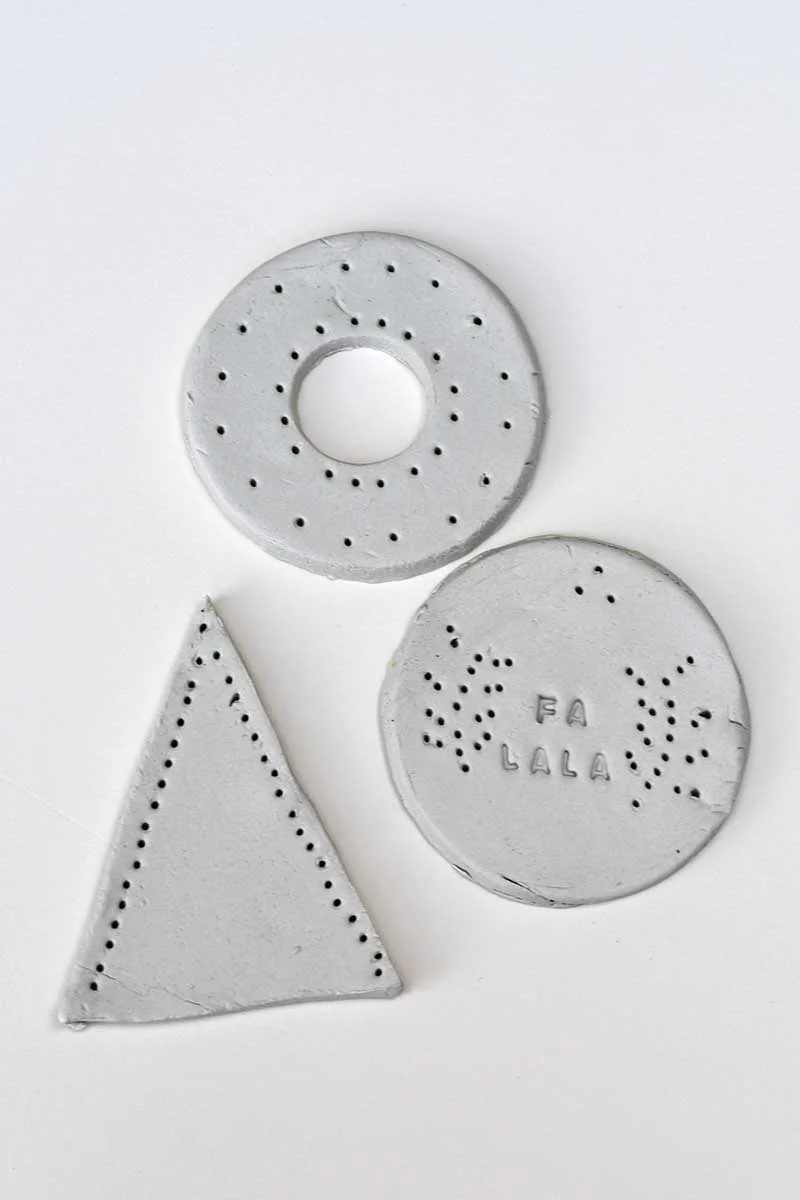
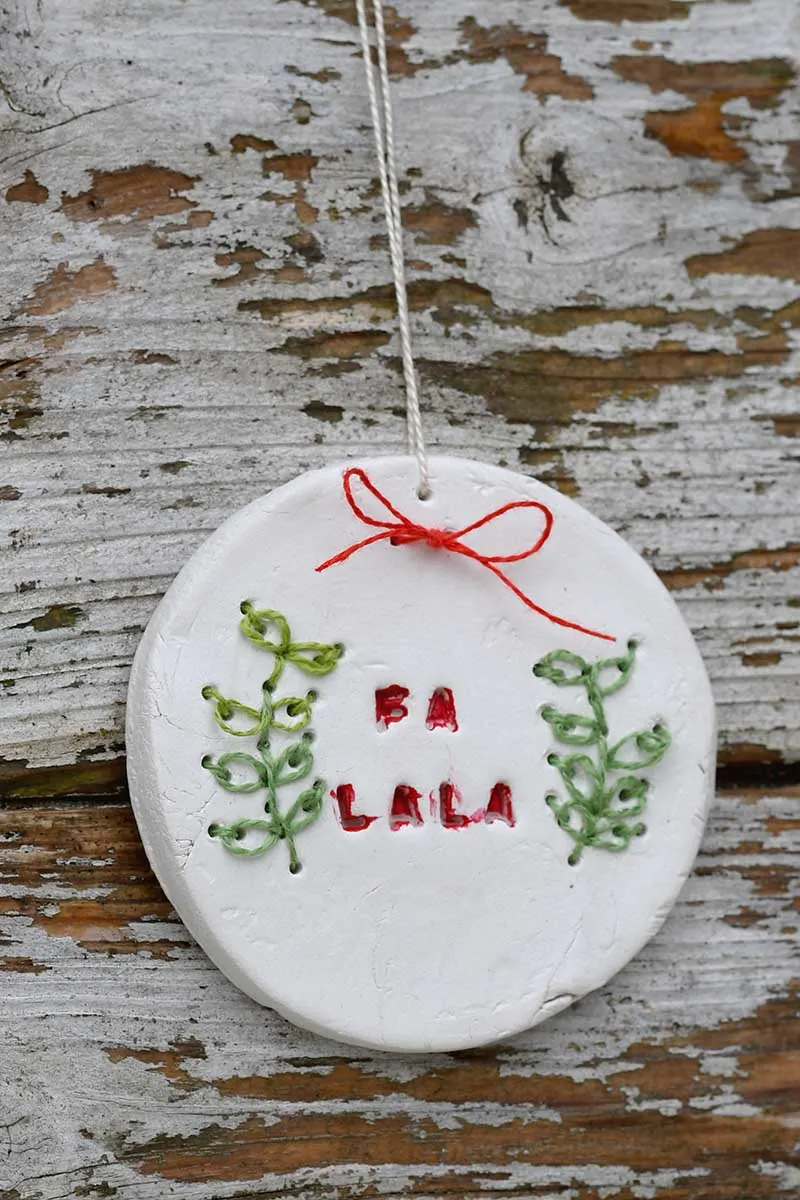
I created three designs: a Christmas tree, a wreath, and a bauble stamped with FA LA LA. Each one uses a simple stitched pattern that’s easy to follow, even if you’ve never embroidered on clay before. I’ve also included free printable hole templates for each shape to make the process easier.
Like most of my Christmas crafts, these ornaments are perfect for personalising. You can paint the clay, stamp on names or words, or mix up the thread colours to match your festive decor. They look beautiful hanging on the tree, tied onto a gift, or even displayed as part of a garland.
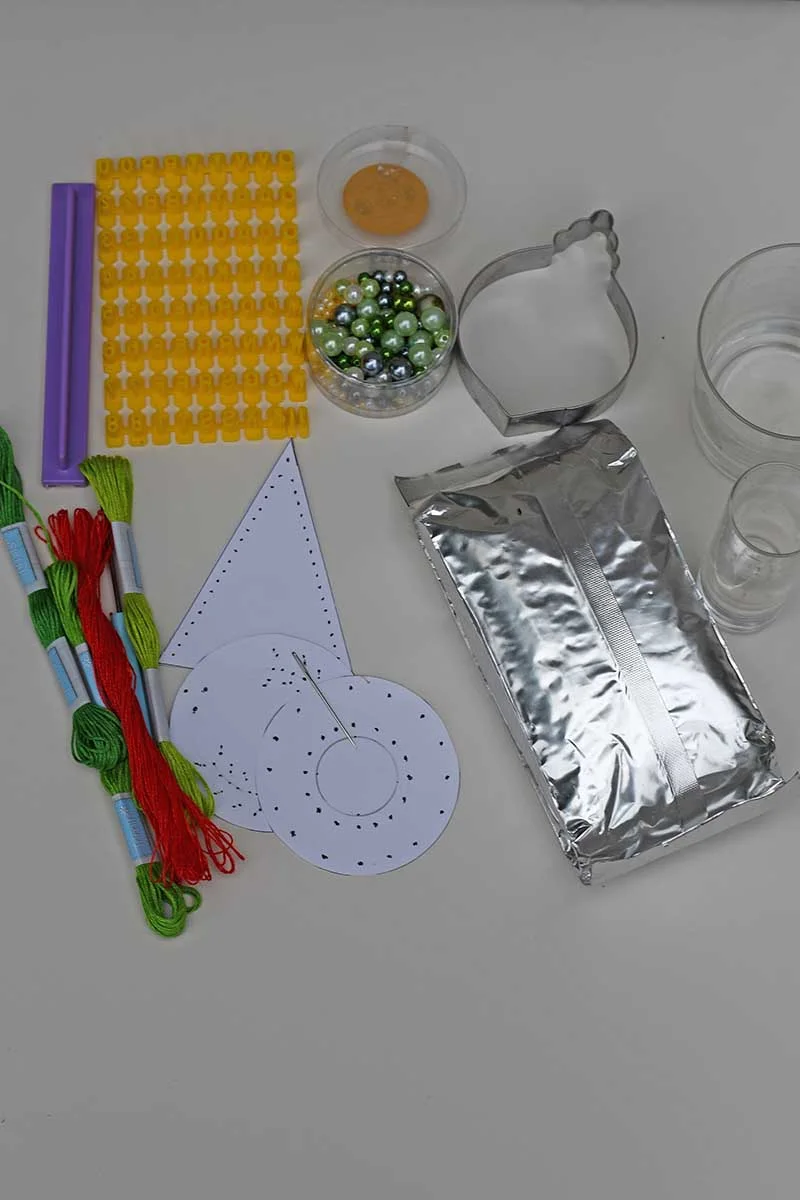
What You Need
We’re a participant in the Amazon Services LLC Associates Program, an affiliate advertising program designed to provide a means for us to earn fees by linking to Amazon.com and affiliated sites. As an Amazon Associate, I earn from qualifying purchases.
- Air-dry clay (white or coloured) – A 500g block of clay will make about eight ornaments.
- Rolling pin or acrylic roller
- Two 3–4 mm spacers (rulers, chopsticks, or coffee stirrers work well)
- Craft mat, craft knife, and circle cutters or glasses (large and small)
- Awl, a needle tool for punching holes
- Free stitching hole templates (tree, wreath, and bauble)
- Embroidery thread in your chosen colours
- Embroidery needle
- Small glass seed beads (optional)
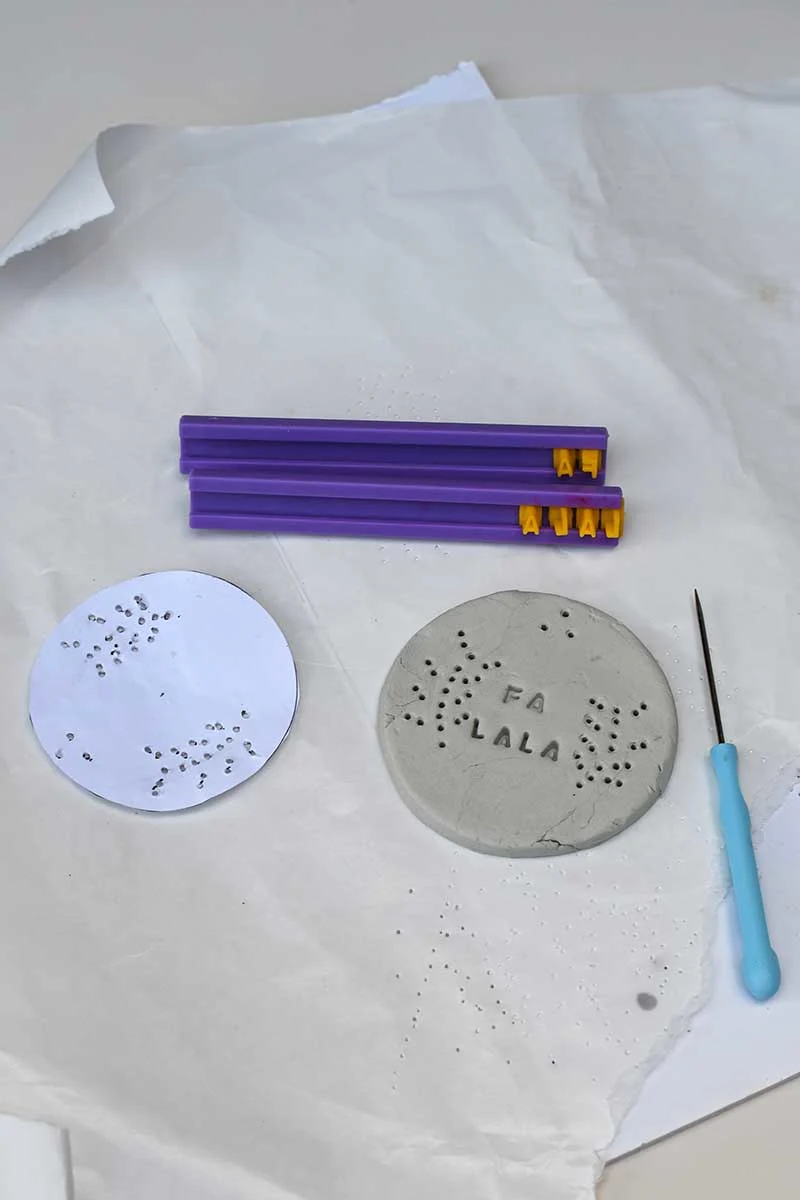
- Alphabet stamps (for “FA LA LA” or other words)
- Fine sandpaper or nail buffer
- Ribbon, twine, or thread for hanging
- Baking paper or a board for drying

Templates
These are the three templates I used to make my embroidered clay ornaments. You can use these to guide your pre-punched holes or design your own.

How To Make The Clay Ornaments
Preparing The Clay For Embroidery
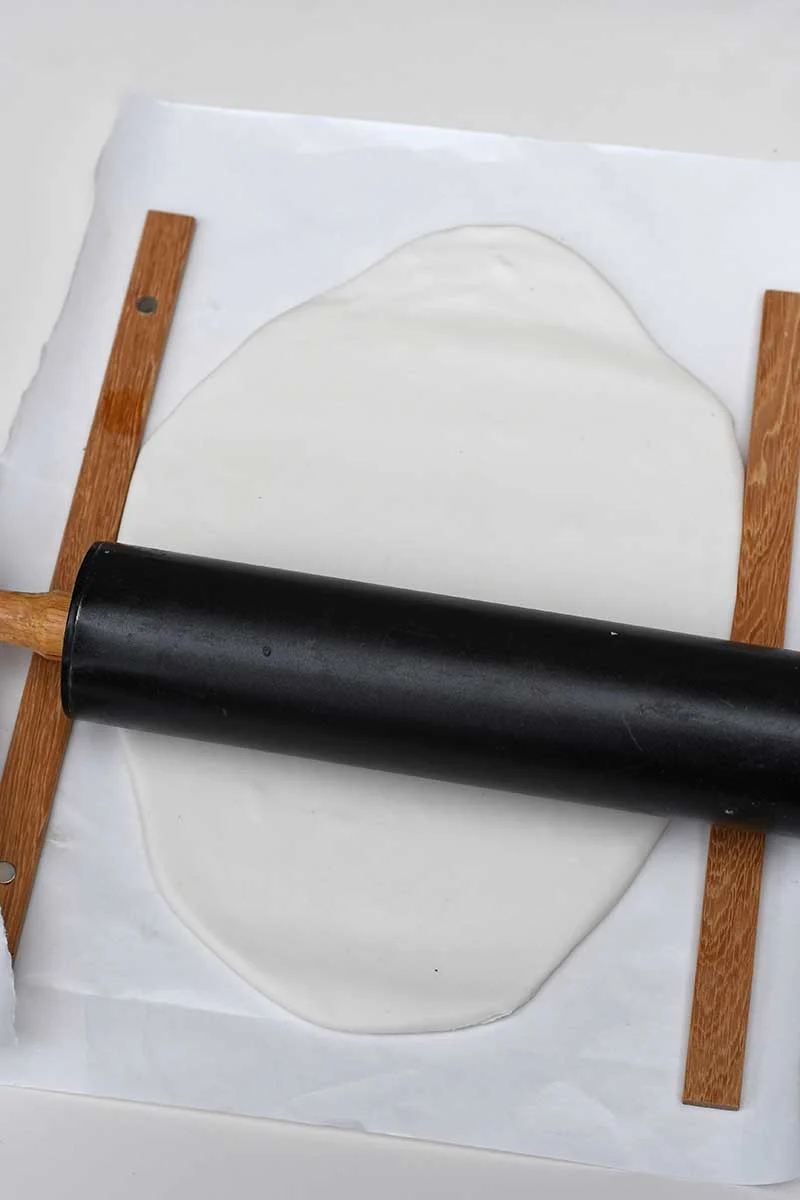
Step 1:Roll and Cut the Clay
Roll out a piece of air-dry clay between your spacers to an even thickness of around 3–4 mm.

- Tree shape: Cut triangles with a craft knife or triangle cookie cutter.
- Wreath shape: Use a large glass or cutter for the outer circle and a smaller one to cut the centre, making a donut shape.
- Bauble shape: Cut a circle with a glass or round cutter.

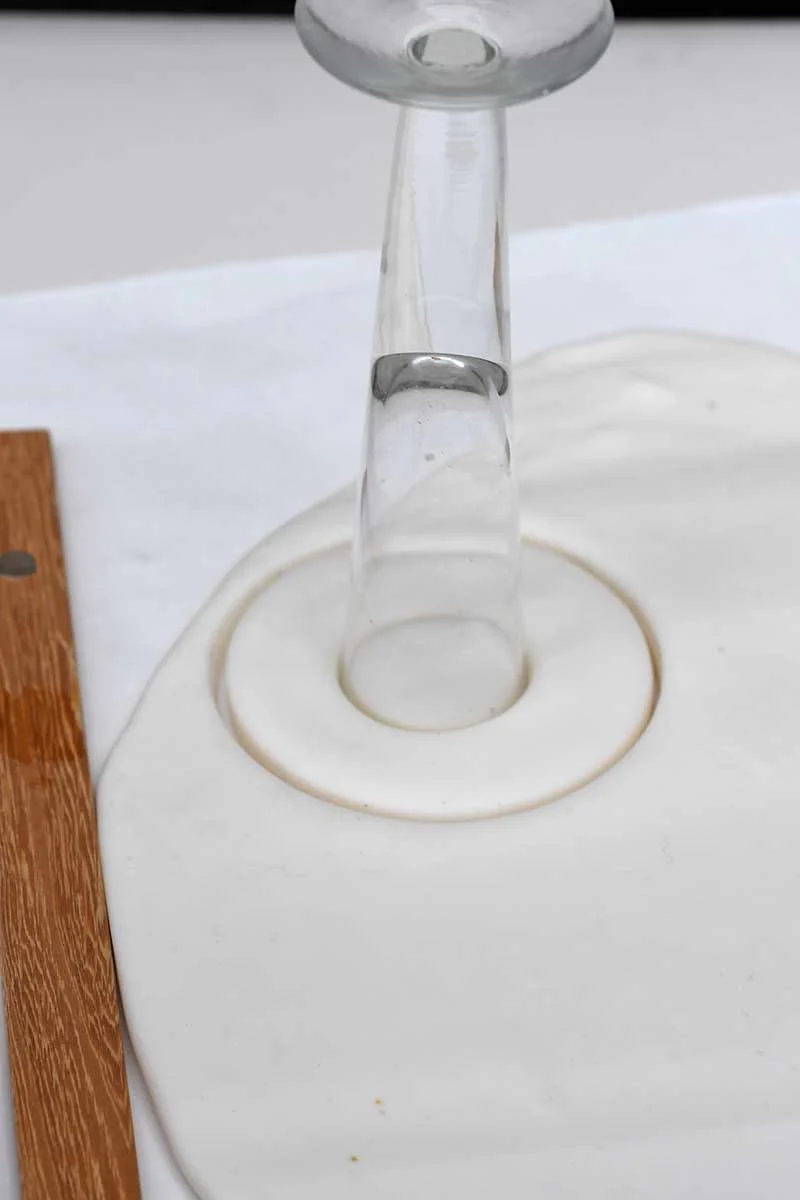
Remember to add holes for hanging — one at the top of the tree and wreath, and three holes at the top of the bauble (one for hanging and two for tying a bow).
Step 2: Pre-Punch the Stitching Holes
Lay your hole template over each clay shape, then use an awl or needle tool that’s roughly the same size as your embroidery needle to mark every dot. Gently twist or wiggle the tool to widen the holes just enough for your needle to pass through later. I find it much easier to do this step with the clay resting on a piece of foam or a soft polyurethane board; it gives the tool room to poke right through without distorting the shape.

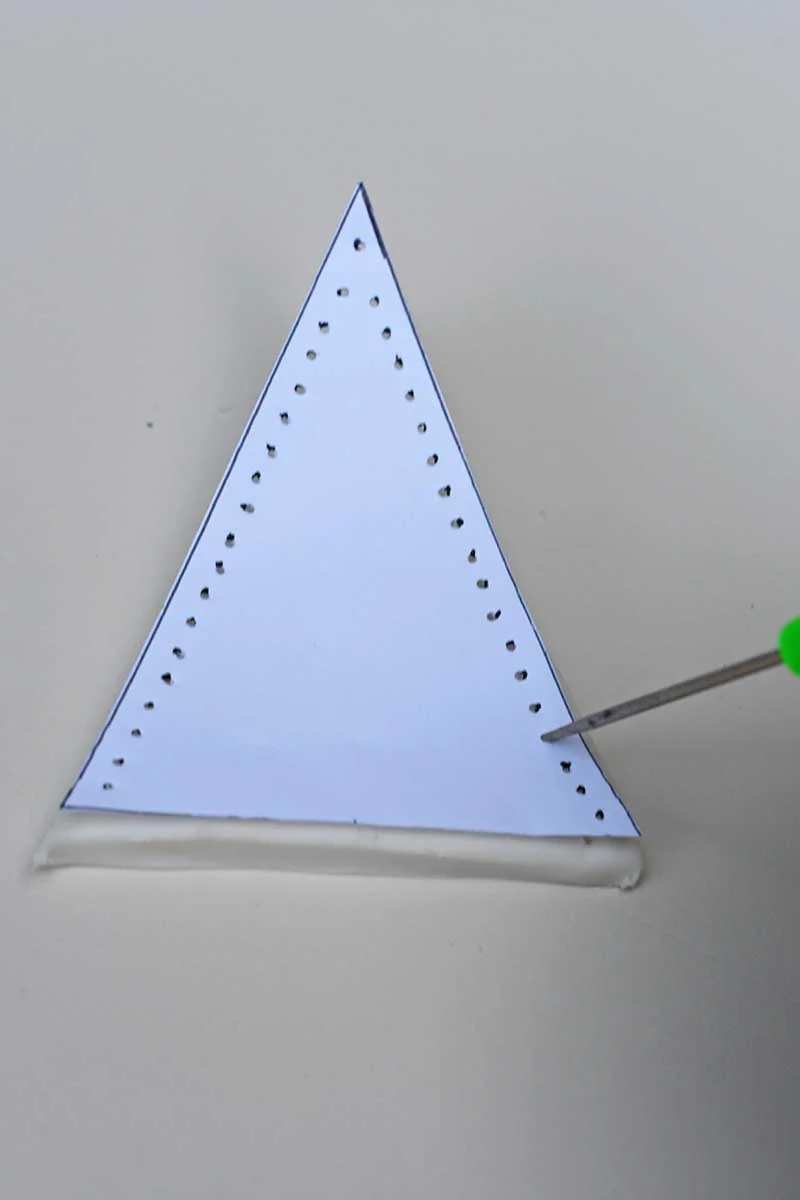
If you’re freestyling, aim for evenly spaced holes around 5–7 mm apart, keeping them a few millimetres away from the edge.

Step 3: Stamp and Smooth
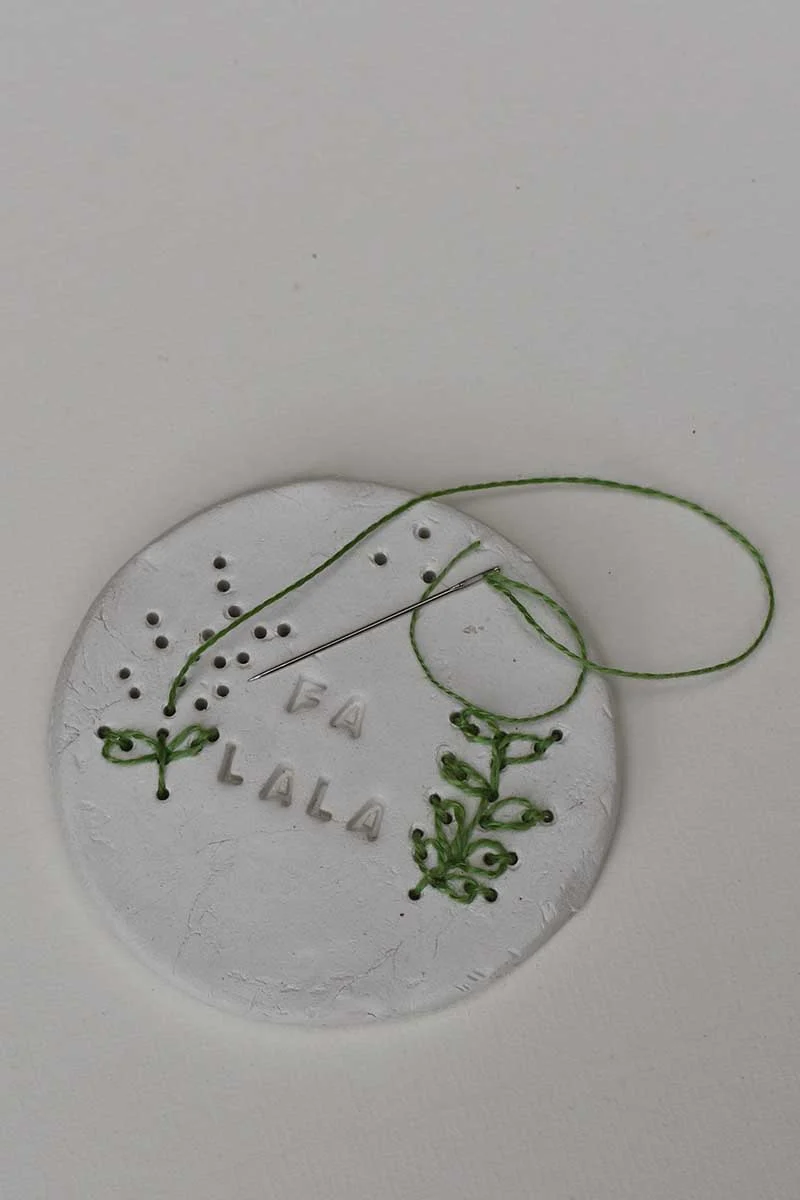
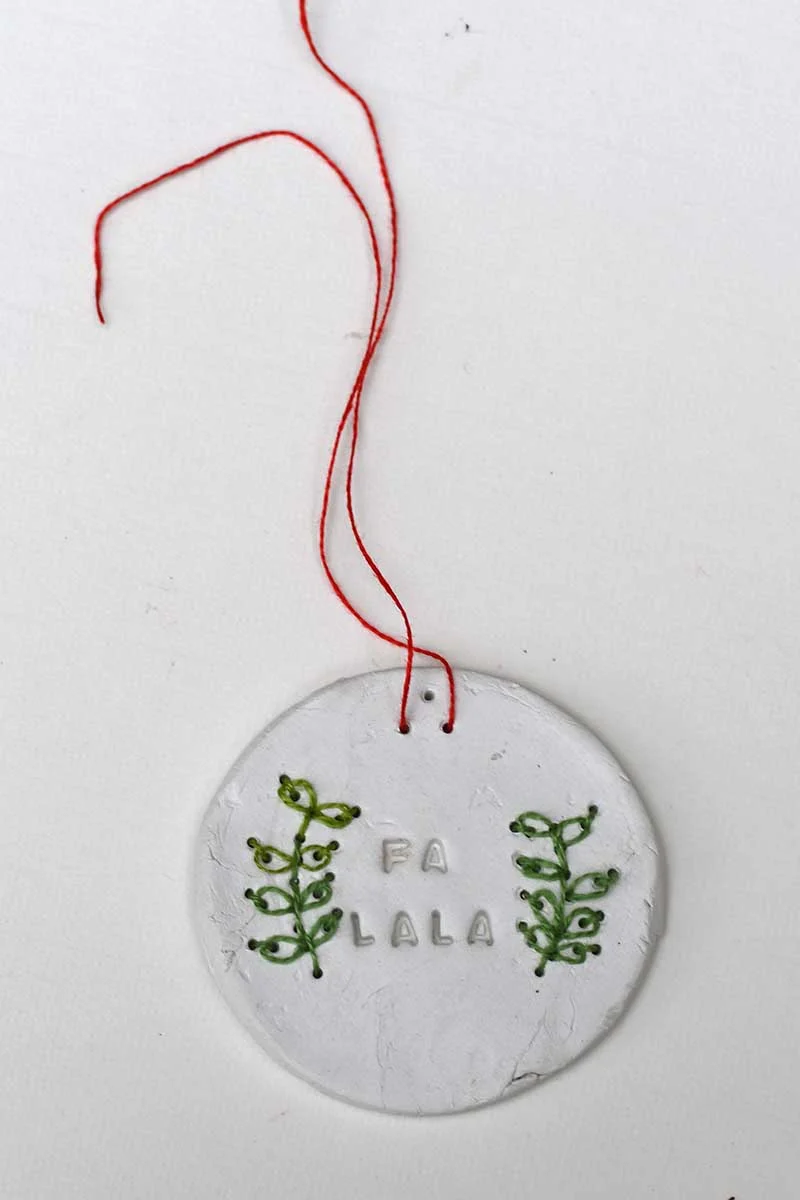
For the bauble ornament, use letter stamps to press FA LA LA (or another festive word) into the centre. Smooth the edges with a damp fingertip.

Let your ornaments dry flat on baking paper for 24–48 hours, flipping once or twice to stop warping. If you’re using polymer clay, bake them following the packet instructions instead. The clay will turn whiter as it dries. Once dry, lightly sand the edges for a neat finish.
Stitching the Christmas Tree
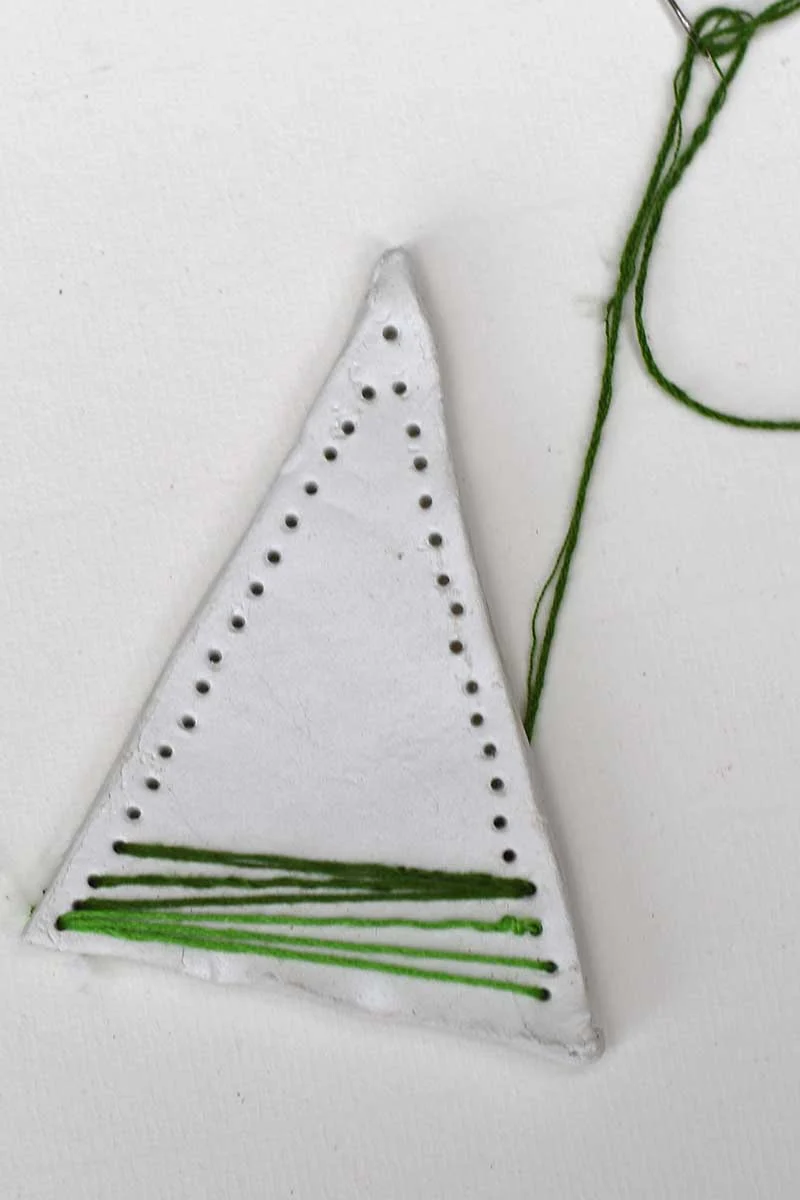
Thread your needle with about 70 cm of embroidery thread in your first colour and knot the end.
Start by bringing the needle up through the first hole on the left side of the triangle, near the bottom. Cross over to the matching hole on the opposite side and go down.
Next, bring the needle up through the next hole on the right-hand side and cross back through the first hole on the left. Then come back up through the third hole on the right and then back down the first hole on the left-hand side.

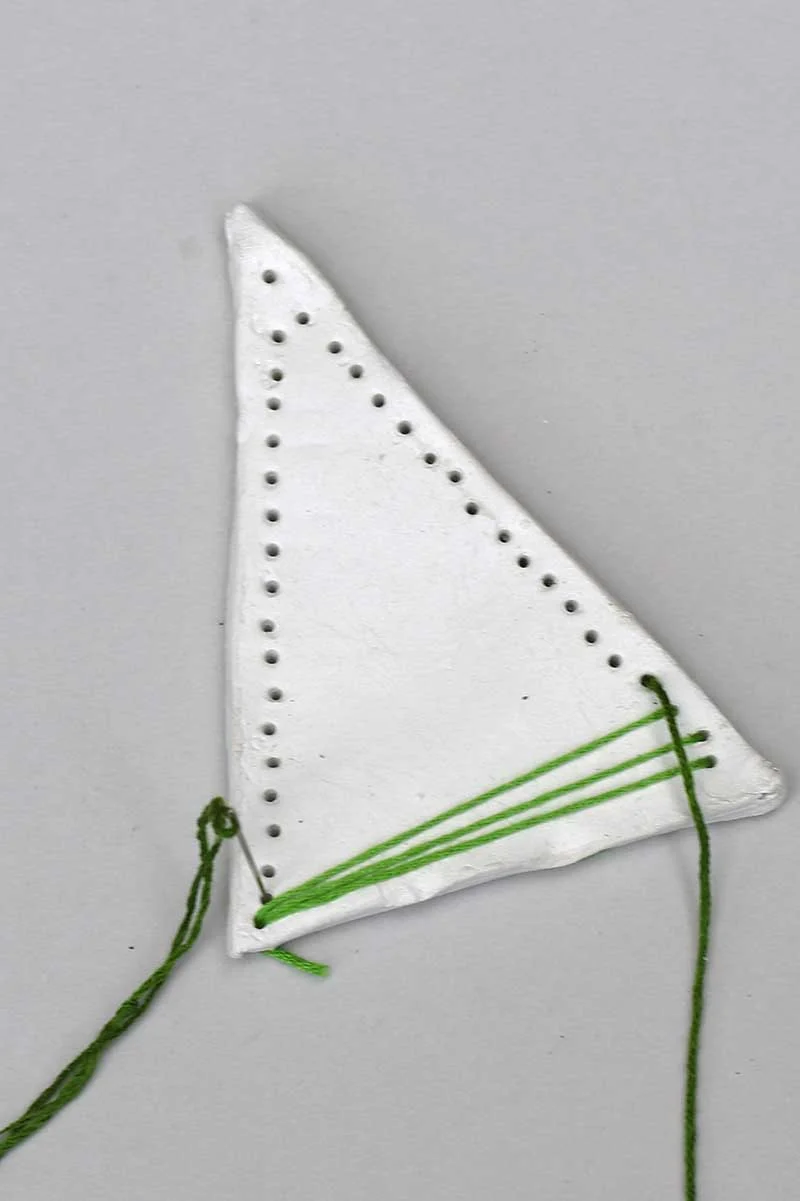
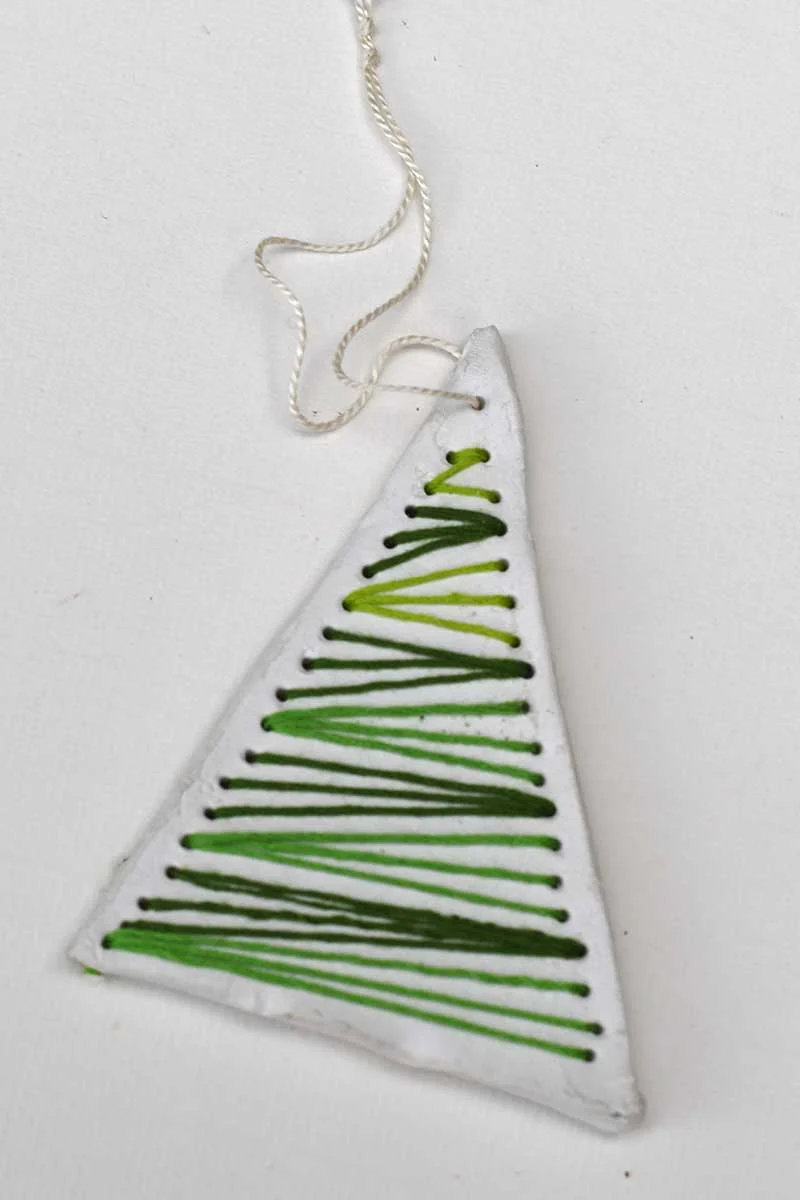
Switch to a different thread shade and repeat this process. This time, the starting point will be the fourth hole on the right-hand side, and the stitches will be going in the opposite direction across the tree. Continue switching up the threads and moving them side to side until the entire tree is covered.

There are endless ways to stitch these ornaments. It’s fun to experiment with different thread colours and directions — you can even try a criss-cross or string-art style pattern for a unique look.

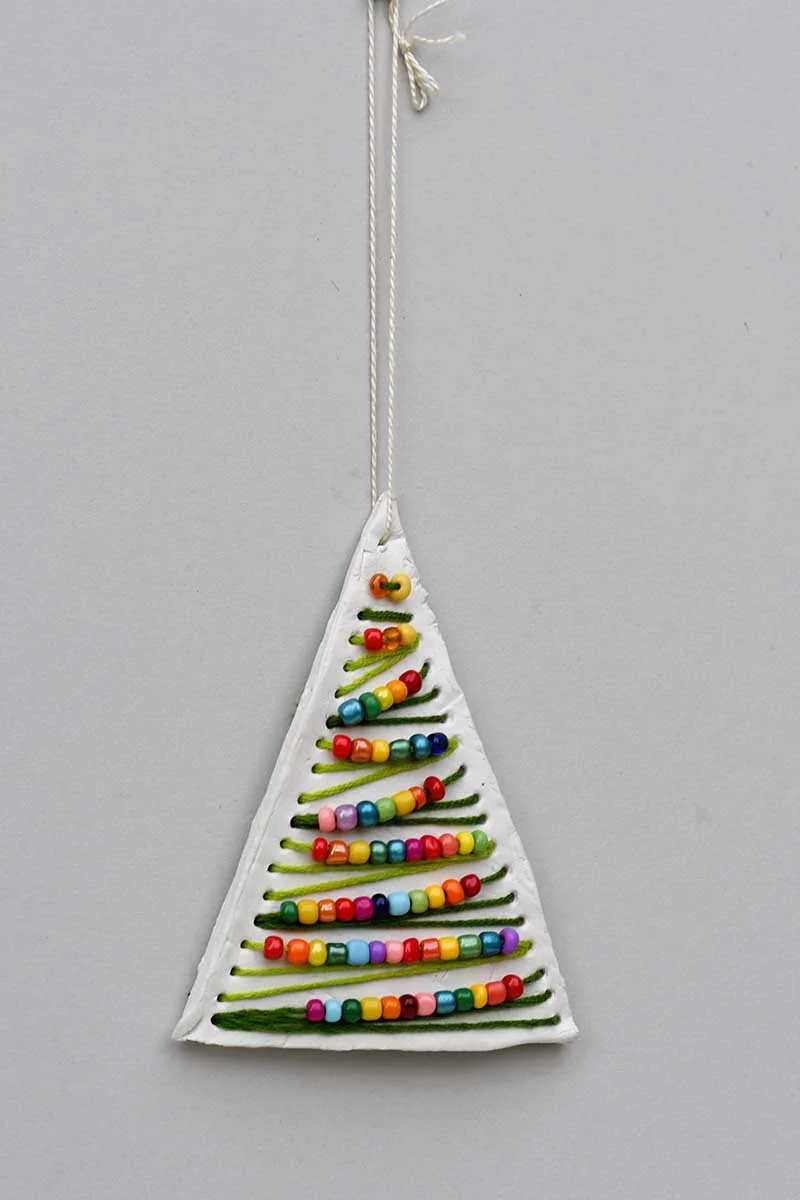
For a more decorative version, slide small glass beads onto your thread every third crossover as you stitch. The beads look like garlands on the tree!

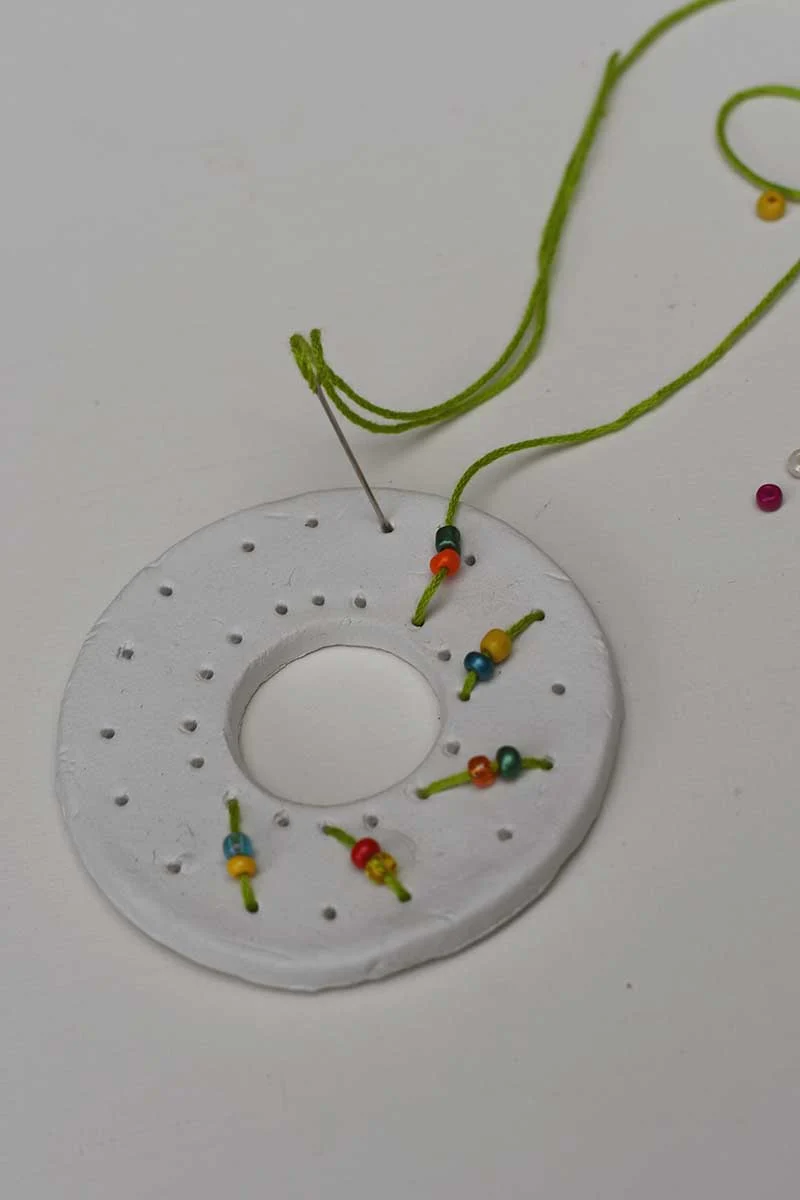
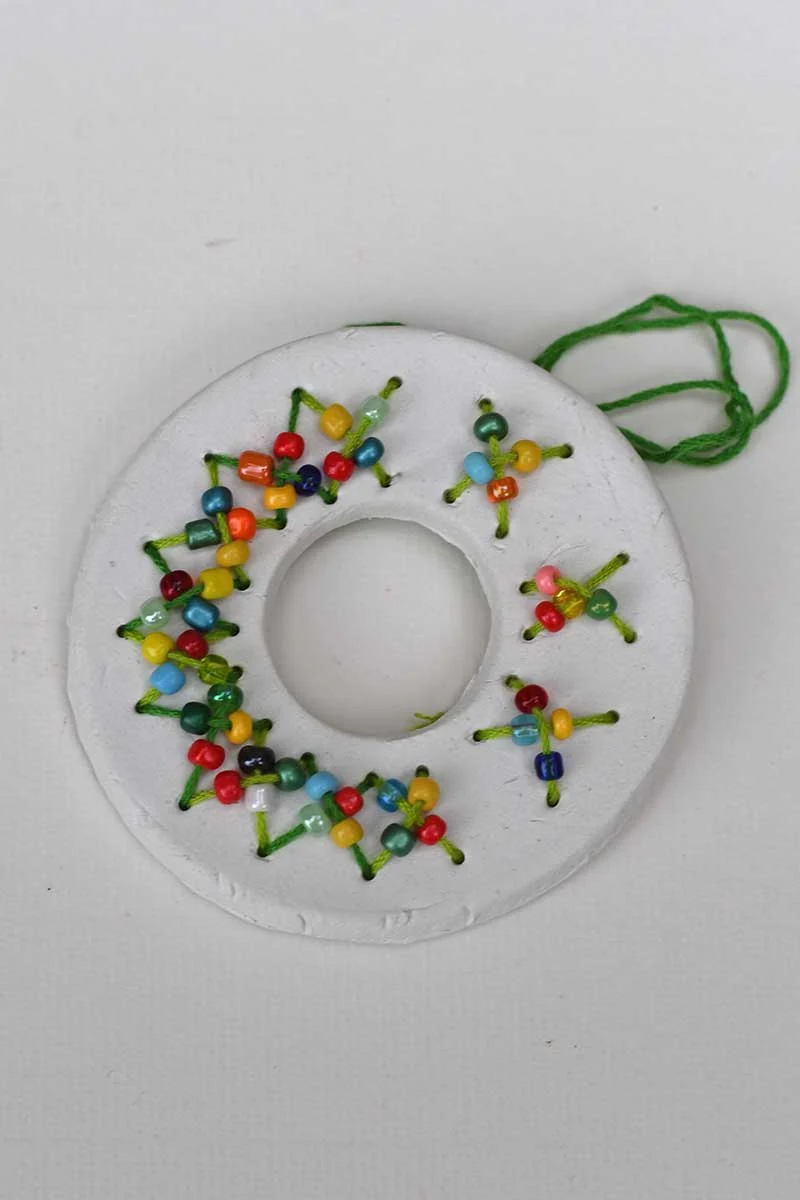
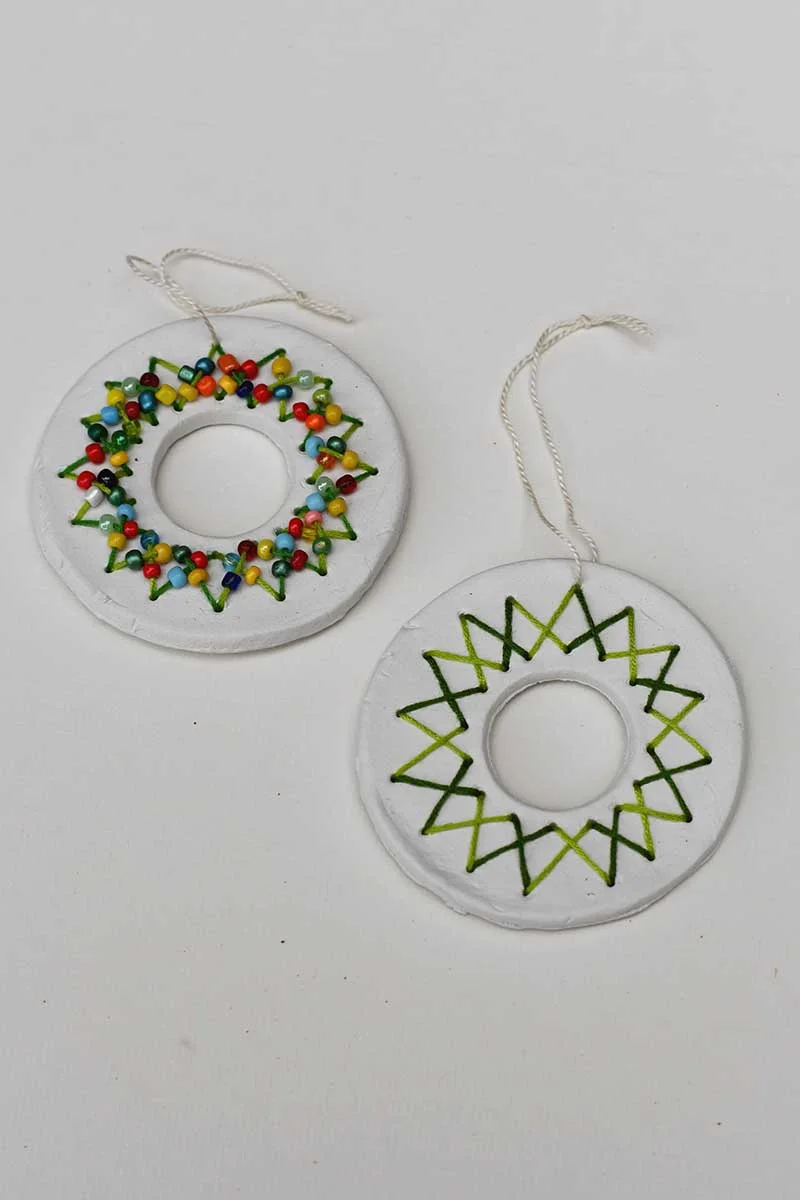
Stitching the Wreath
For the wreath, ensure that the inner and outer rings have the same number of holes.
Again, with the wreath, you can experiment with different stitch patterns. For my embroidered clay wreaths, I went with a simple cross-stitch pattern around the wreath. Again, options include adding beads as you stitch and switching up the coloured embroidery threads.


Stitch the Bauble (with a Petal Stitch)
This design uses a petal stitch (also known as a lazy daisy stitch). It’s simple but gives a lovely leaf or flower effect around the edge.
- Thread your needle and tie a knot at the end of your embroidery thread.
- Bring your needle up through the centre of the clay at the starting point of your petal.
- Insert the needle back into the same hole and bring it up through the clay at the tip where you want the petal to end, creating a small loop of thread.
- While holding the loop with your thumb, pull the thread through until the loop lies flat on the clay surface. Then, insert the needle outside the loop to secure it in place.
- Bring the needle back up at the starting point for the next petal and repeat the process.

When finished, tie a small double red bow through the two top holes and use the centre hole to hang your bauble.


Variations and Tips
If you’d like the back of your ornaments to look neat and hide the stitching, cut a piece of felt to fit and glue it to the back.
These embroidered clay ornaments look lovely on the Christmas tree, but they also make unique gift tags or garland decorations.
- Paint first: Use acrylic or watercolour paint before stitching for colourful backgrounds.
- Decoupage: Use paper napkins to create a decoupage effect on clay.
- Add texture: Press lace or fabric into the clay before cutting for subtle patterns.
- Gild the edges: Rub gold or silver leaf along the edges for a festive touch.
- Customise words: Stamp names, dates, or messages in the clay.
- Scented option: Leave the back unsealed and add a drop of essential oil for a scented ornament.


Conclusion
These embroidered clay ornaments are a truly satisfying project to make. It’s a lovely blend of simple materials, hand-stitching, and festive charm. They’re easy to personalise and make wonderful handmade gifts or keepsakes for your tree.
If you’ve enjoyed this project, you may also like my other Christmas crafts, including fabric decoupage baubles, beer can ornaments, and cardboard robin decorations.
And for even more inspiration, don’t miss my roundup of air-dry clay craft ideas, perfect for handmade projects all year round.

Natasha Mairs
Saturday 29th of November 2025
These are great. I love the Christmas tree ones. I would love it if you stopped by and shared this at my new Serenity Saturday Link Party xx www.serenityyou.com
Julie
Saturday 22nd of November 2025
They are lovely Claire, your ornaments will be a feature over at Handmade Monday this coming week.
Claire Armstrong
Monday 24th of November 2025
Thank you, Julie. I look forward to seeing them featured.
Joy
Friday 21st of November 2025
How cute! Thanks for joining in on Home Matters Linky Party! I will be featuring your post this week! #HomeMattersParty xx
Claire Armstrong
Monday 24th of November 2025
That’s awesome, thank you!
janet trieschman
Tuesday 18th of November 2025
Wow, this is so unique
Claire Armstrong
Wednesday 19th of November 2025
Thank you, it's fun to play around with clay and embroidery!
Jennifer Wise
Monday 17th of November 2025
Oh my goodness, these are so fun!! Pinning to save and share. Visiting from the Busy Monday linkup.
Claire Armstrong
Tuesday 18th of November 2025
Thank you so much.