• Skip to primary navigation
  • Skip to main content
  • Skip to primary sidebar

Pillar Box Blue

  • Home
  • Denim
  • Maps
  • Valentines
  • Crafts
    • Sweaters
    • Marimekko Crafts and DIY’s
    • Seasonal
  • DIY/Upcycling
    • All Upcycling
    • Ikea Hacks
    • Tin Cans
    • Round Ups
  • Christmas
  • About Me
    • What Is Upcycling What You Need To Know
    • Press & Working With Me
    • Link Ups
    • Privacy Policy
    • DISCLOSURE
    • Contact Me
You are here: Home / DIY Upcycling / Easy Steps For A Unique Red Cabinet Upcycle

Easy Steps For A Unique Red Cabinet Upcycle

11th October 2017 by Claire Armstrong 31 Comments

  • Share
  • Tweet

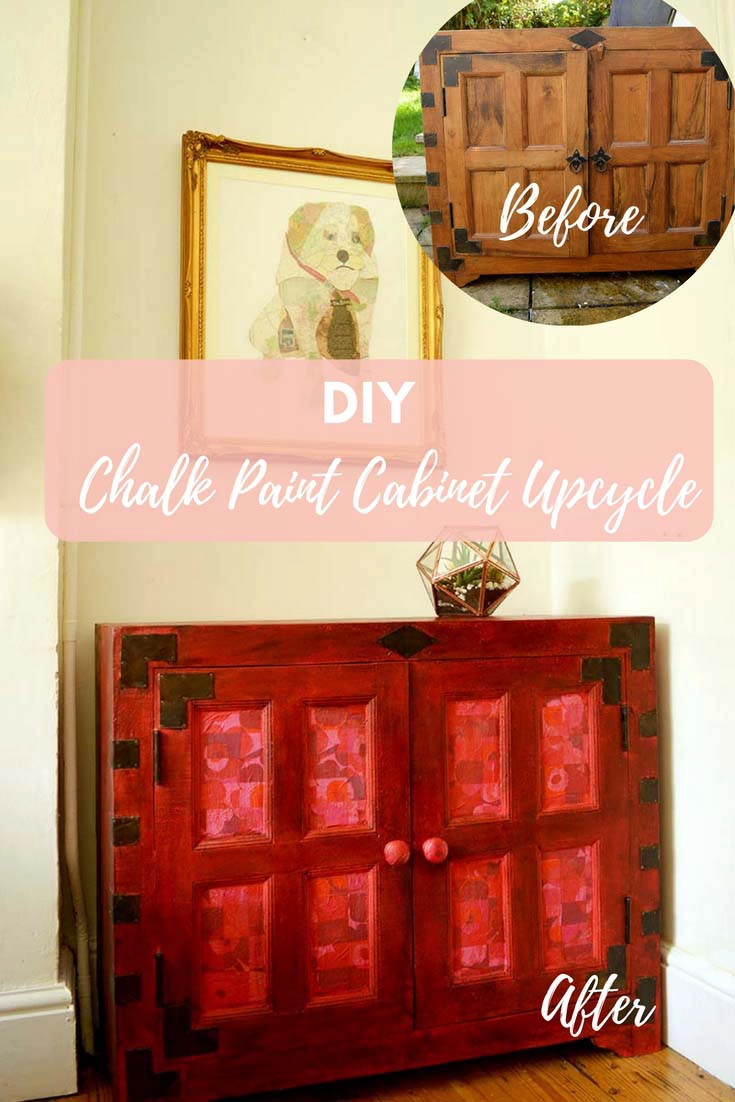
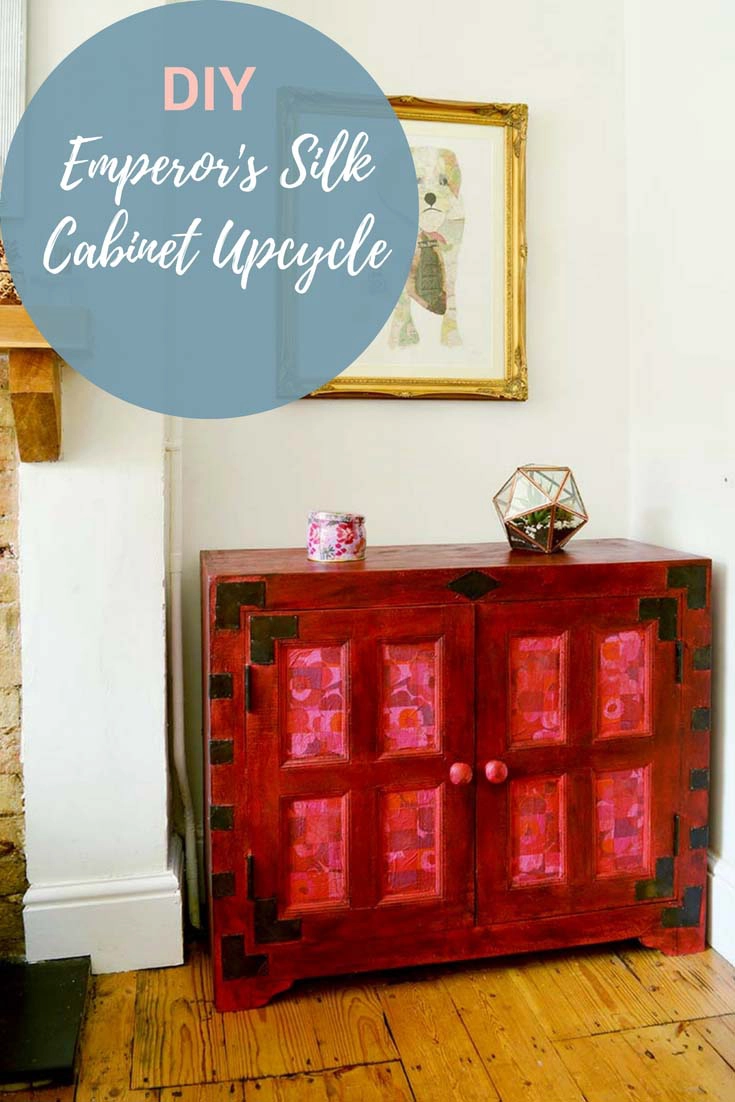
TV Cabinet Upcycle With A Hint Of Marimekko

I really don’t like the cabinet that the telly sits on. However, it is the right size and the cupboard is great for hiding away the computer and stuff that runs with it.
 
The heavy mango wood of the cupboard just doesn’t go with the rest of the decor in our living room. I needed to give it the Pillarboxblue treatment.
 
Which basically involved colour, decoupage and a hint of Marimekko.
 
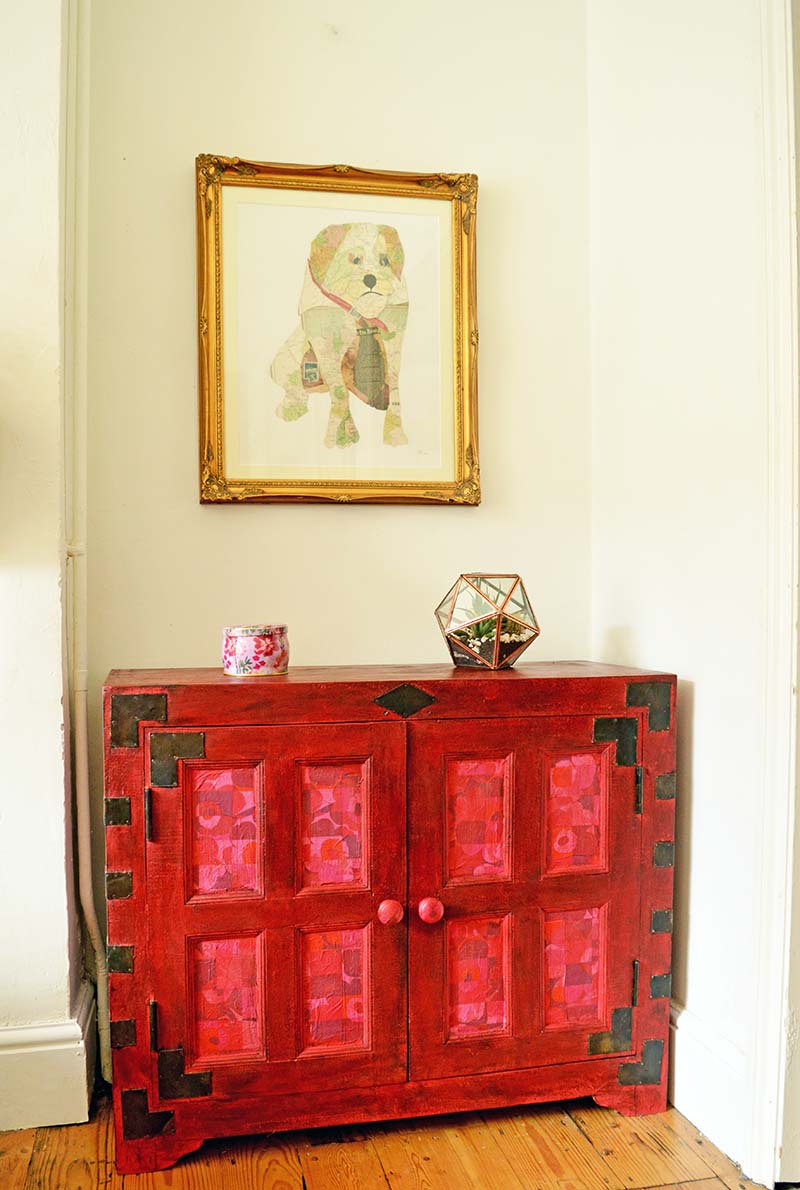
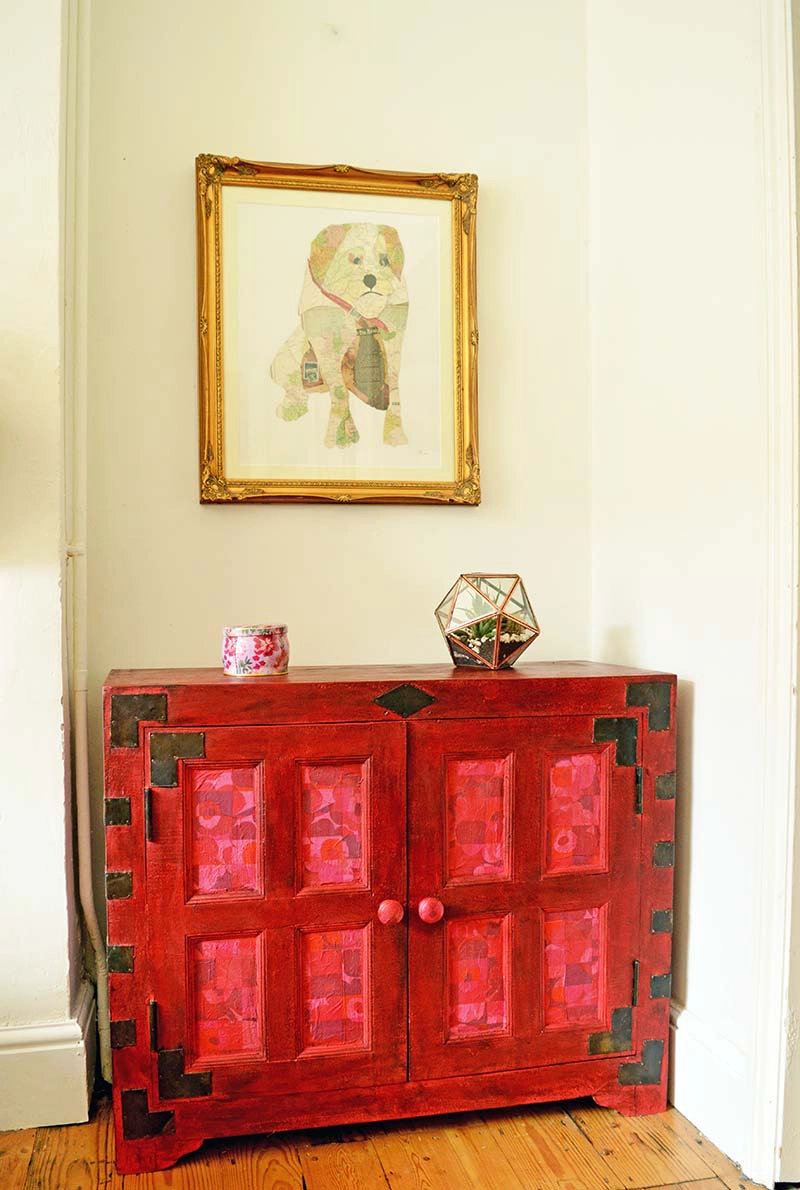
So out came the best chalk paint (in Emperor’s Silk) and some Marimekko napkins for a colourful cabinet upcycle.
 
Now when I watch telly in the evening, I no longer sit there frowning at the ugly cabinet. I already had some chalk paint left over from another project so the only cost was a few pennies for the Marimekko paper napkins.
 
Trouble is, I think my upcycled cabinet maybe too good for the telly now.
 
Chalk paint makes a cabinet upcycle so easy, as no prep is required.  This cabinet upcycle was done with Annie Sloan Emperor's Silk chalk paint and decoupaged Marimekko napkins.
 
 
This post contains Amazon affiliate links for your convenience. Click here to see my disclosure policy.


What I used for the Cabinet Upcycle

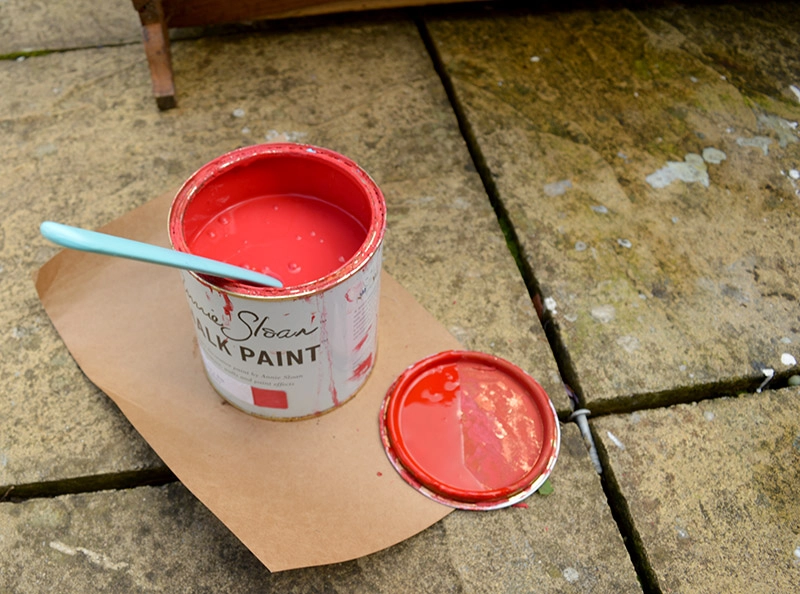
  • Annie Sloan Chalk Paint in Emperor’s Silk
  • Annie Sloan dark wax
  • Marimekko Unikko Paper Napkins in Red
  • Small paint roller kit
  • Wax Brushes
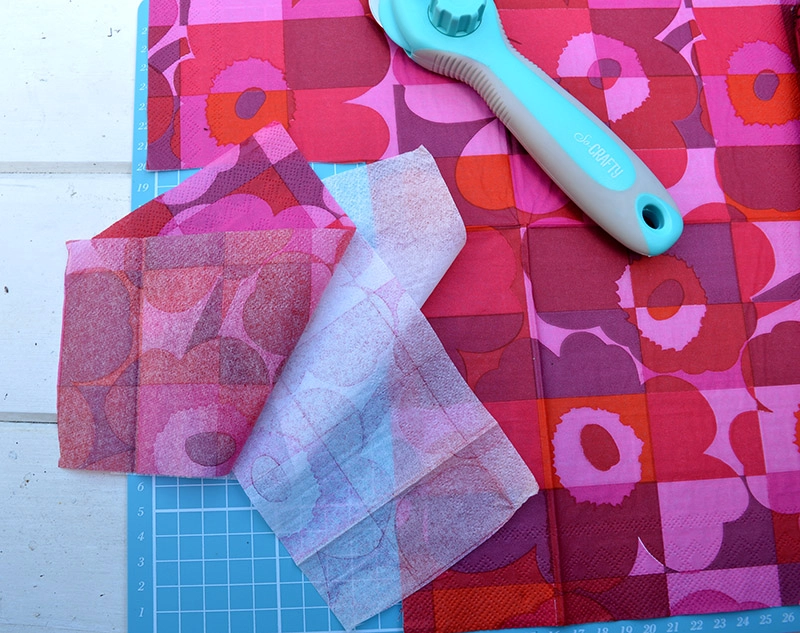
  • Rotary Cutter and Mat

 
Annie Sloan Emperor's Silk Paint


How to do a TV Cabinet Upcycle

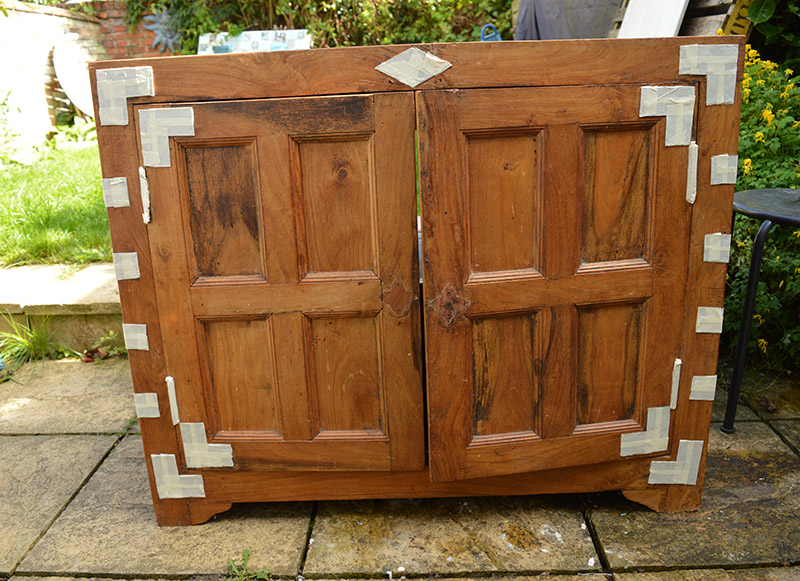
  1. The reason I love chalk paint so much besides the finish is the fact that you don’t have to do any prep. Yes, that’s right no sanding or priming. I did, however, give the cabinet a good wipe down before painting.
  2.  

  3. Make sure you cover any bits of the cabinet you don’t want to be painted with masking tape. Such as the hinges and any ironwork.
     
    Masking tape covered cupboard
  4.  
     

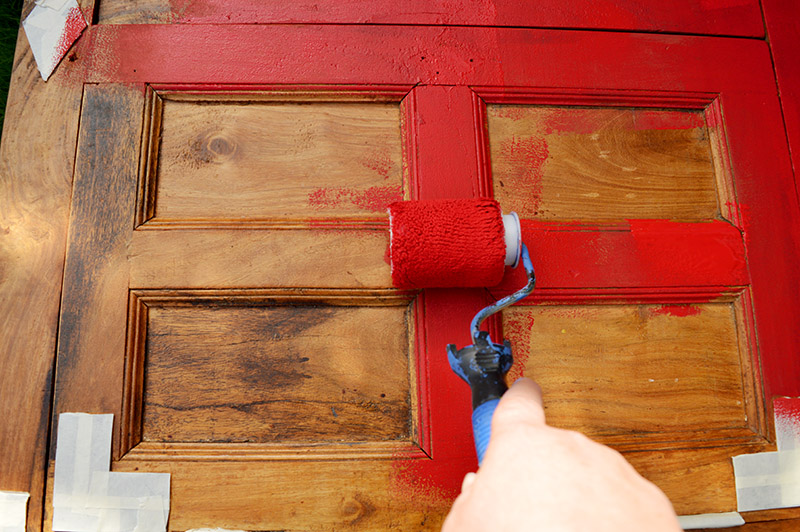
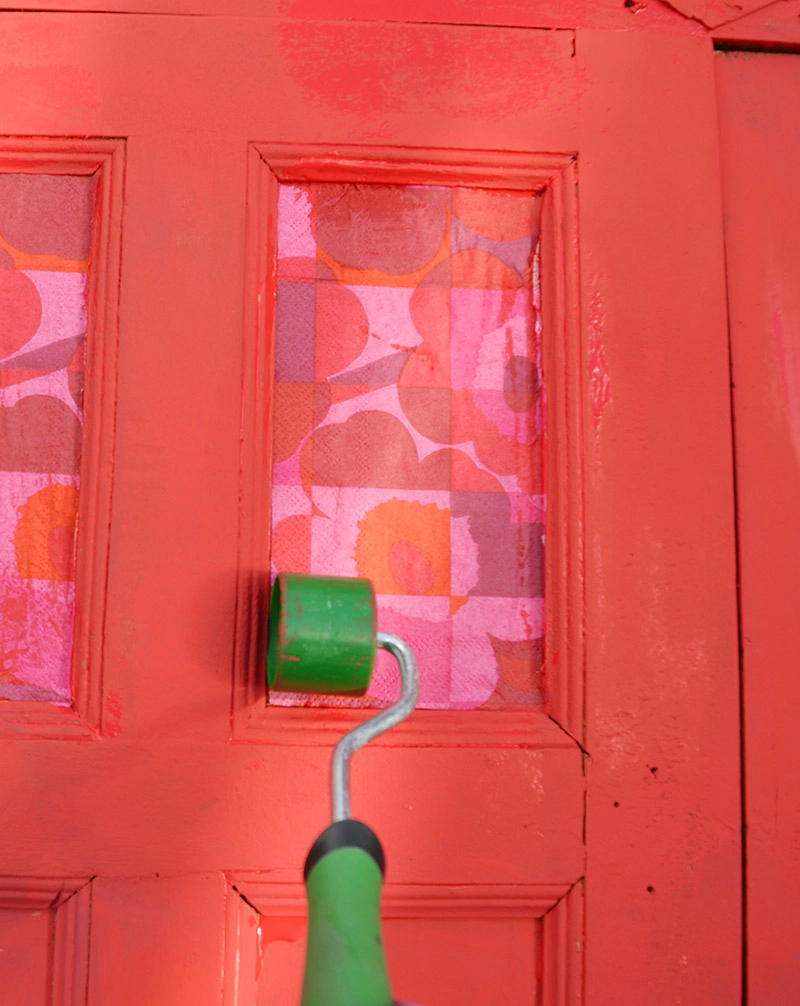
  5. In the past when painting with chalk paint I have always used the approved chalk paint brushes. However, when I updated my kitchen painted worktops with a mini roller I fell in love with the tool. With the mini roller, the paint went on so quickly and smoothly I decided to use it for this cupboard upcycle.
     
    The paint coverage with the roller was thinner than it was with a brush therefore, I used 2 coats of Annie Sloan Emperor’s Silk chalk paint.
     
    Painting a cabinet with a mini roller and chalk paint.
  6.  
     

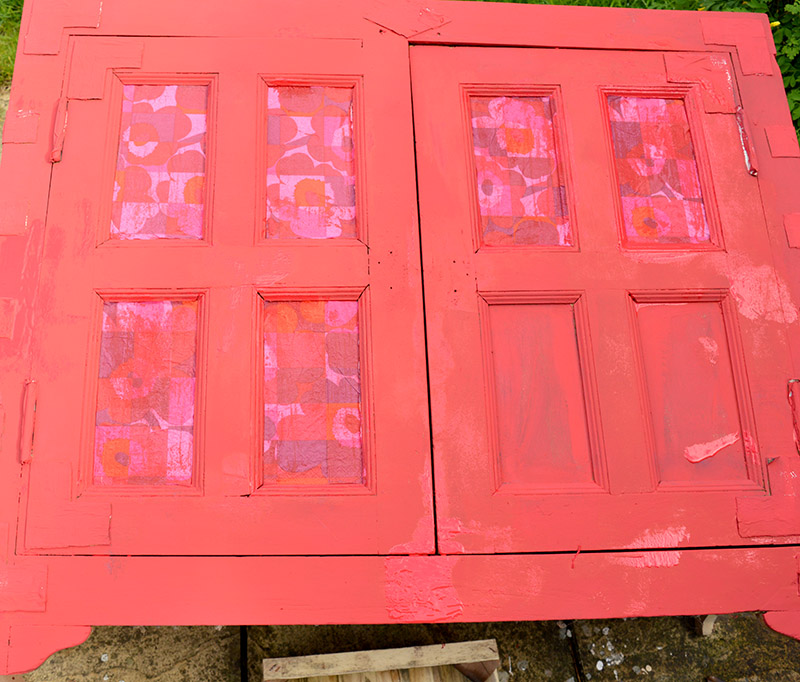
  7. For the Marimekko part of this cabinet upcycle, decoupage the paneled doors. Cut paper Marimekko napkins to fit the size of the panels. Then carefully separate the 3ply napkins so that only the top printed ply of the napkins is used.
  8.  
    Cutting Marimekko Napkins for decoupage cupboard


  9. You can either wait until the chalk paint is dry and use decoupage glue to stick the Marimekko napkins to the door panels. Or do as I did and stick the napkins to the wet chalk paint using the paint as a glue. Either way, make sure you use something like a small roller to flatten out any paper creases.
  10.  
    Marimekko napkin cabinet upcycle decoupage
     
    cabinet upcycle with chalk paint and decoupage


    Finishing off the cabinet upcycle


  11. To match the cabinet I painted and decoupaged 2 wooden door knobs with the same paint and Marimekko napkins.
  12.  

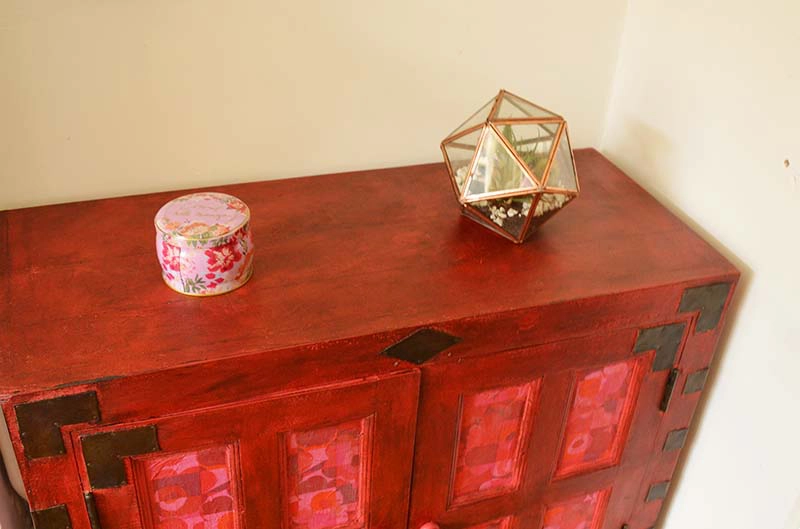
  13. Finally to protect the chalk paint of the cabinet upcycle use Annie Sloan’s furniture wax. I used a dark furniture wax to give the red cabinet a richer more antique looking finish. The wax is simply applied with a brush and then buffed with a lint-free cloth.
  14.  
    Cabinet upcycle with Annie Sloan's Emperor's Silk chalk paint and Marimekko paper napkins.
     
     
    Cabinet upcycle using Annie Sloan Emerpor's Silk red chalk paint and Marimekko paper napkin decoupage.
     
     
    Cabinet upcycle with Annie Sloan Emperor's Silk chalk paint.  Add accents of Marimekko with paper napkin decoupage.


I do love to use chalk paint when painting furniture, you should check out my other chalk paint upcycles or the ones at DIYideacenter.com:
 
The Best Chalk Paint Cupboard Upcycle
Easy Classy Craft Cupboard Transformation
Pineapple Stenciled Table Upcycle


Filed Under: DIY Upcycling, Marimekko Tagged With: annie sloan, cabinet, cabinet upcycle, chalk paint, cupboard, decoupage, Emperor's Silk, marimekko, paint, paper napkin, paper napkins, Red, red paint, unikko, upcycle

Previous Post: « How To Make A Cool Map Rock Keychain
Next Post: Homemade Paper Envelope Advent Calendar »

Reader Interactions

Comments

  1. Sandra L. Garth

    20th October 2017 at 11:05 pm

    What a great color and the inserts are such a fun detail. Thanks, Claire, for sharing with us at Celebrate Your Story, and have a great weekend.

    Reply
    • Claire Armstrong

      21st October 2017 at 7:04 am

      Thank you so much Sandra.

      Reply
  2. Julie

    19th October 2017 at 1:42 pm

    As I think almost everything is better red (apart from traffic lights when you are in a hurry) I an genetically predisposed to think this is amazing! I love the serviette addition too, with out them it would be lovely, now it is fabulous.

    Reply
    • Claire Armstrong

      19th October 2017 at 6:29 pm

      Thank you, Julie. I just realised that this cabinet encapsulates both my Chinese and Scandinavian roots. The red chalk paint has the antique Chinese lacquered vibe to it and the Marimekko napkins the Scandi element.

      Reply
  3. Brenda Young

    19th October 2017 at 3:26 am

    Thanks for sharing your project at #fridaysfurniturefix Claire, love the design pairing. Always a pleasure having you drop in!

    Reply
    • Claire Armstrong

      19th October 2017 at 9:57 am

      Thank you, Brenda!

      Reply
  4. Grandma's House DIY

    17th October 2017 at 11:21 pm

    Thanks so much for sharing with us at the To Grandma’s house we go link party! I’ll be featuring this tomorrow morning when the new party starts 🙂

    Reply
    • Claire Armstrong

      18th October 2017 at 12:07 pm

      Thank you so much, I look forward to seeing it.

      Reply
  5. Michelle

    17th October 2017 at 1:50 pm

    Wow, just WOW!!!!! Claire. That looks amazing. That color and the napkins you used look stunning together. That TV better appreciate what it’s standing on coz it’s gorgeous

    Reply
    • Claire Armstrong

      17th October 2017 at 7:24 pm

      Thank you so much Michelle. I do like the brighter colour.

      Reply
  6. Lins @ Boo & Maddie

    17th October 2017 at 1:03 pm

    It’s so funny seeing Caro’s comment just above because it totally reminded me of Chinese cabinets too, it definitely has an antique look about it now and as though it has been passed down through generations. Such a fantastic makeover. Thank you for linking to #HomeEtc x

    Reply
    • Claire Armstrong

      17th October 2017 at 7:24 pm

      Thank you, Lins. It’s because the red waxed paint looks like traditional Chinese red lacquer.

      Reply
  7. Caro | The Twinkle Diaries

    16th October 2017 at 9:20 am

    Well done Claire — it looks fab! We’ve got an antique Chinese wedding cabinet and the finish you’ve achieved is not dissimilar! 🙂 I’m a sucker for Annie Sloan’s chalk paint too — love the stuff. Particularly that you don’t need to prep beforehand. Perfect for lazy upcyclers like me 😉 Thanks so mych for linking up to #HomeEtc Caro x

    Reply
    • Claire Armstrong

      16th October 2017 at 2:28 pm

      Thank you, Caro. I also find that Annie Sloan paint goes a long way. We have a few of those antique Chinese wedding cabinets in our family too! I was born in Hong Kong and my family lived there for the first 30 years of my life and collected a lot of the red antique Chinese furniture which we still have today.

      Reply
  8. Florence @ Vintage Southern Picks

    15th October 2017 at 11:55 pm

    That is really a distinctive and eye-catching style! Isn’t it amazing how napkins transform a piece? Looks like you did a good job on it!

    Reply
    • Claire Armstrong

      16th October 2017 at 6:26 am

      Thank you so much. It is amazing what you can do with a paper napkin.

      Reply
  9. Laurie

    15th October 2017 at 1:31 am

    I’ve always wanted a red accent piece in my home. Yours is pretty awesome! I’m still trying to find the right piece of furniture to transform.

    Reply
    • Claire Armstrong

      15th October 2017 at 7:14 am

      Thank you Laurie. I like to have a flash of colour in every room.

      Reply
  10. Angie ~ Ambient Wares

    14th October 2017 at 2:03 am

    This cabinet looks wonderful in red and the use of the napkins adds the perfect touch! Beautiful job, Claire. Pinned!

    Reply
    • Claire Armstrong

      14th October 2017 at 6:15 am

      Thank you, so much Angie!

      Reply
  11. Debrashoppeno5

    14th October 2017 at 1:53 am

    Such a nice makeover. I appreciate the tip about the roller.

    Reply
    • Claire Armstrong

      14th October 2017 at 6:16 am

      Thank you, it’s any easy way to eliminate brush marks,

      Reply
  12. Sam - Raggedy Bits

    13th October 2017 at 2:08 am

    What a fabulous makeover! Love the colour and how you have popped the serviettes in the inserts of the cupboard.

    Reply
    • Claire Armstrong

      13th October 2017 at 5:24 am

      Thank you, Sam. I love the fact that you called the serviettes and not napkins. Serviette is obviously Aussie as well as English!

      Reply
  13. Janine

    12th October 2017 at 10:48 pm

    What a great project and now your cabinet is quite the stunning statement! I love anything from Marimekko!

    Reply
    • Claire Armstrong

      13th October 2017 at 5:25 am

      Thank you, I’m a sucker for Marimekko.

      Reply
  14. Cecilia

    12th October 2017 at 8:43 pm

    Thanks for sharing your fun red cabinet at Vintage Charm!

    Reply
    • Claire Armstrong

      12th October 2017 at 9:58 pm

      Thank you for hosting!

      Reply
  15. Sarah | A Few Favourite Things

    12th October 2017 at 7:34 pm

    A fantastic idea to include swatches of fabric to the recesses, really adds that extra detail to the cabinet

    Reply
    • Claire Armstrong

      12th October 2017 at 9:58 pm

      Thank you ?

      Reply

Trackbacks

  1. Cabinet Re-Make With Chalk Paint says:
    8th March 2018 at 1:00 pm

    […] really unhappy with the cabinet the way it is? If this describes you, then seeing what Claire from pillarboxblue did with her old TV cabinet will set your mind at ease. She shares her easy steps for transforming […]

    Reply

Leave a Reply Cancel reply

Your email address will not be published. Required fields are marked *

This site uses Akismet to reduce spam. Learn how your comment data is processed.

Primary Sidebar

Follow Me

Subscribe to newsletter

Search This Website

Denim feather wall decor

How To Make Denim Feather Wall Decor

Tiled square Boho Moroccan planters

Make Beautiful Moroccan Planters In Under 10 Minutes

9 unique blue jean rug DIY's

How To Make A Blue Jean Rug, 12 Unique Ways

Free printable maps

Wonderful Free Printable Vintage Maps To Download

DIY No Sew Denim Rug

How To Make A Cool Denim Rug Without Sewing

Copyright © 2021 Pillar Box Blue on the Foodie Pro Theme