
This is a step-by-step tutorial on how to make a DIY footstool any size. Here I made an upcycled denim footstool, but other fabrics can be used to upholster the stool. The process is the same, whatever fabric you use.
This is a very easy and affordable tutorial that doesn’t have to involve any sewing. Especially if you use a repurposed fabric, such as an old pair of jeans to upholster the footstool.
Other fabrics can be used, in the past, I have even used an old tea-towel to make a map footstool. I’ve even used velvet before for a more luxurious finish when making a pouf.
Difference Between Footstools, Poufs and Ottomans.
The three terms footstool, pouf (also spelt pouffe), and ottoman are often used interchangeably.
Footstools are basically just designed with the main function of being somewhere to rest your feet when you are on the sofa.
An ottoman is a low upholstered seat without a back or arms and functions as both a footstool and extra seating. Many ottomans are also designed with some kind of storage under the seat pad, like my IKEA denim ottoman.
Poufs on the other hand come from the French word for meaning something that is “puffed out”. They are normally covered entirely in fabric, without legs and essentially a large hard cushion. Poufs can both be used as a seat and footstool but are tend to be smaller in size than an ottoman.
Customized Denim DIY Footstool
I made this footstool for my son, to serve both as a footstool and a low seat. He loves to play board games on our large coffee table and wanted a low stool to sit on whilst doing so.
When my son isn’t sitting on it, I use it as both a footstool and somewhere to rest my coffee when lounging on the couch.
With this tutorial, you can custom make the DIY footstool to any size you want. You can also vary the height of the footstool depending on the height of the legs you use.
(There is a printable how-to card for this craft at the end of the post.)

We’re a participant in the Amazon Services LLC Associates Program, an affiliate advertising program designed to provide a means for us to earn fees by linking to Amazon.com and affiliated sites. As an Amazon Associate, I earn from qualifying purchases.
What You Need To Make a Footstool
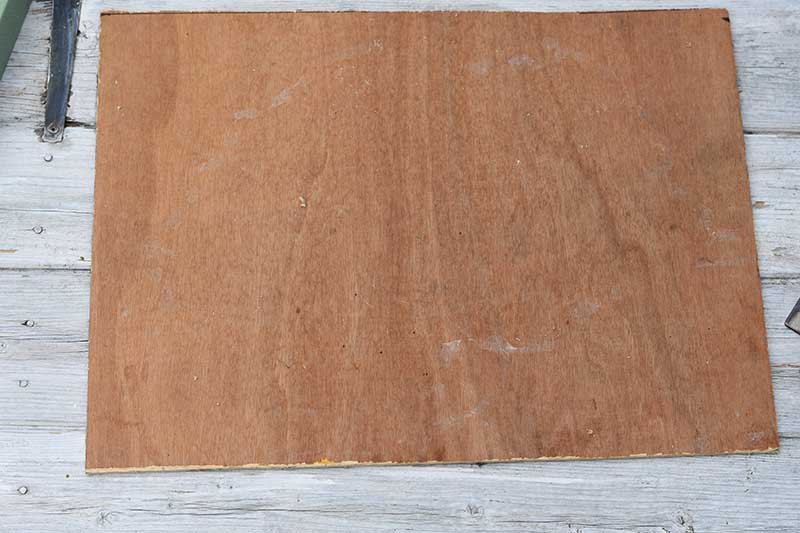
- A hard wood base, such as a piece of plywood. This will determine the size of the footstool. For the foot stool here I cut a piece of plywood approximately 34cm by 44cm (13″ by 18″).
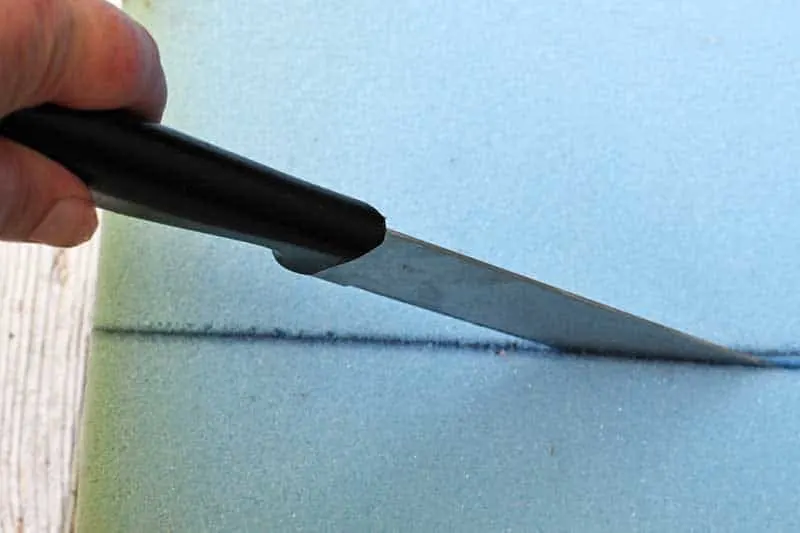
- Dense foam the same size as the base and about 5cm (2″) thick.
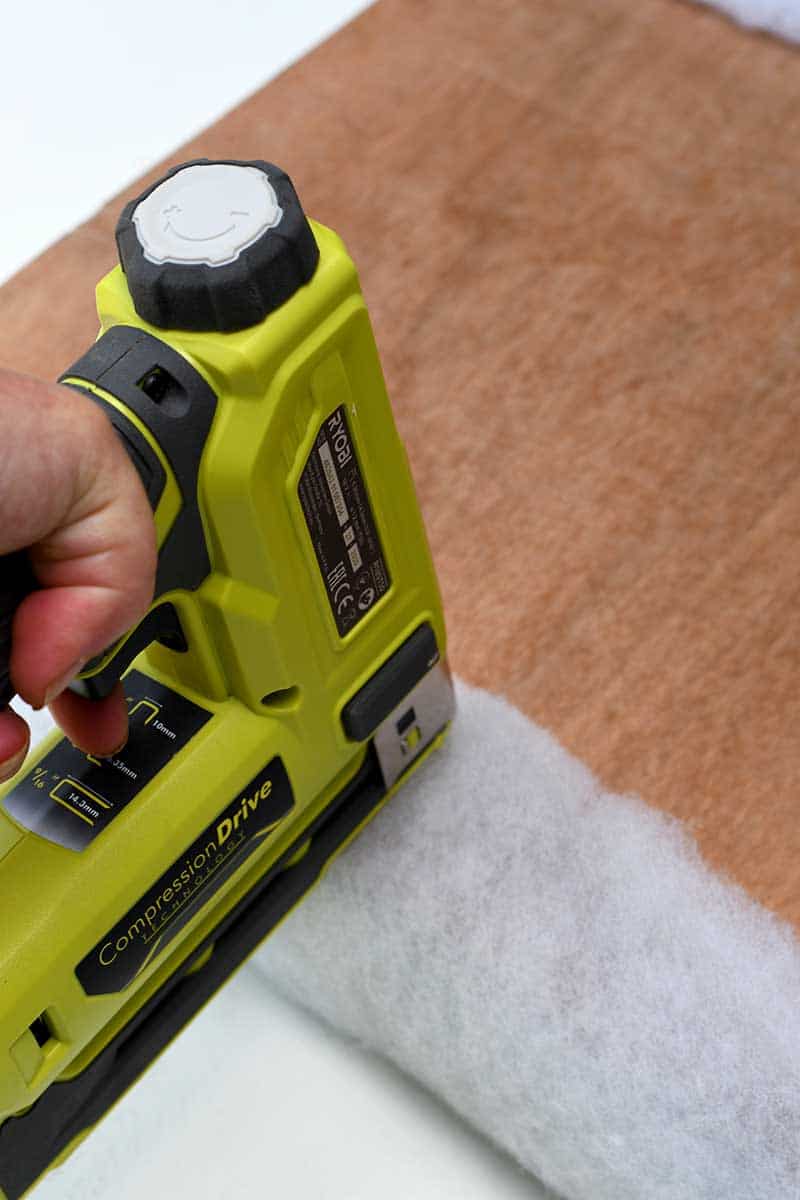
- Thick wadding (batting), enough to cover the foam.
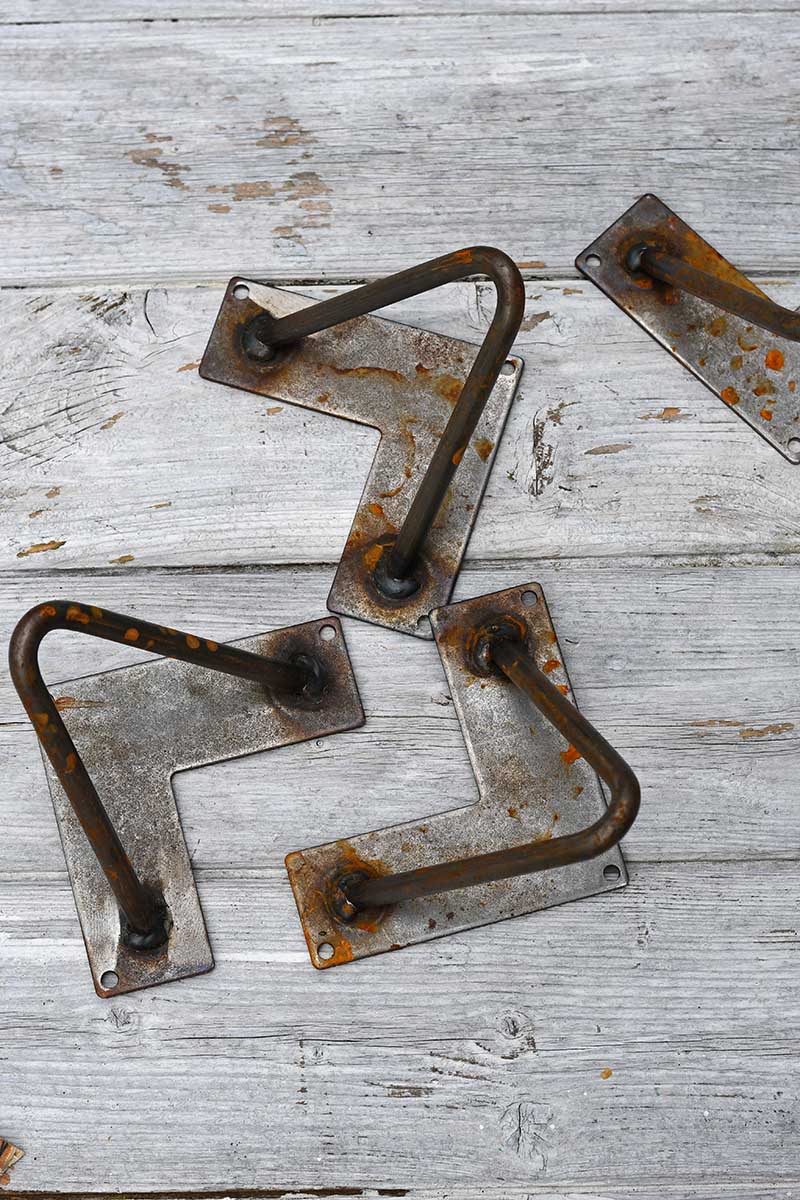
- Four 6″ hairpin legs or other legs (see below).
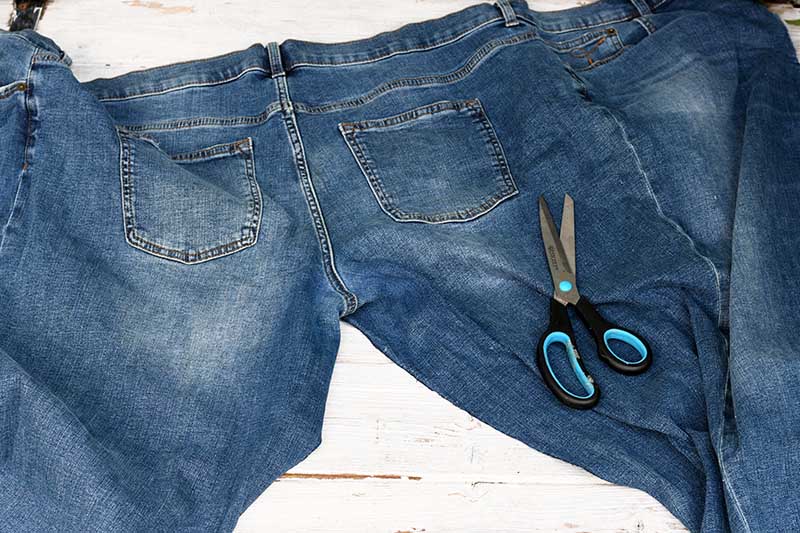
- A pair of jeans for the upholstery or other fabric.
- Scrap piece of fabric for the underside (same size as the base).
- Iron on embroidery patches (optional).
- Electric Stapple gun
- White glue
What Legs To Use For A Footstool
I used the 6″ hairpin legs I already had in my shed. I thought the industrial look of the legs went well with the denim. Hairpin legs are great for DIY furniture can be bought in various colours and sizes.
My footstool was a little smaller than your traditional footstool but it was custom made to fit our needs. Most standard footstool legs are a couple more inches taller in height. So if you’d like a higher footstool you can use 6″, 8″ or 10″ legs.
If you look on Amazon or eBay, there are many more styles of legs available in wood or metal. Etsy has some lovely furniture legs. Another popular option and the more traditional one is the tapered wooden leg.
Junk shops are also a great place to source old furniture legs. Just make sure they come with a base plate to fit them to your DIY footstool.
How To Make A Denim Footstool
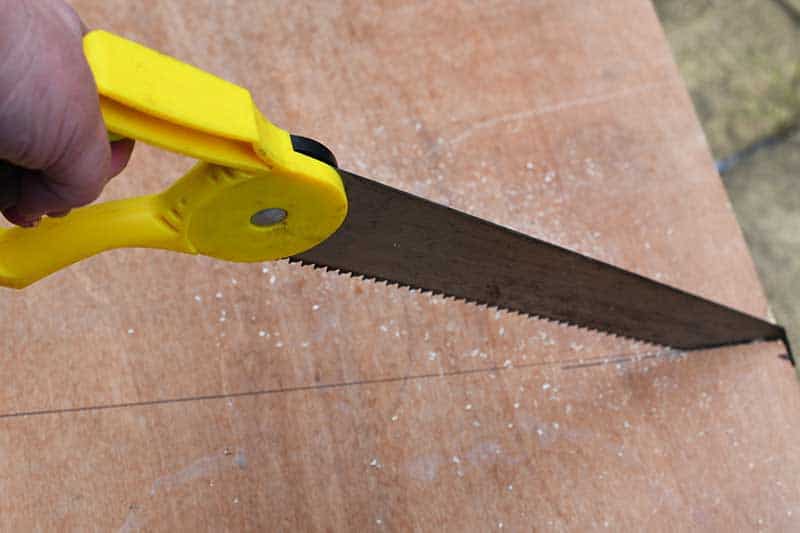
1.. First, decide on what size you want to make your footstool and saw the plywood base to that size. This footstool was bout 13″ by 18″.
Top tip: If you buy plywood from a DIY store, often they will cut it to size for you.


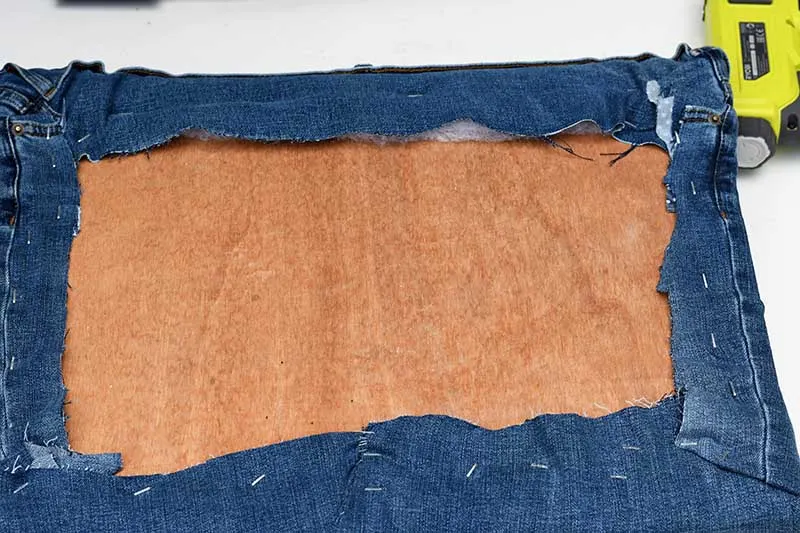
2. Next, place the plywood base on top of the foam base and draw around it with a black sharpie. Then cut the foam the same size as the plywood. The foam can easily be cut using just a large kitchen knife.
Then glue the foam to the plywood base using standard white (PVA) glue.

3. Next, wrap the foam seat pad with the wadding and secure it in place with a staple gun.

Making the Denim Cover
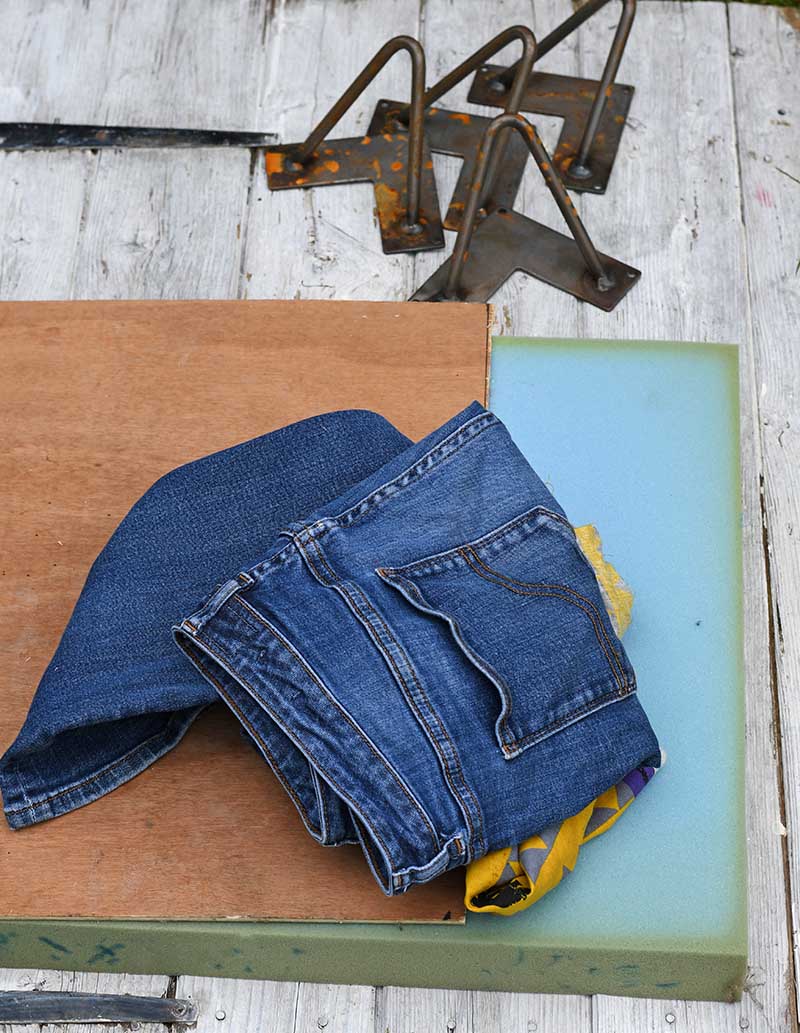
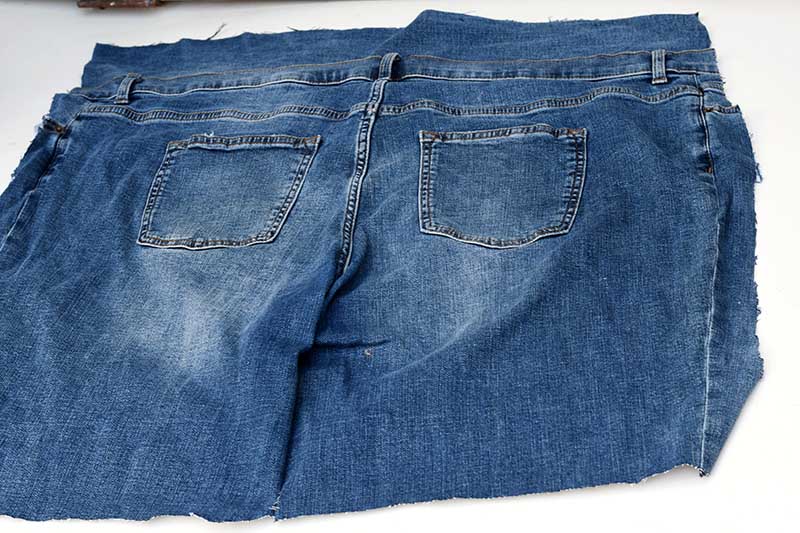
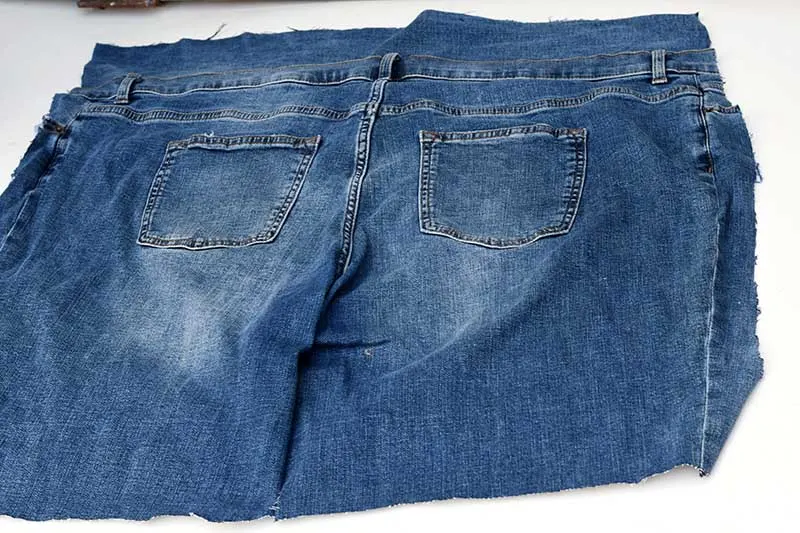
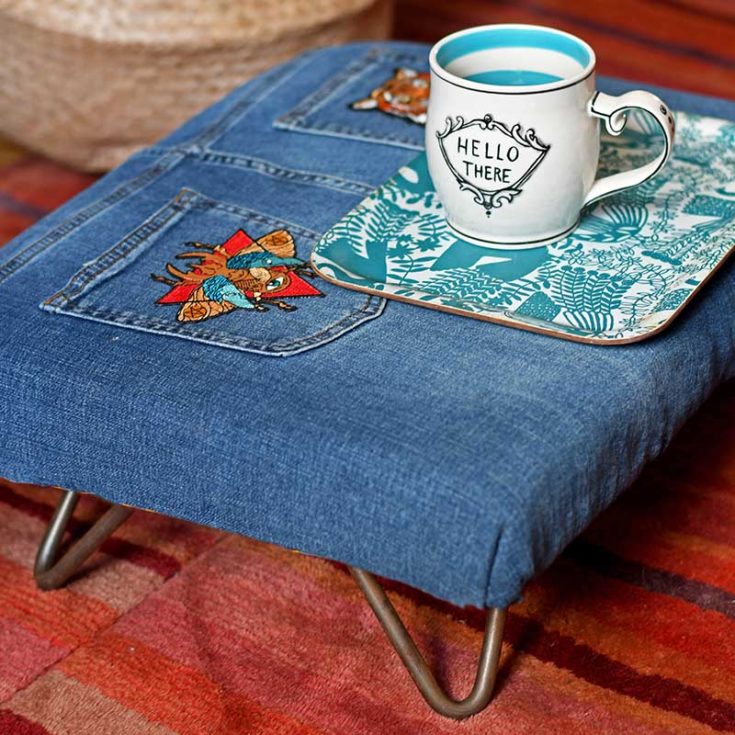
4. As I love to upcycle and repurpose denim whenever possible, I used an old pair of jeans to cover my footstool. Denim is also a good choice as it is a hard-wearing fabric. But any hardwearing fabric can be used and would be slightly easier than using a pair of jeans.
To create a large piece of denim from the jeans I cut them up the seams on the inside legs. And then either side of the zipper. I then cut the denim into a large enough piece to cover the foam seat pad of the footstool. Allow enough fabric to staple it to the underside.
I wanted the denim pockets on the top of the seat and the waistband visible. This involved cutting and stitching a strip of denim to the waistband to allow for enough denim to stretch the underside.
The pair of jeans I used for this upholstery was stretch fabric which made it slightly easier.
As the edges of the fabric are going to be hidden under the footstool, there is no need to stitch hems.

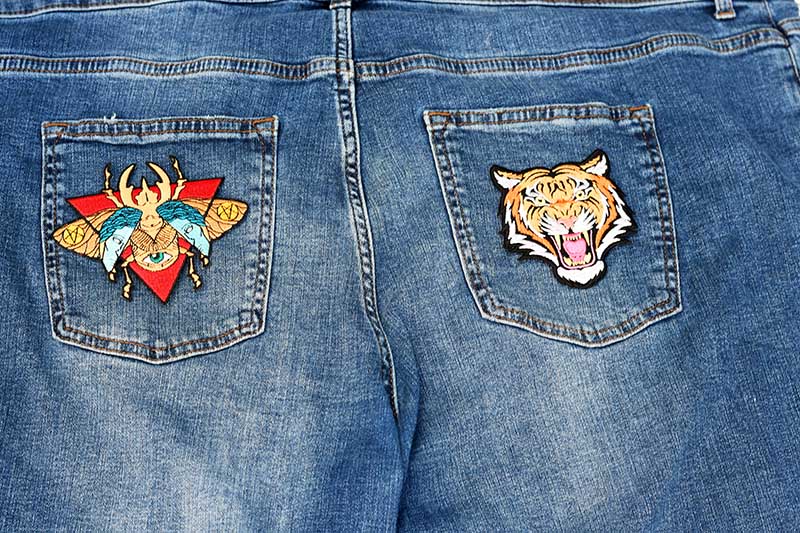
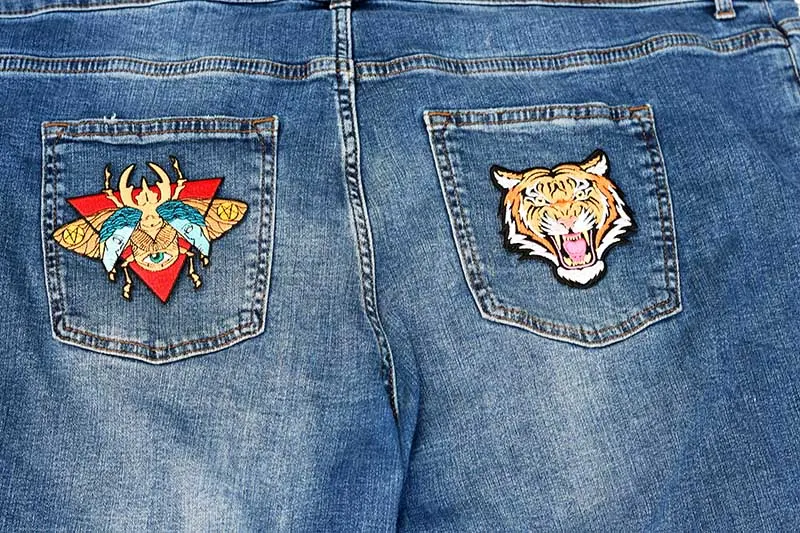
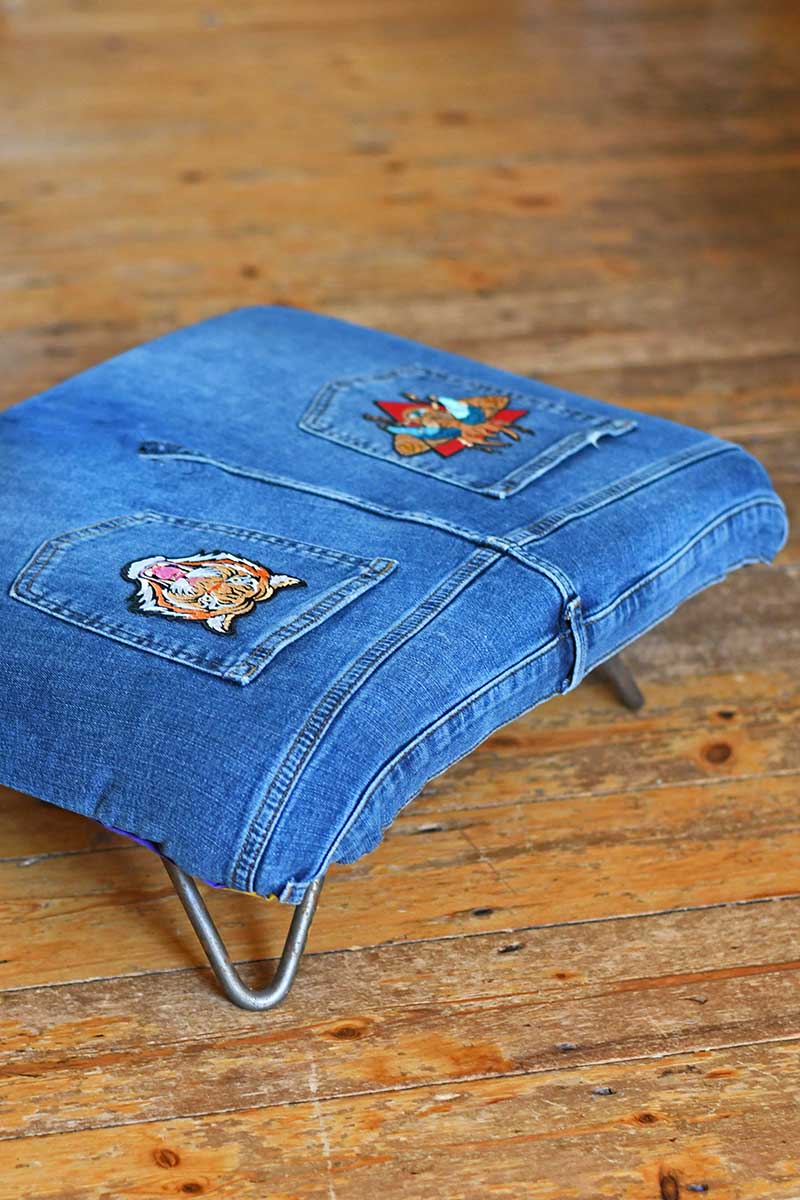
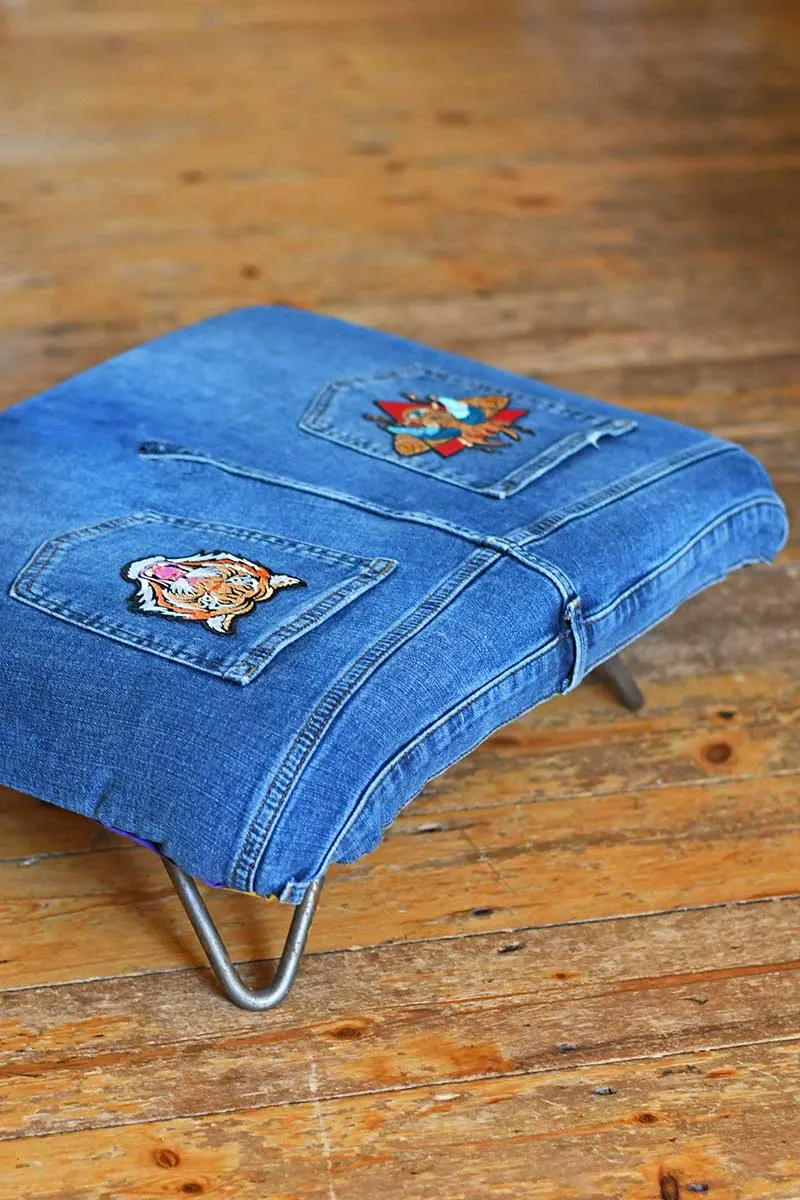
5. To add a bit of interest to the denim footstool, I added an embroidery patch to each pocket. One was a scarab beetle and the other was a tiger. The tiger patch matched the DIY Gucci Tiger Pillow I had made for my sofa.
These were iron-on patches, all you need is a hot iron to attach them to the denim.
Covering the Foam Seat Pad
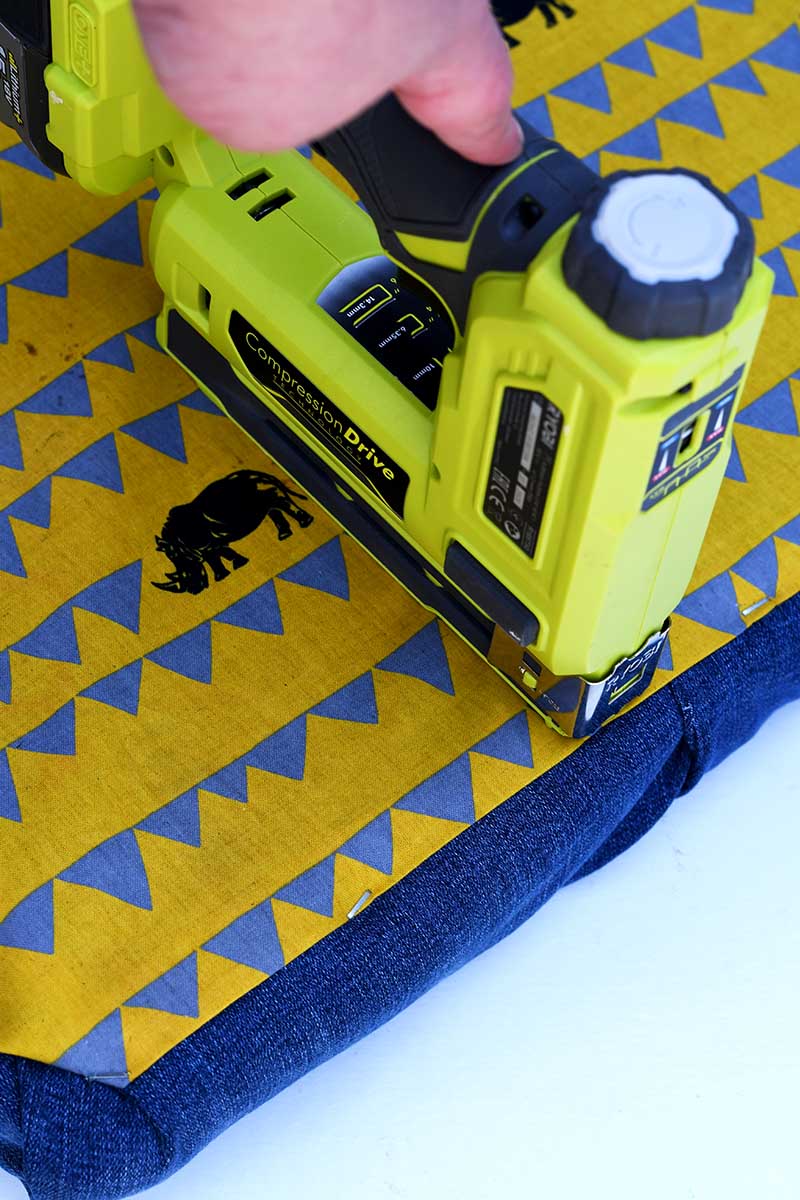
6. Next, place your fabric over the foam pad. Turn the pad over, then attach the fabric to the plywood with a staple gun.
Start stapling one long side of the footstool, and then pull the fabric taught before stapling the other side.

Before doing the short sides, staple the corners. Fold the fabric in the corners like you would when making a bed with a flat sheet. We call these “hospital corners“. Once the corners in place, finish off by stapling the other two sides, pulling the fabric taught as you go.


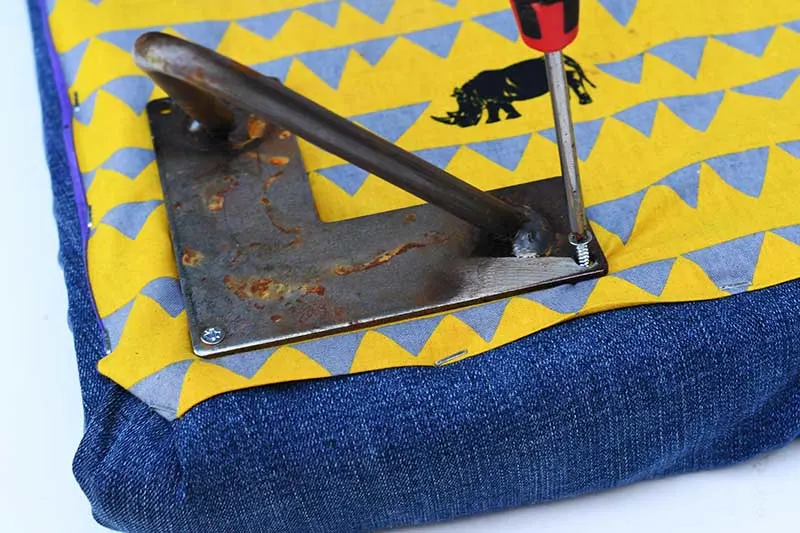
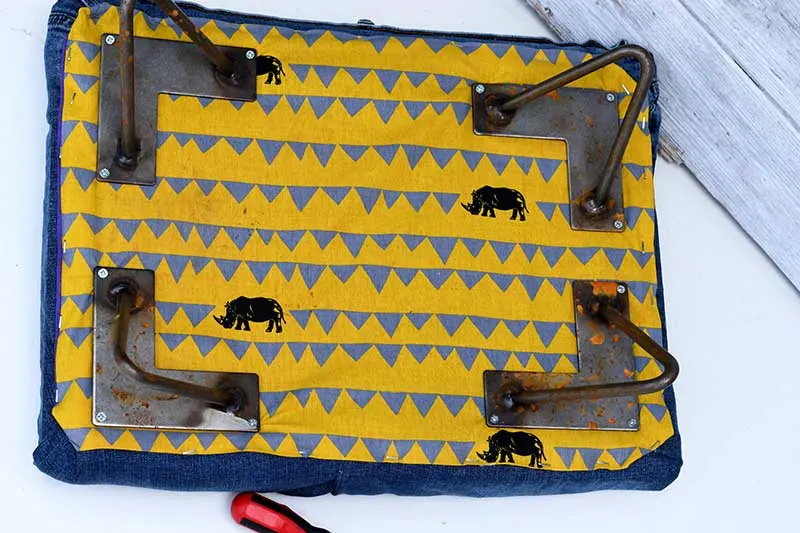
7. I know that you are not likely to see the underside of the DIY footstool, but I still wanted it to look neater. So again with the staple gun, I added a piece of scrap fabric to cover the underside of the seat pad.

8. Finally, once the seat pad was finished the legs were screwed into the base one by one. One hairpin leg in each corner.

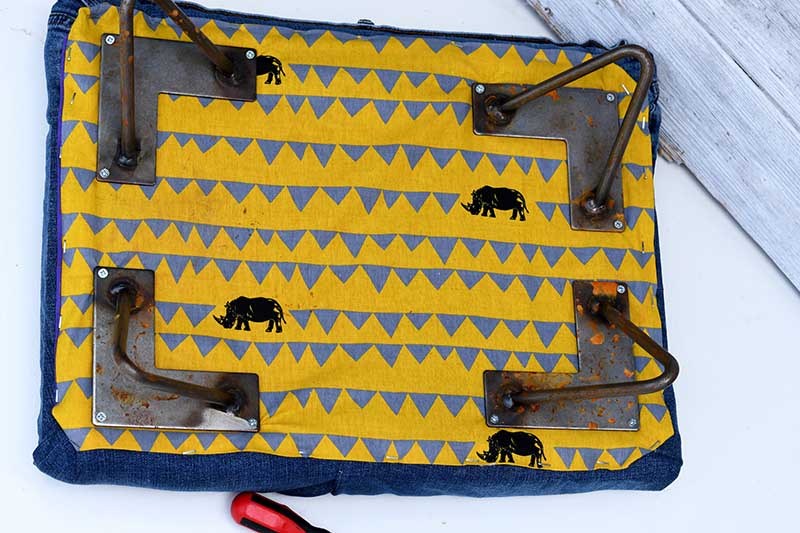
This easy denim footstool is now ready, and with the hairpin legs, it will be able to take a substantial weight. As well as using it to rest my feet it is strong enough to take the weight of a large fully grown adult.
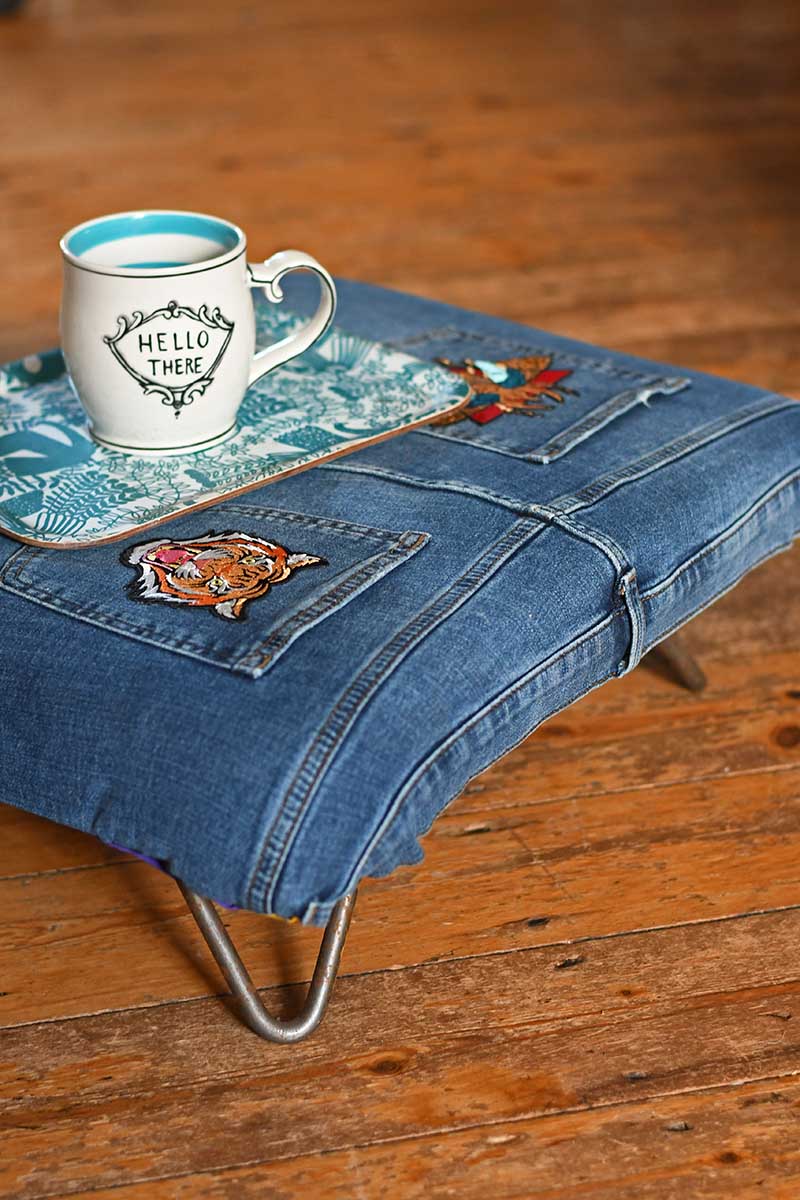
Since making this footstool the denim pockets have proven to be a handy place to store the TV remote. It also makes a handy extra side table for my coffee.


Hairpin legs are really handy for making simple DIY furniture. I’ve used them before to make an upcycled suitcase side table, a DIY wine box nightstand and a world map desk for my office. I’ve also repurposed the legs off an old chair and made a unique scaffolding board bench.


DIY Footstool

An easy tutorial that shows you how to make a DIY footstool in a customizable size that can be covered in any fabric. The footstool example made here is upholstered in repurposed denim.
Materials
- Plywood cut to the size of the DIY footstool
- 2" deep upholstery foam the same size as the plywood base.
- Enough wadding/batting to cover the seat pad
- Four short hairpin legs and fixing screws
- White glue
- Old pair of jeans and scrap fabric for the underside
Tools
- Electronic Staple Gun
- Saw and large kitchen knife
Instructions
- Saw the plywood base to the exact size of the footstool seat.
- Then using a kitchen knife cut the upholstery foam to the same size.
- Stick the foam to the plywood using white glue.
- Next, cover the foam in the wadding and secure it to the base using the staple gun.
- Next, if using denim to cover the seat pad, cut open the jeans at the inside leg seams. Then cut the denim fabric to obtain a piece of fabric large enough to cover the seat pad.
- Wrap the denim fabric around the padded seat and secure it underneath using the staple gun. . Fold the corners in the same way as "hospital corners" when folding sheet corners on beds.
- Neaten the underside of the footstool with a scrap piece of fabric. Use a staple gun to secure the fabric in place.
- Finally, screw a hairpin leg into each corner of the padded footstool seat.
Recommended Products
As an Amazon Associate and member of other affiliate programs, I earn from qualifying purchases.

Find more DIY upcycles here.
Southern Crush Collective - Southern Crush at Home
Friday 22nd of October 2021
[…] Credit: Pillar Box Blue […]
Michelle Leslie
Wednesday 21st of July 2021
As always, Claire, I love your denim projects and who wouldn't want a cute DIY denim-covered footstool, especially when it's a no-sew version?
Claire Armstrong
Thursday 22nd of July 2021
Thank you, Michelle. It is a handy footstool, my feet are resting on it now as I type this response.
Grandma's House DIY
Tuesday 20th of July 2021
Thanks for sharing with us I'm featuring you this week when the new To Grandma's house we go link party starts!
Claire Armstrong
Tuesday 20th of July 2021
Thank you so much, that's great I look forward to seeing it.
Cecilia
Sunday 18th of July 2021
So cute, Claire! Thanks for sharing at Vintage Charm!
Claire Armstrong
Monday 19th of July 2021
Thank you so much, it was fun to make.
Louise
Thursday 15th of July 2021
Oh wow! At first I thought this was a tutorial on how to cover a footstool, but it's for making a complete footstool! That's super cool. I love the thought of also personalising a footstool for each person by using a pair of their old favourite jeans.
Claire Armstrong
Thursday 15th of July 2021
Thank you, that sounds like a fabulous idea, everyone having their own personalized footstool.