
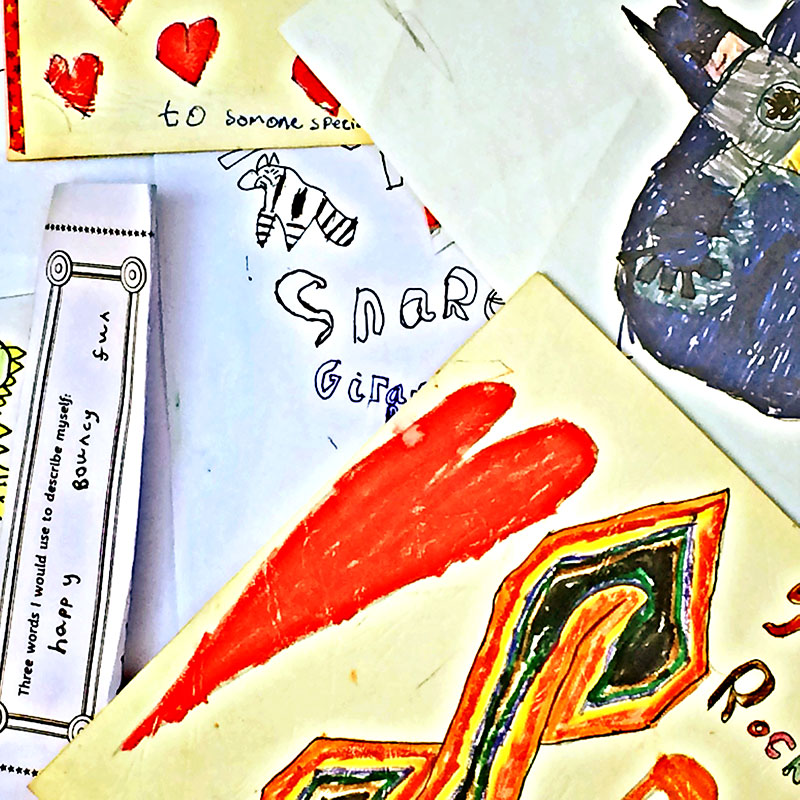
Embroidered Memories: As soon as they start nursery, your kids bring home pieces of artwork or random doodles. This artwork typically spent a few months on the fridge door in our house. It would, unfortunately, end up in the bin. The fridge was only so big!
However, I couldn’t bring myself to throw away all of this artwork. It was just so cute!
These precious pieces of paper and memories were stashed in the kitchen drawer, ready for them to be turned into an embroidered memories art piece.
How to Turn Your Children’s Artwork Into an Embroidered Memory
I got the inspiration to create this piece of embroidered memory art after meeting the textile artist Tilleke Schwarz at one of her exhibitions. Tilleke is a fantastic thread artist, and her work is so eye-catching.
Tilleke’s pieces look like big embroidered doodles and scribbles of everyday things. At first glance, her textile creations appear to be a random collection of things, but if you look closely, a lot is going on in her artwork, and it follows a theme.
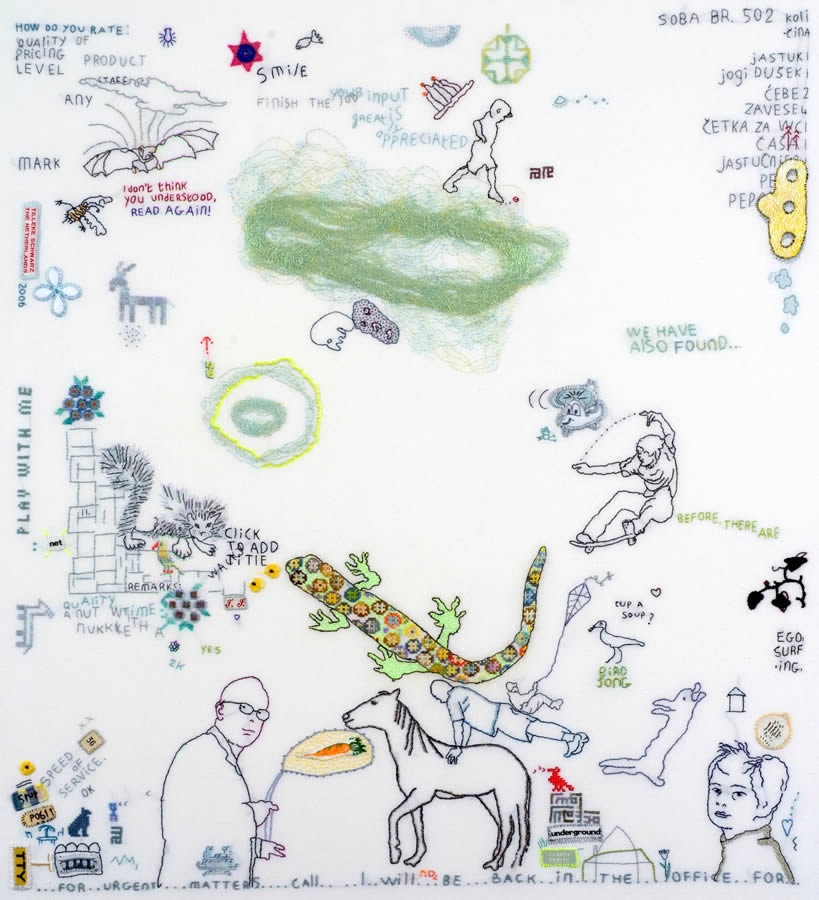
I warn you; this is not a quick project; it took me a long time to finish. But it’s one that you can do in small bursts over time; as the piece is created bit by bit, just like a doodle, it grows.
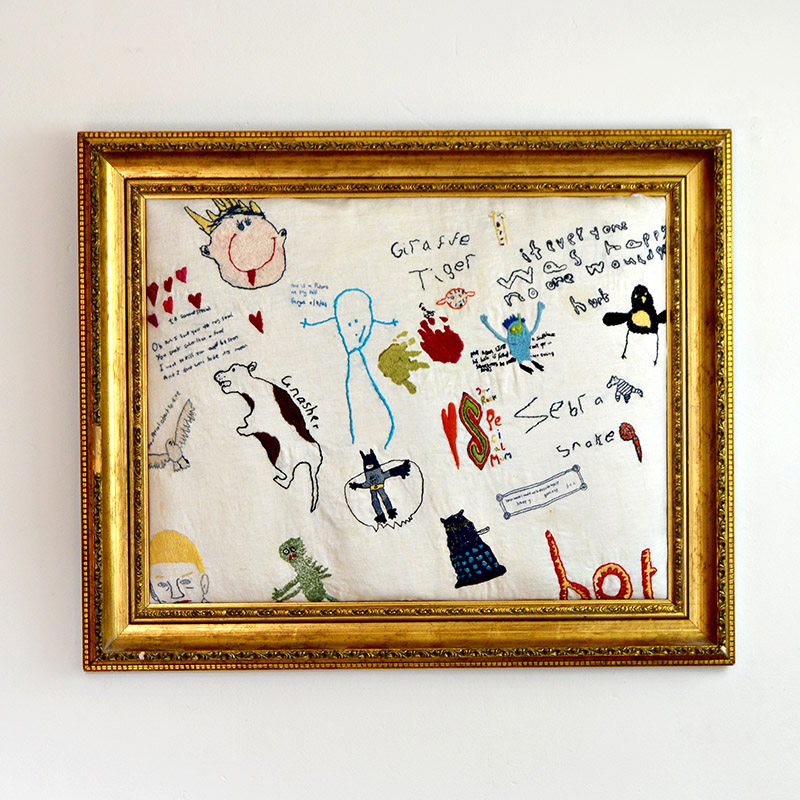
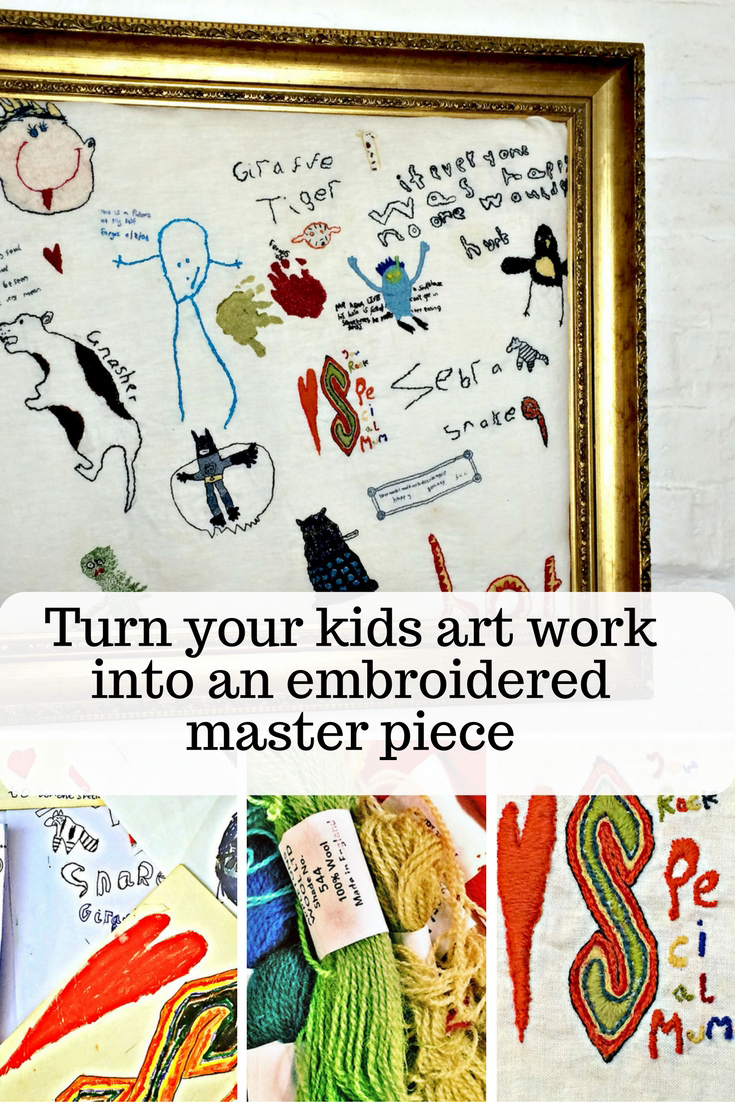
The time spent on the embroidery was well worth it, as it now proudly hangs up in our lounge, and every time it catches my eye, it makes me smile.
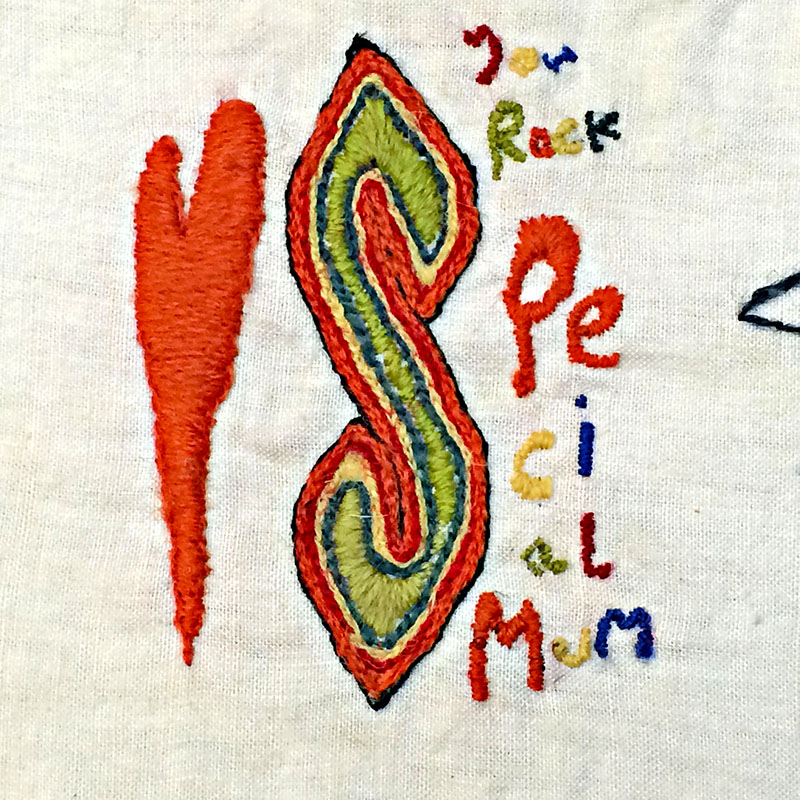
Remembering that your eldest son once thought of you as a “special mum that rocked” is heartening.
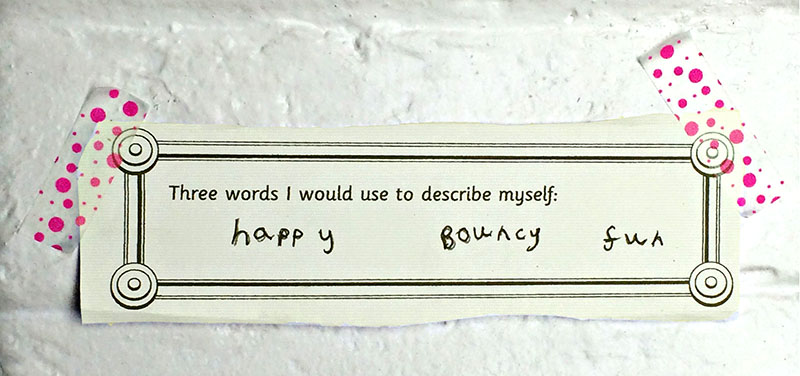
My 5-year-old middle son brought home a piece of paper from school; he’d been asked to describe himself in three words. His words were, “happy, bouncy fun”. It is ironic now that he is a moody teenager who spends most of the weekend in bed.
We’re a participant in the Amazon Services LLC Associates Program, an affiliate advertising program designed to provide a means for us to earn fees by linking to Amazon.com and affiliated sites. As an Amazon Associate, I earn from qualifying purchases.
What You Need
- Linen fabric for your base; you want something easy to hand embroider. An old t-towel will also work well. Think about how you will frame the finished embroidered artwork and how big you want the final piece to be. This will dictate the size of the linen fabric you use. Also, allow a border for framing (this is something I forgot). My finished piece was approximately 50cm by 70cm.
- Appleton’s crewel wool for the embroidery – I love the texture and the range of colours. For the more finely stitched elements, I just used ordinary cotton thread.
- Crewel embroidery needles
- Embroidery iron transfer pen
- Tracing paper

How To Turn Your Childs Art Work Into Embroidered Memories
1.. The first thing to do is gather all the artwork and doodles you want to transfer into an embroidered memory. These don’t have to be the most amazing pieces of artwork; you want the pieces that make you smile and trigger a positive emotion. This might be something as simple as a word in their handwriting.

2. Next, match the colours in your gathered pieces with the embroidery threads.
3. Iron the linen fabric you will use for the background. Make sure it is flat with no creases.
4. Transfer the artwork onto the linen fabric (like my embroidered coffee cosy). First, decide whether you will keep the artwork the same size as the original. If it is a bit large and will dominate the finished embroidery, consider reducing the size on a photocopier first.
Then trace around the image with the iron transfer pen onto tracing paper. This will give you a mirror image, so you need to go over your tracing paper on the back so that you can counter the mirror image.
Next, carefully position the tracing paper image to where you want it on the linen, with the mirror image facing down. Then iron over the tracing paper image with a hot, dry iron (no steam) for about 30 seconds. The image should be transferred onto the linen when the tracing paper is lifted.


5. Stitch over the transferred lines and copy your child’s original designs with thread instead of crayons. I used whatever stitches I wanted, so sometimes it was just a running stitch or split stitch, a satin stitch to colour in larger areas, and French knots for texture.


Top Tips and Finishing Off
Don’t worry if you are not a master seamstress; the more childlike the stitching, the more appealing the finished embroidered artwork. Play around with the stitches to create different textures.
I found that when stitching text, it’s best to use a simple running stitch and thin embroidery thread rather than crewel wool. But it also depends on the size of the fonts; with larger letters, you can use the yarn.
Don’t worry about completing this piece of embroidered artwork in one go. It took me months to complete mine. I just did a bit here and there when I fancied it. This was one of those beautiful slow crafts you can do over time. I was picking it up whenever you wanted.
I did a lot of my stitching in the evening when relaxing in front of the TV. Embroidery is very therapeutic and doesn’t require much concentration.


When framing my embroidered masterpiece, I used some wadding to give the artwork a bit of height. It hangs above my sofa and is a real talking point.
Even though they are all adults, the kids still love looking at the piece. They often remark on their previous artistic skills or lack of them! It still evokes many memories; my oldest son loves that the drawing of his pet rat (Gnasher) is immortalized in this piece!

Another fun way to recreate your children’s paintings into stitched artwork is to make a mixed media embroidery piece, combining watercolour paint and stitches.
As well as embroidering on linen did you know you can embroider on paper too? I have used the technique to create some unique paper embroidery. For other embroidery ideas, check out the Christmas embroidered decorations, my Scandinavian Embroidered hearts and spring embroidery.
Cross-stitch is another favourite needlework of mine especially supersized cross-stitch which is super fast. I have used this technique to make a fun supersized stitched cushion for my sofa and a funky DIY draught excluder for my front door.
Nhacaipbv88
Thursday 27th of March 2025
I absolutely love this idea! Thank you for sharing.
Claire Armstrong
Friday 28th of March 2025
Thank you so much.
12 creative ways to display kids' artwork. Reclaim that fridge!
Monday 29th of July 2019
[…] in awe of this embroidered memories collage featured on Pillar Box Blue. It’s such a sweet, creative way to honor and preserve your […]
Cecilia MyThriftStoreAddiction
Sunday 9th of October 2016
I absolutely love this idea! Thank you for sharing @Vintage Charm!
Claire Armstrong
Monday 10th of October 2016
Thank you !
Cucicucicoo: Eco Sewing and Crafting
Friday 7th of October 2016
What a sweet idea! I did something similar years ago, having my daughter draw pictures of family members on fabric, which I embroidered over and sewed into bookmarks. You can see some here here (sorry, really bad pictures!). But I like the idea of accummulating doodles over time. It's really a great memory-saver! :) Lisa
Claire Armstrong
Friday 7th of October 2016
Thank you, your bookmarks look really sweet and a much quicker project.
Sam @ Raggedy Bits
Friday 7th of October 2016
I am with everyone else on this project!! Such a great idea and so very precious!! I will have to give this a go!! Thank you for the inspiration Claire :-)
Claire Armstrong
Friday 7th of October 2016
Thank you ! It is still my favourite thing hanging in my house.