• Skip to primary navigation
  • Skip to main content
  • Skip to primary sidebar

Pillar Box Blue

  • Home
  • Denim
  • Maps
  • Valentines
  • Crafts
    • Sweaters
    • Marimekko Crafts and DIY’s
    • Seasonal
  • DIY/Upcycling
    • All Upcycling
    • Ikea Hacks
    • Tin Cans
    • Round Ups
  • Christmas
  • About Me
    • What Is Upcycling What You Need To Know
    • Press & Working With Me
    • Link Ups
    • Privacy Policy
    • DISCLOSURE
    • Contact Me
You are here: Home / DIY Upcycling / How to Make Marimekko Wallpapered Stairs

How to Make Marimekko Wallpapered Stairs

25th May 2016 by Claire Armstrong 81 Comments

  • Share
  • Tweet

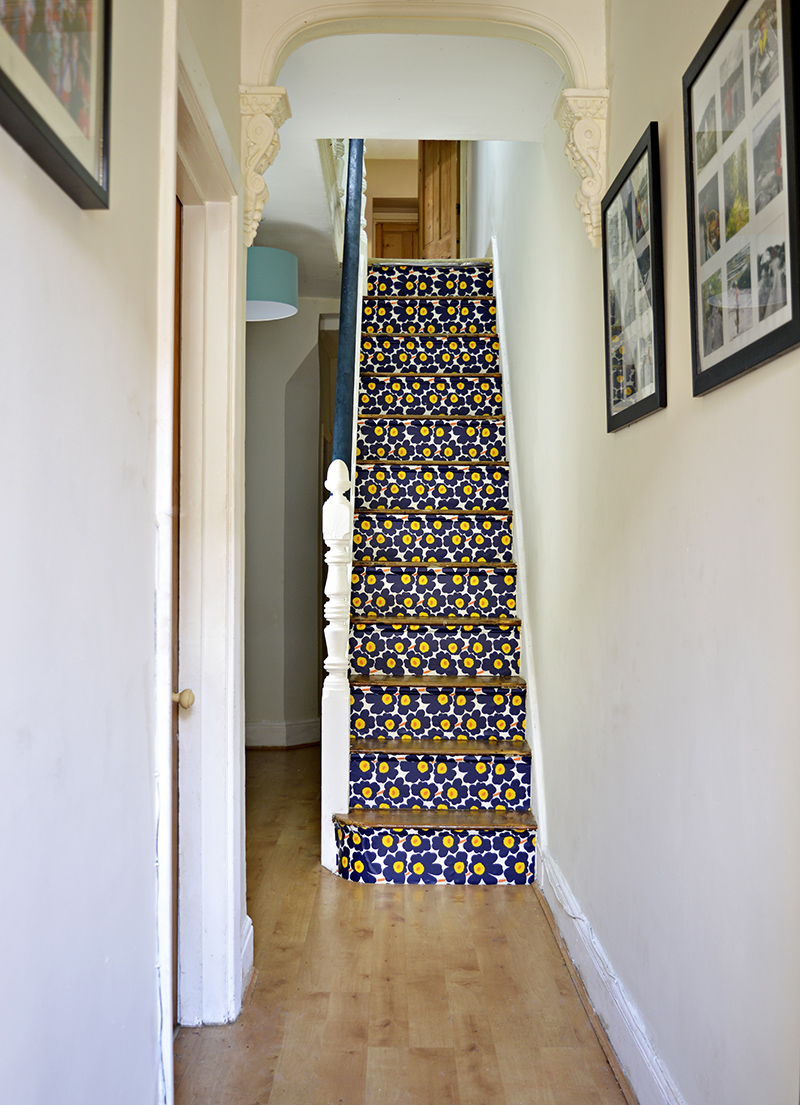
The first thing you see when you open my front door is the steep victorian stairs. These stairs have been crying out for a transformation. I finally got rid of the boring beige carpet that was just a dust and dirt magnet and brightened them up with a touch of Marimekko. I will show you how I wallpapered the stairs.

Every time, I open the front now, I can’t help but smile at my lovely cheery stairs. Even my teenage sons who don’t normally notice anything around the house, have told me without prompting how much they love the new stairs.

My Marimekko stairs were achieved by wallpapering the risers in Marimekko wallpaper. Other wallpapers are available but I do have a bit of a thing about Marimekko.

In the past I have Marimekko’d shoes, a bench, and even a giant paper mache cactus.

We are a participant in the Amazon Services LLC Associates Program, an affiliate advertising program designed to provide a means for us to earn fees by linking to Amazon.com and affiliated sites. As an Amazon Associate, I earn from qualifying purchases.

These stairs were transformed with Marimekko Unikko wallpaper.  Full tutorial on how to remove old carpet from stairs and how to wallpaper them for a more striking cleaner look.

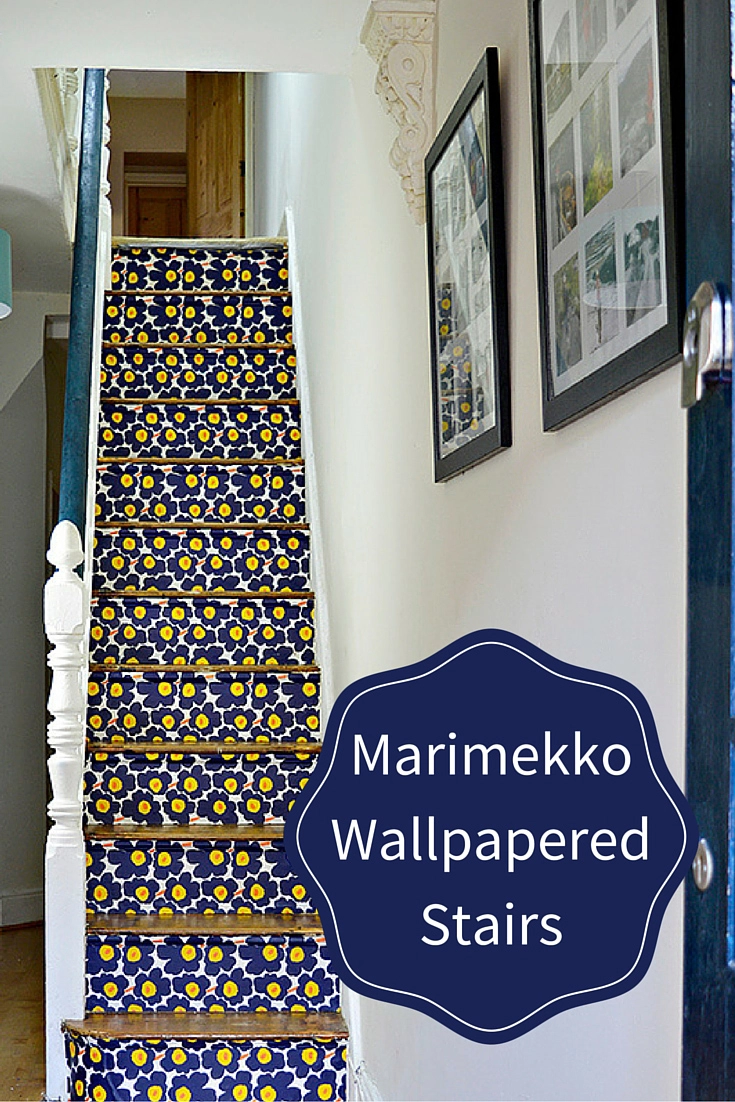
How I Marimekko Wallpapered My Stairs

Tools & Materials Used

  • Heat gun
  • Hammer
  • Pliers
  • Sander
  • Wood Varnish
  • Brush to apply varnish
  • Stanley knife

Preparing Carpeted Stairs for Wallpapering

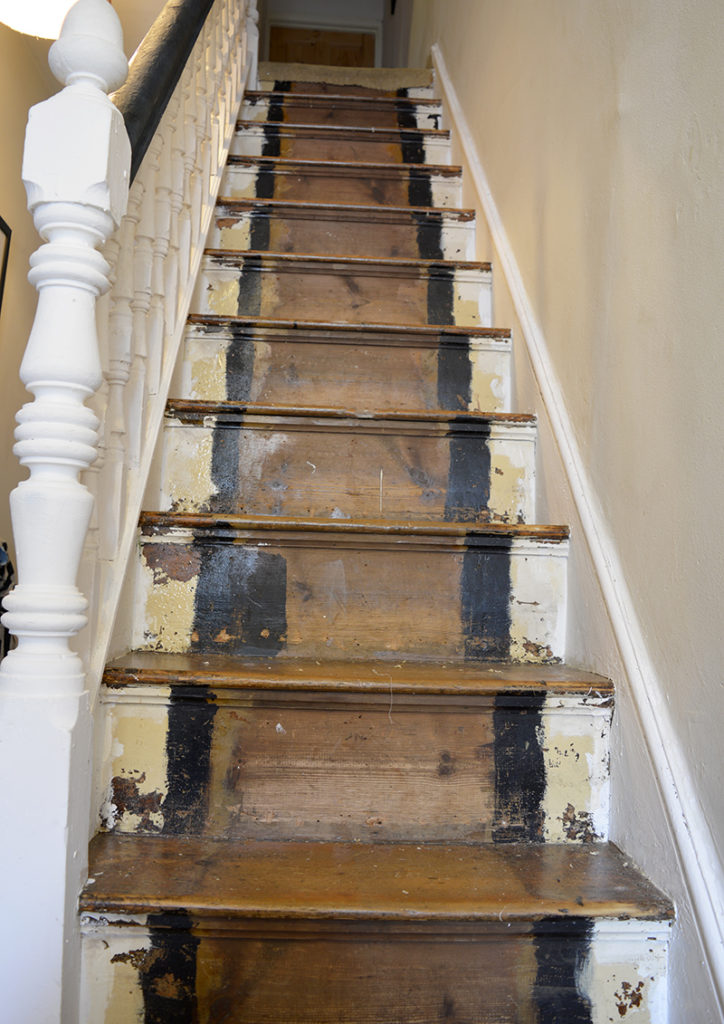
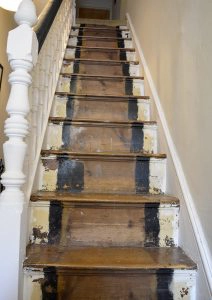
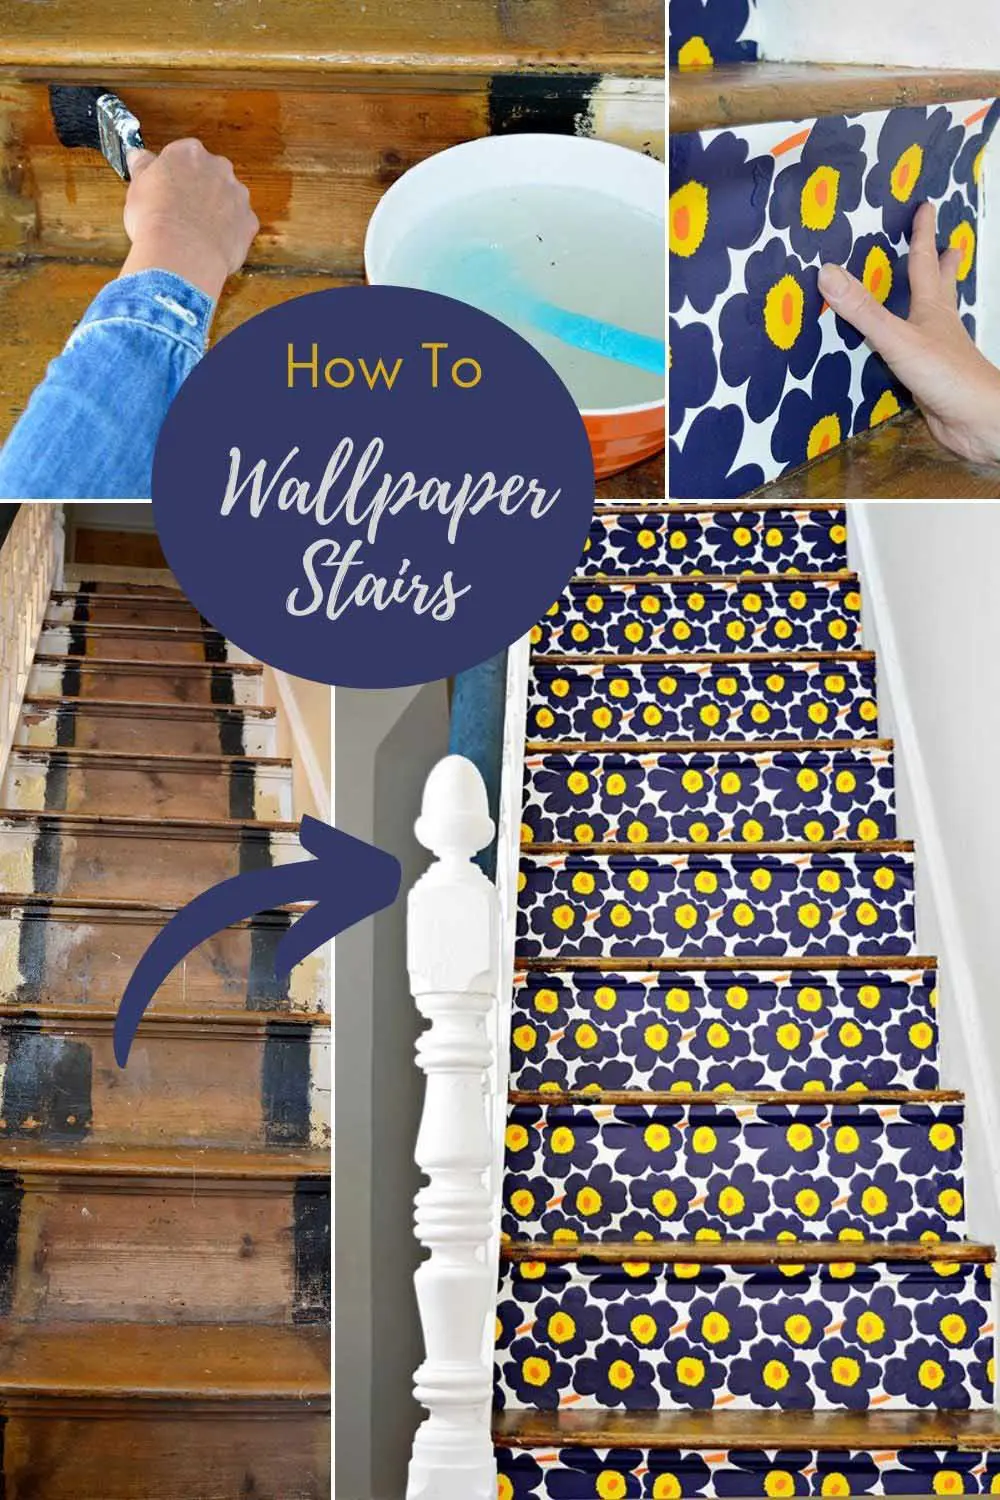
1.. The first thing I did was to remove the old carpet.

As these were the only stairs in the house and I live in a busy household with people constantly going up and down the stairs, I decided to remove the carpet one stair at a time.

I don’t know if you have lifted the carpet off your stairs before, but what is underneath are lethal carpet grippers and nails.

Stepping on one of those grippers is going to hurt. Using a Stanley knife I cut the carpet off each stair one by one, removing the grippers and nails before moving on to the next step.

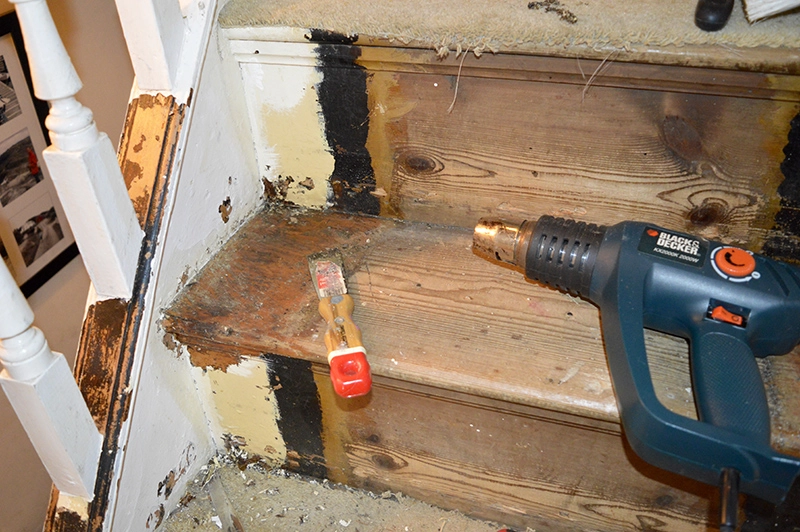
2. Once all the carpet was finally removed I then used the heat gun to strip any residual paint on the stairs.

The stairs in my house are over a hundred years old and had been obviously been painted before. As I was going to be wallpapering the risers, I only needed to remove the paint on the top of each step.

removing old paint with heat gun

Varnishing the stairs..

3. I ended up varnishing the stairs in 2 halves, so everyone could walk down one side of the stairs while the varnish dried on the other side.

I applied 2 coats of varnish on the stairs one in the morning and another last thing at night, so this took a couple of days one for each side.

stair transformation

4. The banister and railings were also given a new coat of paint. The banister was painted a dark blue to match my chosen wallpaper. I had noticed that my white banister had got very grubby over the years and I was hoping that a blue banister would fair better.

What you need to wallpaper stairs.

  • Half a roll of wallpaper- I chose Marimekko Pieni Unikko wallpaper in blue.
  • Wallpaper paste
  • Wallpaper Brush
  • Wet Sponge
  • Rotary cutter
  • Cutting Mat
  • Varnish

How to wallpaper stairs.

I could have wallpapered the stairs on my own but decided to rope in the help of my friend Wendy, who is an expert at upcycling with wallpaper. She had recently wallpapered her tabletop with a paper in a similar design.
 

1.. First, to make sure that the wallpaper will stick to your stairs well, key them first. I did this by applying a coat of wallpaper paste to each stair riser and letting it dry thoroughly.

2. Next, measure the width and length of each step riser. It may be awkward to get an accurate measurement, it’s always better to measure too big, then too short as you can trim later.

3. Then, using a rotary cutter and a cutting mat cut your wallpaper for each step. You will have to think about how best your chosen wallpaper pattern will work.

I was lucky as the Marimekko pattern I chose worked either way up so I was able to cut my wallpaper to the length of my stairs and thus avoided any joins.

 wallpapered stairs full step by step tutorial

4. Next, paste-up your paper well with wallpaper paste and then place carefully on each step, positioning from the bottom up. When in place, go over the top with a damp sponge pushing the wallpaper into any grooves.

5. Continue until all the stairs are finished leave to dry thoroughly. Even though the wallpaper is washable to protect it further apply a coat of varnish to each step.

The finished stairs..

Marimekko Stairs - Transform you stairs with wallpaper step by step tutorial

 
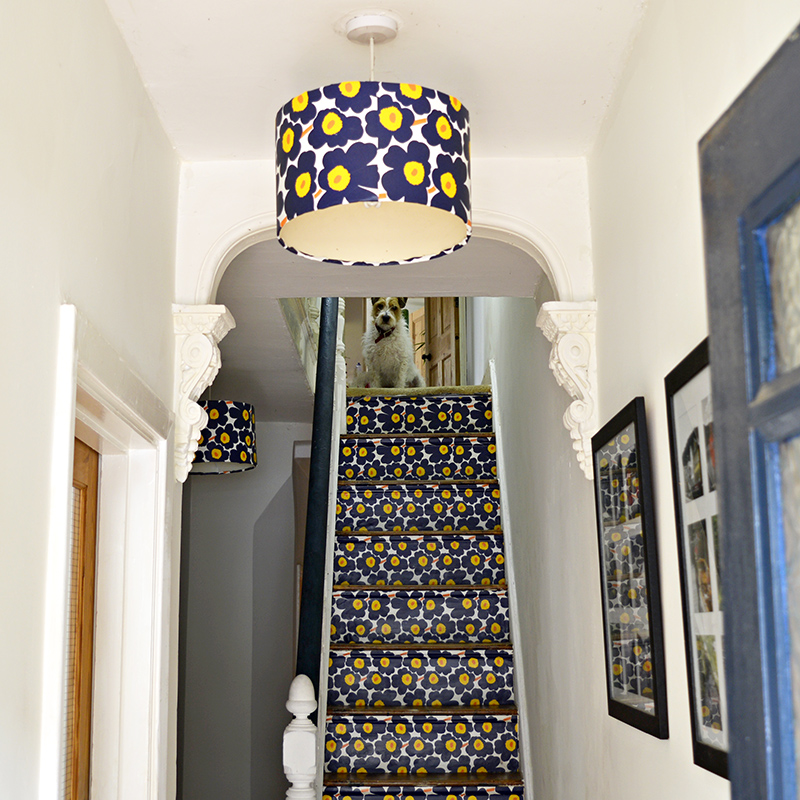
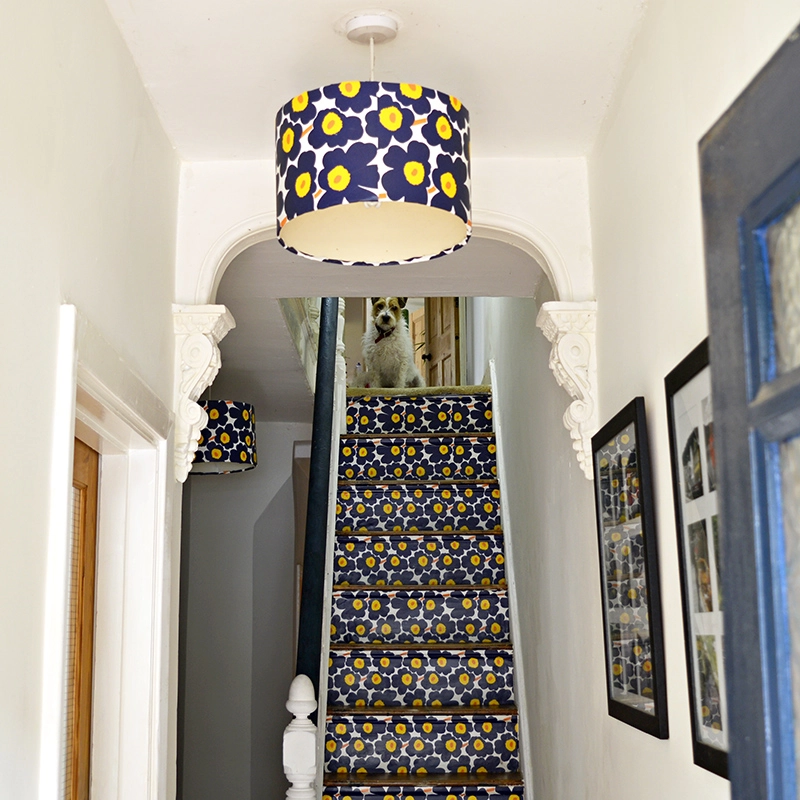
I love it now when I open my front door and see my lovely Marimekko wallpapered stairs. With some of the leftover wallpaper remnants, I also wallpaper the lampshades in the hall to match.

I’ve even wallpapered the IKEA mirror that hangs by the loft stairs in my home.

How to wallpaper lampshades so that it matches your decor

If the Marimekko stairs are a bit bold for you or if you love Marimekko, how about moving the Marimekko into the garden with these gorgeous upcycled Marimekko decorative tin can planters.

I have lots of Marimekko crafts and DIYs on Pillarboxblue. I painted the shed in my garden with the same Marimekko pattern as these wallpapered stairs.


For even more fantastic wallpaper ideas check out my awesome creative wallpaper ideas.


For more home, improvement ideas visit diyideacenter.com

Marimekko wallpapered stairs

Filed Under: DIY Upcycling, Marimekko Tagged With: marimekko, marimekko stairs, marimekko wallpaper, revamped stairs, stair transformation, stairs, transformation, upcycled stairs, upcycling, wallpaper, wallpaper stairs, wallpapered stairs

Previous Post: « The Most Amazing 21 IKEA Bekvam Stool Hacks
Next Post: How to Doily Stencil a Cushion / Pillow »

Reader Interactions

Comments

  1. Lisa

    2nd July 2019 at 1:21 pm

    if I did, I’d do exactly what you have done. They are so fun and such a great pop of color against the white walls. And if you get bored, you can just rip it off and start over! Visiting from Redo It Yourself Inspiration party.

    Reply
    • Claire Armstrong

      3rd July 2019 at 1:40 pm

      Yes, I did the stairs a couple of years ago now but they still make me smile when I open the front door. I haven’t got bored of them yet!

      Reply
  2. Carole McLendon

    23rd January 2017 at 12:35 am

    Covering the drum shade on the light fixture there was a master stroke…great job all round. Congratulations. Now wishing I had stairs…

    Reply
    • Claire Armstrong

      23rd January 2017 at 7:36 am

      Thank you so much Carole.

      Reply
  3. Naomie Moore, Castaic, CA

    22nd January 2017 at 8:06 pm

    Ourstanding! A+. Those stairs are steep aren’t they. Love your design choice, I would have picked it too. Thanks for sharing! ☺

    Reply
    • Claire Armstrong

      22nd January 2017 at 8:43 pm

      Thank you, Naomie, yes they are steep!

      Reply
  4. 499Lake

    22nd January 2017 at 5:48 pm

    A very clever way to use wallpaper. None-the-less, the blue on the stair railing and the navy blue in the wallpaper are discordant, one is greenish blue and the other is black blue. It would have been better if you repeated the navy on stair railing or painted it a color with less contrast.

    Reply
    • Claire Armstrong

      22nd January 2017 at 7:34 pm

      Thank you! Thanks for your suggestion.

      Reply
  5. LynneWebb

    22nd January 2017 at 12:29 pm

    Not my choice of colors but it’s a great improvement. I can’t understand why someone (and I suspect it was a previous owner) covered those beautiful oak treads with carpet to begin with. That’s a stunning feature and certainly not cheap. I suppose if it was me I’d mimic another similar re-do I saw. I’d use wallpaper that looked like birch trees on the risers or even bricks or stones. But, it’s clear your choice of color is blue and it looks great.

    Reply
    • Claire Armstrong

      22nd January 2017 at 12:51 pm

      Thank you! I agree that it is a great improvement and I know my choice of wallpaper is a bit too bold for some people’s taste. I do like your idea of birch tree or stone wallpaper I think they would look great too.

      Reply
  6. Julie

    3rd January 2017 at 12:43 pm

    Oh good lord, these look amazing! What a fab thing to walk in to every day.

    Reply
    • Claire Armstrong

      3rd January 2017 at 2:34 pm

      Thank you, they still make me smile 8 months on !

      Reply
  7. Renee

    1st November 2016 at 5:38 pm

    Wow! How super fun this looks! I love it! So bright and cheery!

    Reply
    • Claire Armstrong

      1st November 2016 at 7:30 pm

      Thank you ! They are still making me smile everytime I open the front door.

      Reply
  8. Cynthia

    4th August 2016 at 12:19 pm

    This is an absolutely spectacular project. I love how it turned out. I really need to speak up, though, about using the heat gun on the paint in your old Victorian home. Statistically your home is covered with lead based paint and using a heat gun on lead-based paint releases a dangerous amount of lead for you and your family. I work for the Cincinnati health department childhood lead poisoning prevention program and I would be happy to give you more information. Or you can just Google it and you’ll find information from the EPA and from HUD. Best of luck! I look forward to seeing more of your projects. Perhaps your local health department has the ability to check paint for you before you continue on a project.

    Reply
    • Claire Armstrong

      4th August 2016 at 12:27 pm

      Thank you and thank you for your concern, I will check the paint next time.

      Reply
  9. Wendy

    10th June 2016 at 1:38 pm

    Okay Claire… This project completely blows me away! I’m also a Marimekko fan, and recently I’ve been in my Orla Kiely phase!
    Wendy

    Reply
    • Claire Armstrong

      10th June 2016 at 1:57 pm

      Thanks, love Orla Kiely too. In fact my crafty pal also called Wendy is a huge Orla Kiely fan too! Next week I’ll be showing some Orla Kiely lampshades she made.

      Reply
  10. Lyndsay

    7th June 2016 at 3:32 pm

    WOW, I love it, it’s so vibrant and colourful, it really gives a totally different feel to your hallway and stairs, amazing!

    Lyndsay | Fizzy Peaches Travel & Lifestyle Blog

    Reply
    • Claire Armstrong

      7th June 2016 at 4:57 pm

      Thank you very much !

      Reply
  11. Emma

    7th June 2016 at 2:04 pm

    Wow, this looks fantastic. You’ve done a great job. Don’t know if I’m brave enough to do it on my stairs but I love the Marimekko pattern. Pinning for the future when I’m feeling a little braver 🙂

    Reply
    • Claire Armstrong

      7th June 2016 at 3:06 pm

      Thank you ! I was a bit apprehensive myself at first but glad I didn’t play it safe in the end. I love the fact that it’s bold.

      Reply
  12. Leslie

    6th June 2016 at 3:31 am

    Wow! That is such a gorgeous transformation! I love the bold color and pattern, and you blended the stain beautifully considering you had to do each side separately.

    Reply
    • Claire Armstrong

      6th June 2016 at 6:15 am

      Thank you very much !

      Reply
  13. Emily

    5th June 2016 at 4:10 pm

    Wow!! What a transformation! I love the pop of color and pattern from the Merimekko paper! Thanks for sharing with Merry Monday last week 🙂

    Reply
    • Claire Armstrong

      5th June 2016 at 4:57 pm

      Thank you !

      Reply
  14. Elina

    4th June 2016 at 6:40 am

    I followed a link from link up party and checked what other things you do and then I saw Marimekko print on these photos, print that I know quite well as I’m from the country of Marimekko’s. I have seen it in many different colours and almost everywhere but seeing it in a blog that isn’t Finnish was a surprise. 😀 Great job with the stairs!

    Reply
    • Claire Armstrong

      4th June 2016 at 7:58 am

      Thank you ! I love Marimekko prints and have used them for other projects on my blog, like a bench and a giant paper mache cactus. My husbands family is from Norway so share a border with FInland. I have been to the Merimekko shop in Oslo (very small), but would like to visit the one in Helsinki one day.

      Reply
  15. Mistie

    3rd June 2016 at 3:20 pm

    So Gorgeous!! I love that you used wallpaper, and what beautiful wallpaper. I have never redone stairs, and that looks like some work doing the prep, but your finished project looks like it was worth every second. That would make me smile too seeing it everyday. Great work and great tutorial.

    Reply
    • Claire Armstrong

      3rd June 2016 at 4:50 pm

      Thank you ! It was definately worth the work.

      Reply
  16. Mary-the boondocks blog

    2nd June 2016 at 9:36 pm

    Claire this is brilliant. The pop of color that is right there as you walk into the house can brighten anyone’s spirits. An ingenious use of wallpaper. You would not know it was the same house.

    Reply
    • Claire Armstrong

      2nd June 2016 at 9:38 pm

      Thank you so much. It’s great now to be greeted by something bright and cheery when I open the front door.

      Reply
  17. Tuula @ Thrifty Rebel Vintage

    2nd June 2016 at 2:20 am

    Your stairs turned out amazing Claire! Love how fun and funky they are. Thanks so much for sharing at Vintage Charm.

    Reply
    • Claire Armstrong

      2nd June 2016 at 6:07 am

      Thank you very much

      Reply
    • Claire Armstrong

      2nd June 2016 at 6:08 am

      .Thank you very much !

      Reply
    • Claire Armstrong

      2nd June 2016 at 6:11 am

      Thank you very much.

      Reply
  18. Gina

    2nd June 2016 at 12:24 am

    This looks like a completely different staircase! I love the way it turned out! It looks like a lot of work to me though. I’d find it a bit daunting to take this on. But, bravo to you!

    Reply
    • Claire Armstrong

      2nd June 2016 at 6:09 am

      Thank you it was well worth the work.

      Reply
  19. Linda

    1st June 2016 at 10:46 pm

    The transformation is fabulous! It looks like decorative tile. It looks like a lot of work, but you pulled it off. Thanks for sharing this delightful project at DI&DI.

    Reply
    • Claire Armstrong

      2nd June 2016 at 6:10 am

      Thank you very much !

      Reply
  20. Chloe Crabtree

    1st June 2016 at 5:57 pm

    What a fun makeover…well, the result is fun, it doesn’t look like the process was fun at all! Your hard work was all worth it, though, as the outcome is fun and certainly an improvement over the carpet! What a bright and fun welcome you get when you open your front door now! Thanks so much for sharing over at the Celebrate Your Story! link party! Hopefully this will inspire some more folks to take on their staircases. I live in a one story now, so no more stairs for me!

    Reply
    • Claire Armstrong

      1st June 2016 at 9:02 pm

      Thank you very much. It’s still making me smile everytime I open the front door.

      Reply
  21. liebe design

    31st May 2016 at 8:49 am

    That looks great!!!
    Something very special!

    Reply
    • Claire Armstrong

      31st May 2016 at 1:08 pm

      Thank you very much.

      Reply
  22. Name*

    30th May 2016 at 9:12 pm

    What a great transformation!! I love how brightening the yellow is:)

    I’d love it if you shared this at my weekly link party!
    http://www.twentysomethinginthe2010s.com/peace-love-linkup-009/

    Reply
    • Claire Armstrong

      31st May 2016 at 6:16 am

      Thank you and thanks for the invite.

      Reply
  23. Mimi

    30th May 2016 at 1:44 am

    Now THATS cute!

    Reply
    • Claire Armstrong

      30th May 2016 at 9:49 am

      Thanks !

      Reply
  24. sahana

    30th May 2016 at 1:26 am

    Wow, it looks amazing!!Great transformation. Thank you for sharing with us at #HomeMattersParty .We would love to have you again next week.

    Reply
    • Claire Armstrong

      30th May 2016 at 9:55 am

      Thank you !

      Reply
  25. Lynn

    29th May 2016 at 3:46 pm

    I couldn’t have been more excited about seeing your Stair Project! My stairs are sort of tucked away but I’ve been wanting to do a redo on them for some time. Yours look amazing and add such character and a personality to your stairs. I’m totally inspired. Thank you for sharing over at the Happiness is Homemade Link Party!

    Reply
    • Claire Armstrong

      29th May 2016 at 4:55 pm

      Thank you so much, happy to have inspired. Good luck with your stairs.

      Reply
  26. Laura Ingalls Gunn

    29th May 2016 at 1:36 am

    Your stairs are delightfully charming! Thank you so very much for joining us at Thoughts of Home on Thursday. Have a wonderful holiday weekend.

    Reply
    • Claire Armstrong

      29th May 2016 at 7:36 am

      Thank you! Hope you have a good weekend too.

      Reply
  27. creativejewishmom/sara

    28th May 2016 at 9:58 pm

    Wow wow wow! Really fabulous. Glad you added some varnish as stair risers do get wear and tear and hopefully this will last a while! thanks for sharing on craft schooling Sunday!

    Reply
    • Claire Armstrong

      29th May 2016 at 7:38 am

      Thank you ! I’m sure they will last with the varnish. I know other people who have wallpapered their stairs and it#s lasted years.

      Reply
  28. DebraShoppeno5

    27th May 2016 at 10:09 pm

    I don’t have stairs but I love to see the creative ways people redo them over from the carpet. Your transformation is so attractive. It adds such cheerfulness to the stairway.

    Reply
    • Claire Armstrong

      28th May 2016 at 6:58 am

      Thank you, that’s really nice to hear.

      Reply
  29. Barbara Viney

    27th May 2016 at 7:08 am

    Look great can’t wait to see what you have done with the rest of the stairs

    Reply
    • Claire Armstrong

      27th May 2016 at 7:17 am

      Thanks Mum, thats another project for another day !

      Reply
  30. Laura

    27th May 2016 at 12:43 am

    Oh my goodness- this is amazing.
    Not only is it clever and creative and colorful, but you executed the process so well.
    I am afraid I would have created a big hot mess!
    Thank you for being at TOHOT!

    Reply
    • Claire Armstrong

      27th May 2016 at 6:10 am

      Thank you very much!

      Reply
  31. Cristina @ remodelando la casa

    26th May 2016 at 1:31 pm

    ADORABLE! That pattern is so lovely! Thanks for the detailed tutorial.

    Reply
    • Claire Armstrong

      26th May 2016 at 2:11 pm

      Cheers and thank you !

      Reply
  32. Jaclyn | One Thousand Oaks

    26th May 2016 at 1:30 pm

    I love your stairs! Its beautifully done. I really like that you painted the railing a dark blue as well, I think it really pulls the look together!

    – Jaclyn

    Reply
    • Claire Armstrong

      26th May 2016 at 2:11 pm

      Thanks ! I’m going to wallpaper the lampshades next to match and paint the picture frames the same colour as the banister.

      Reply
  33. Bernideen's Tea Time, Cottage and Garden

    26th May 2016 at 12:51 pm

    Very charming. Kids would love your home too!

    Reply
    • Claire Armstrong

      26th May 2016 at 2:12 pm

      Thank you ! Mine do.

      Reply
  34. Stacey

    26th May 2016 at 12:45 pm

    Claire, this is pretty darn brilliant! The pattern you chose is fun and definitely beckons people to go upstairs. Now you come remove the carpet from mine?

    Happy Thoughts of Home. 🙂

    Reply
    • Claire Armstrong

      26th May 2016 at 2:13 pm

      Thanks ! I think carpet free stairs are the way to go so much cleaner and fresher.

      Reply
  35. Sara

    26th May 2016 at 12:44 pm

    Wow those stairs looks steep! Great job – I love what you’ve done! It’s a nice pop of colour in the space.

    Reply
    • Claire Armstrong

      26th May 2016 at 2:13 pm

      Thanks ! I do like a pop of colour.

      Reply
  36. Jemma

    26th May 2016 at 12:20 pm

    Your stairs turned out wonderful!
    Love the pattern you chose-pinned too.
    Thanks so much for joining us at TOHOT.
    Jemma

    Reply
    • Claire Armstrong

      26th May 2016 at 12:25 pm

      Thank you ! The pattern is actually over fifty years old it’s a classic Marimekko. Jackie Kennedy once had a dress in the UNIKKO print.

      Reply
  37. Julie Bagamary

    26th May 2016 at 12:09 pm

    Nice bold statement of art!

    Reply
    • Claire Armstrong

      26th May 2016 at 12:20 pm

      Thanks ! Yeah I decided not to play it safe, and I’m really pleased I didn’t, I love it.

      Reply
  38. Wendy Swain

    25th May 2016 at 10:48 pm

    I can’t get over how great they look! x

    Reply
    • Claire Armstrong

      26th May 2016 at 6:17 am

      Thank you and thanks for your help !

      Reply
  39. Victoria @DazzleWhileFrazzled

    25th May 2016 at 12:30 pm

    I don’t have stairs in my home but if I did, I’d do exactly what you have done. They are so fun and such a great pop of color against the white walls. And if you get bored, you can just rip it off and start over! Visiting from Redo It Yourself Inspiration party.

    Reply
    • Claire Armstrong

      25th May 2016 at 1:25 pm

      Thank You ! That’s what I thought if I don’t love it I can just strip the wallpaper and choose a different one. Lucky for me not only do I love it but my husband and boys do so it will be staying for awhile.

      Reply

Trackbacks

  1. Celebrate Your Story! #29 - Celebrate & Decorate says:
    7th June 2016 at 12:01 am

    […] and I have already pinned this one to my “coconut” PInterest board!  Jenny selected Claire’s Marimekko Stairs Transformation for her feature and I agree, this was a totally new look!  You can see it all over at Pillar Box […]

    Reply

Leave a Reply Cancel reply

Your email address will not be published. Required fields are marked *

This site uses Akismet to reduce spam. Learn how your comment data is processed.

Primary Sidebar

Follow Me

Subscribe to newsletter

Search This Website

Denim feather wall decor

How To Make Denim Feather Wall Decor

Tiled square Boho Moroccan planters

Make Beautiful Moroccan Planters In Under 10 Minutes

9 unique blue jean rug DIY's

How To Make A Blue Jean Rug, 12 Unique Ways

Free printable maps

Wonderful Free Printable Vintage Maps To Download

DIY No Sew Denim Rug

How To Make A Cool Denim Rug Without Sewing

Copyright © 2021 Pillar Box Blue on the Foodie Pro Theme