
Inside: An easy air dry clay tutorial to make some stylish marbled candle holders for the festive table.
I have a confession to make I love playing with clay and dough. When the kids were young, that was one of my favourite activities to get the plasticine and play dough out. The other day I spotted some air dry clay in a craft shop and thought it would be fun to make something with it.
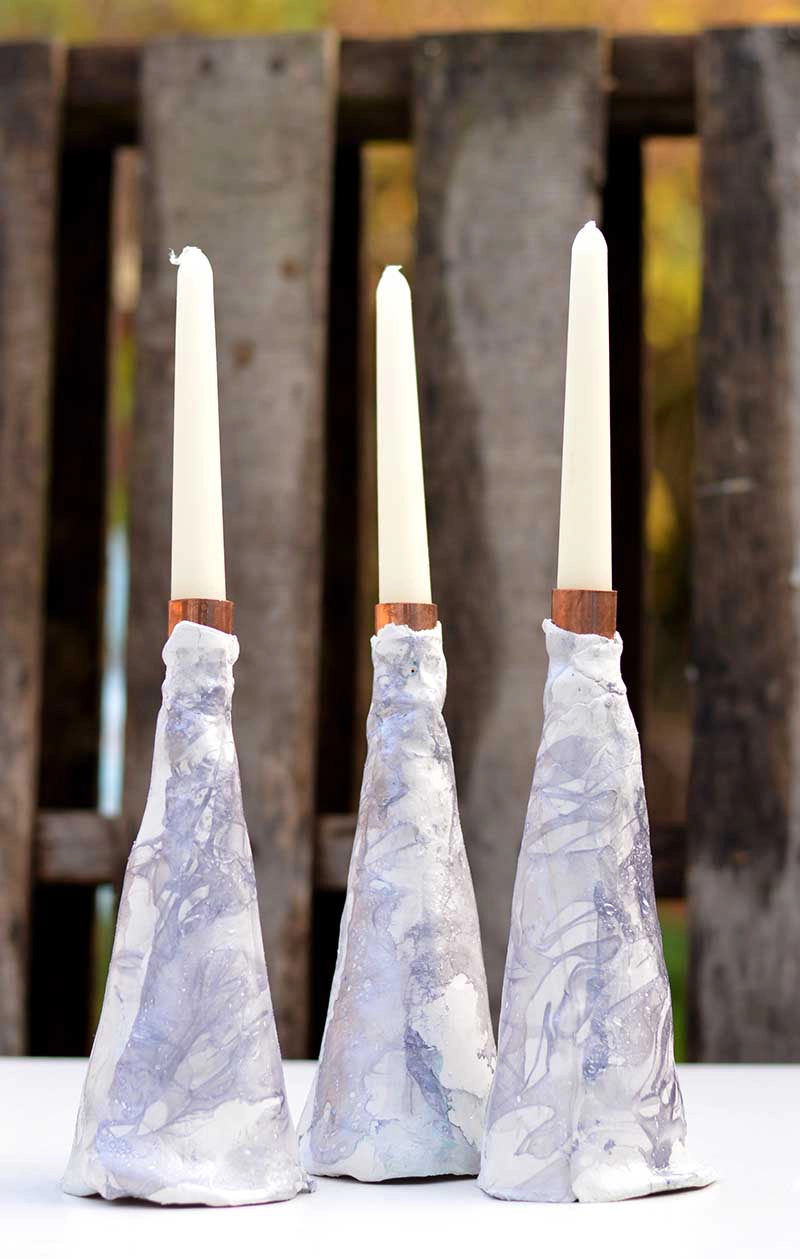
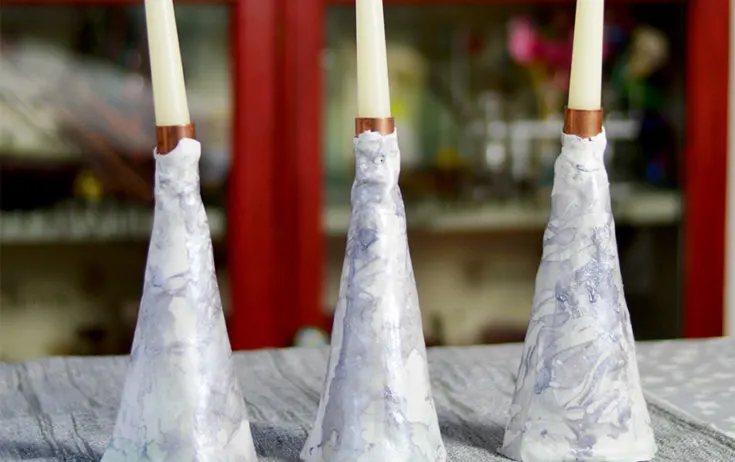
Even though tempted, I didn’t go down the monsters and dinosaur route that I did with the kids. But I created something more grown-up and made some lovely marbled air dry clay candle holders.
These candleholders were simple to make, and once the clay had dried, instead of painting them, I marbled them. They look a bit like sophisticated silver Christmas trees. Which means they look great as a centrepiece on my dining room table.
I chose silver as I thought that went well with the copper pipe fixings, but you can make them in any colour you want as long as you can buy that colour in nail polish. You could even make them in more than one colour.
This DIY clay candle would look great with any Scandinavian-themed Christmas decorations.
Is Air Dry Safe To Use For Candles
Air dry clay is not flammable but porous and will absorb the melting wax, which can cause problems. It’s advisable to use an insert with air dry clay candleholders to ensure the heat doesn’t directly come in contact with the candle to solve the problem.
That is why I used copper piping to hold the candles; also, they make a firm base for the candle sticks.
We’re a participant in the Amazon Services LLC Associates Program, an affiliate advertising program designed to provide a means for us to earn fees by linking to Amazon.com and affiliated sites. As an Amazon Associate, I earn from qualifying purchases.
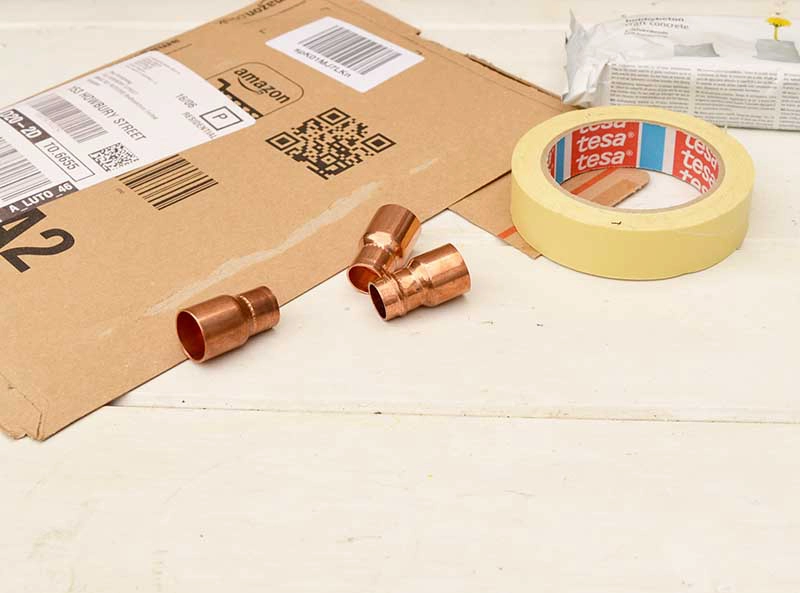
What You Need
- White air dry clay – One packet was enough to make three candle holders
- Scrap cardboard – I just used some Amazon packaging I had lying around
- Copper pipe end feeds 22mm – one for each candlestick.
- Clear nail polish – not quick drying
- Waterproof Mod Podge
- Silver nail polish – not quick drying
- Masking tape
- Rolling pin

How To Make The Air Dry Clay Candle Holder
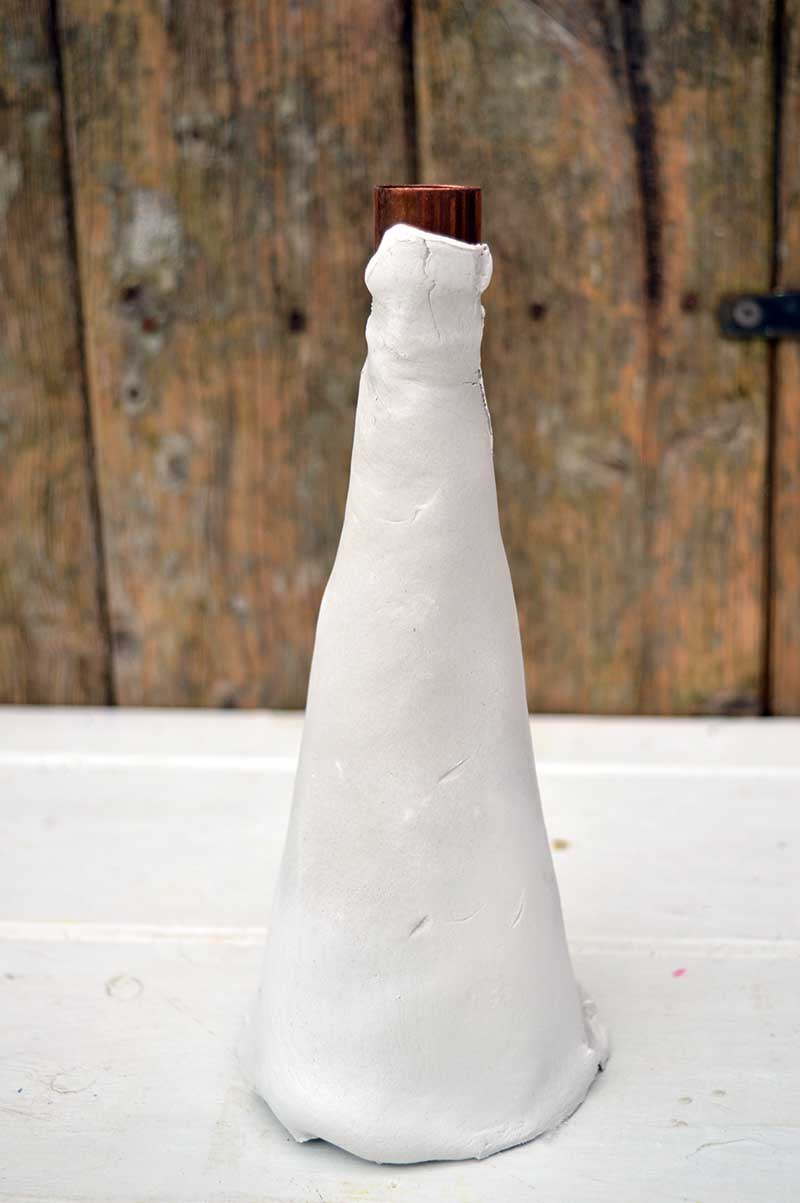
Step 1: Firstly, with the cardboard packaging and tape, make a cone shape the size you would like your candle holder. Mine was about 15cm (6″) tall.
Making a cardboard cone by rolling up a quarter circle is easy.

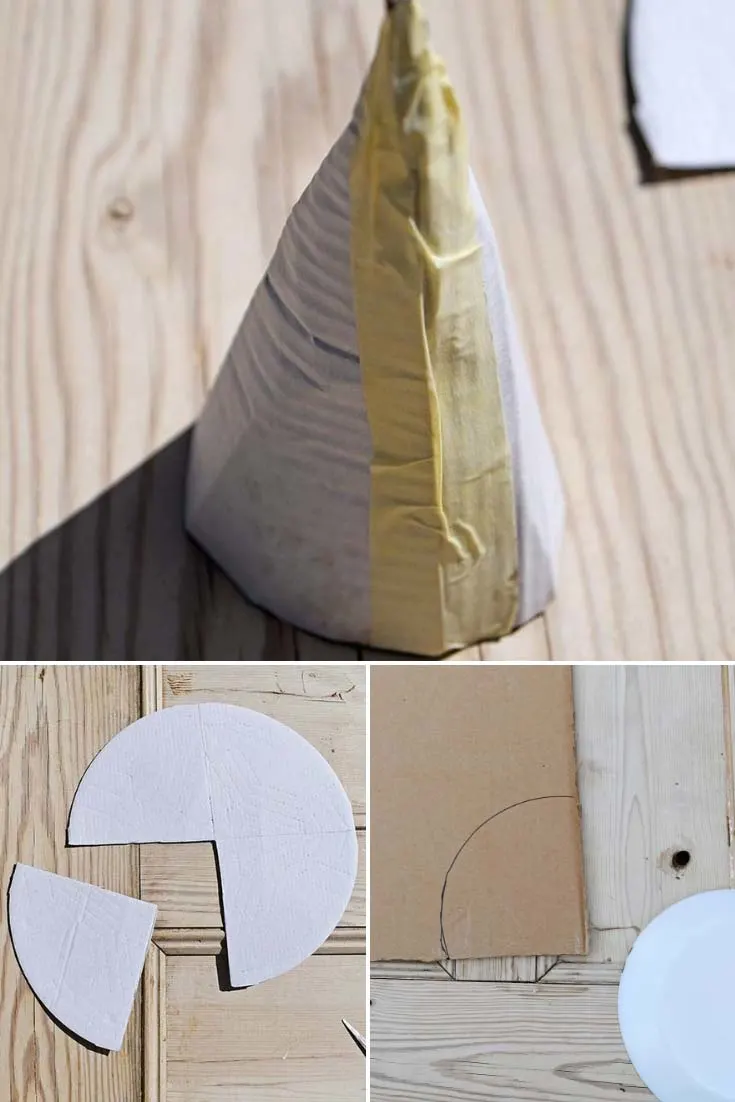
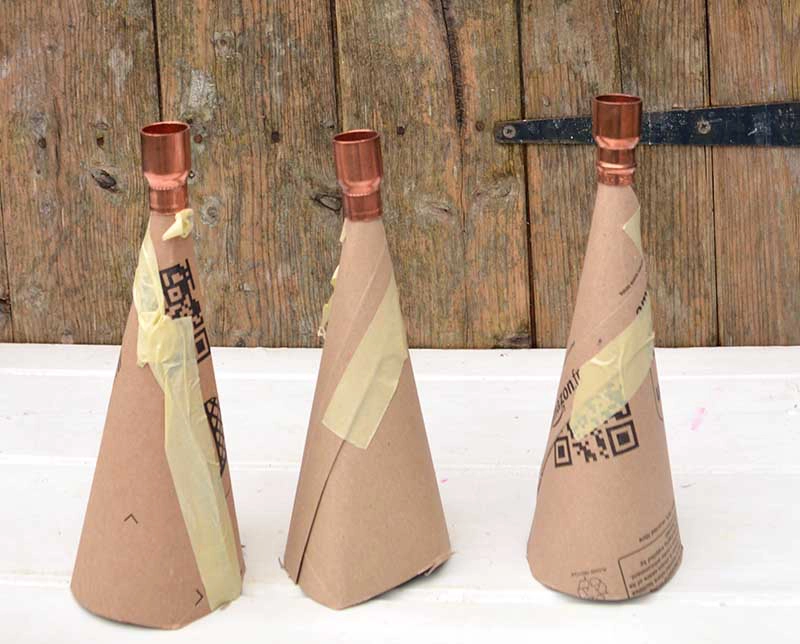
Step 2: Place a copper pipe end feed on each cardboard cone. Secure with tape if needed.

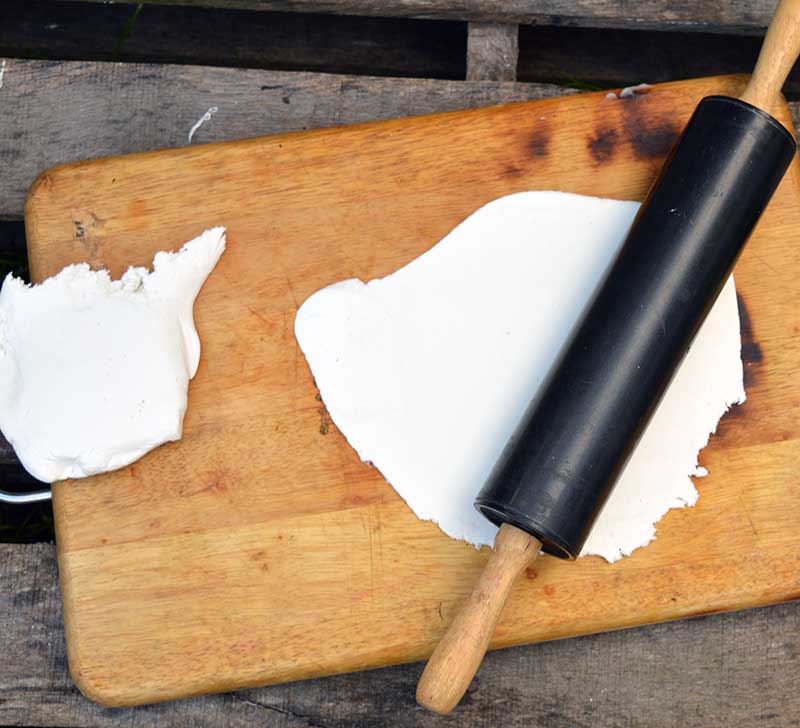
Step 3: Take the air dry clay out of the packaging and roll it out to about a thickness of 5mm using a rolling pin.

Step 4: Carefully lift the clay off the board and wrap it around the cardboard cone. Trim off any excess clay. Leave them until the clay has dried hard. I leave mine for at least 24 hours in a warm, dry space.
Top tip: Don’t try to speed up the drying process with heat or an oven, as the clay is likely to crack. It needs to dry slowly.

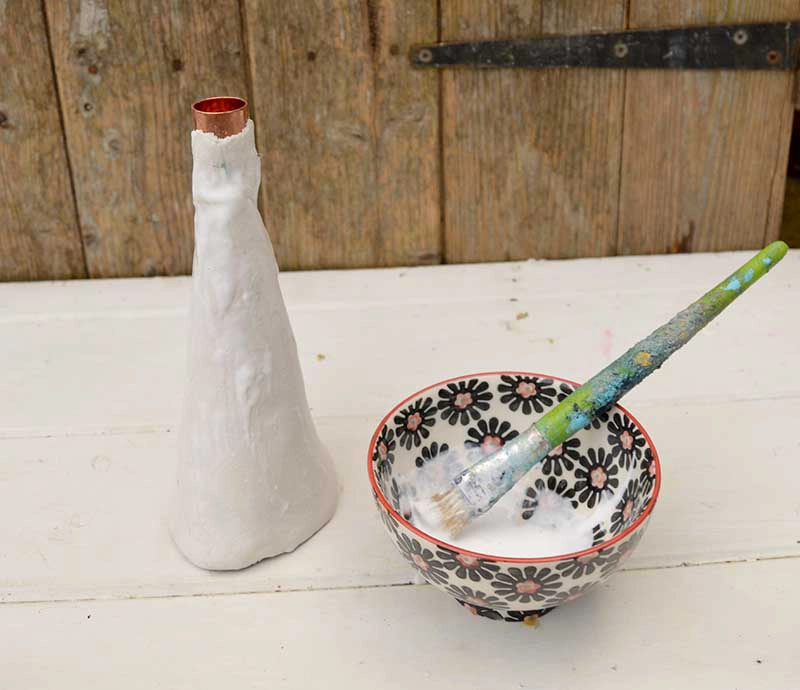
Step 5: Once dry, the clay will need sealing before marbling. To do this, first, I covered the copper pipe with masking tape to protect it. I then made a mixture of 50% clear nail polish and 50% waterproof mod podge and brushed it all over the clay candle holder. I then left it to dry.

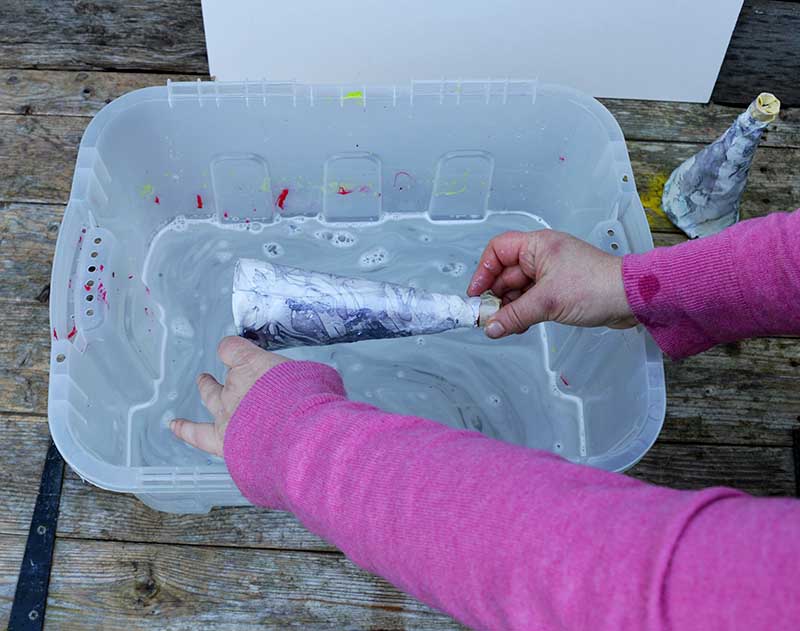
Step 6: Finally, the air dry candle holder is ready to marble. I used the same method with my upcycle tins with faux marble, which involves splashing nail polish on the surface of warm water and then rolling the clay candle holder over the top.

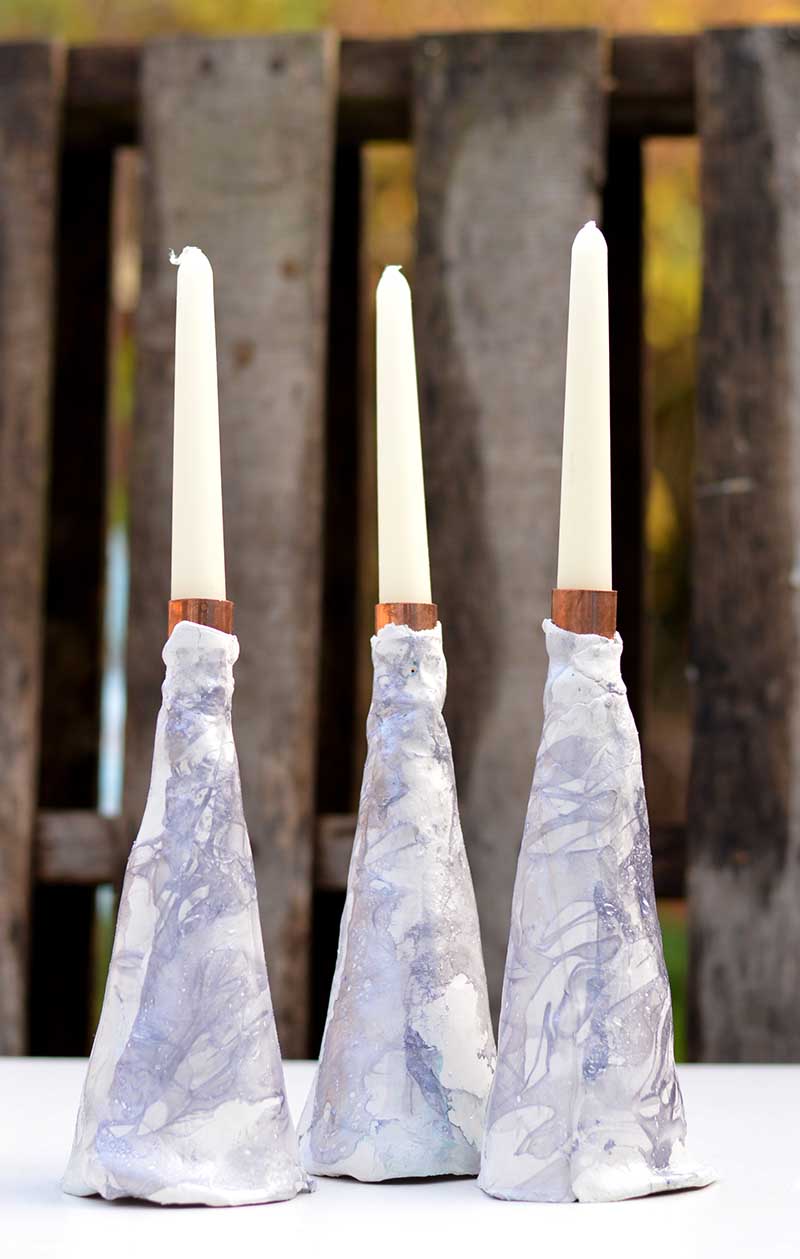
Now all you need to do is add candles. I’m pleased with how the air dry candle holder turned out. I think three together look good and will be on the centre of my dining table this Christmas.
Mind you, I also think they look delicious on the mantle, so I might have to make some more. Perhaps with green nail polish this time, they look even more like Christmas trees.
Other Ways To Illuminate The Table
I’ve also made candles in oyster shells before, and these make lovely hostess gift ideas. I’m always looking for fun ways to illuminate my home in the winter, and even though I love real candles, they aren’t always practical, so I use LED tea lights instead. I’ve even made craft beer can candles.
I’ve made mini lanterns for the Chinese New Year, map luminaries and postage stamp tea lights. And for Halloween, I made some upcycled bottle lights.
Don’t forget to check out my many cool adult craft ideas and Christmas crafts for adults.
Air Dry Clay Candle

The air dry clay candles are easy to make and look fabulous on any Christmas tablescape or mantle. They have been decorated with a beautiful marble effect.
Materials
- White Air Dry Clay
- Copper pipe ends
- Cardboard and tape
- Clear and Silver Nail Varnish
- Mod Podge
Instructions
- Make a cone out of the cardboard. Draw a quarter circle on the cardboard and then cut it out. Roll this up and tape at the join to get a cone. Repeat this three times.
- Next, stick a copper pipe end to the top of each cardboard cone.
- Open up the air dry clay; using a rolling pin, roll it out so it is about 5mm thick.
- Ccarefully lift this sheet of clay and wrap it around the cone until the ends meet.
- Then using a knife, trim away any excess clay.
- Leave the clay to dry in well ventilated, warm room for at least 24 hours until it is hardened.
- Then seal the clay with a coat of waterproof Mod Podge and again leave it to dry.
- Next, carefully tape over the copper piping.
- In a large bowl of warm water, then add some silver nail polish. Carefully dip the candle holder into the water, rolling it over the surface to create a faux marble effect.
I have a cool collection of air dry clay ideas on the blog that you should check out.


Mo
Thursday 22nd of October 2020
Hi!
Do you actually light these or just use as decoration - I understand that air dry clay can be flammable?
Claire Armstrong
Thursday 22nd of October 2020
Yes you are right some air dry clays are flammable. If you are lighting the candles it’s best to use a non flammable clay. Also, you should never leave lit candles unattended anyway.
Florence @ Vintage Southern Picks
Friday 29th of December 2017
Hi Claire, So you're saying you just pour a bit of nail polish in the water & roll the cone in it? That sounds easy. Yours turned out so pretty, and I'm sure you could modify this for other uses besides Christmas. Great idea. I always loved Play Doh too, but I think I liked eating it the best...LOL
Claire Armstrong
Friday 29th of December 2017
Thank you, Florence. Yes marbling is that easy, just make sure the water is warm and you don't use a quick drying nail polish.
Cecilia
Tuesday 26th of December 2017
Love these, Claire! Thanks for sharing at Vintage Charm!
Claire Armstrong
Wednesday 27th of December 2017
Thank you for hosting!
Julie
Tuesday 19th of December 2017
These are lovely. I made a air dry clay cone last year, much smaller than yours and I use it to keep my rings overnight. It's turned out to be really useful. I love this nail varnish marbling technique, it's so much fun it does make you want to marble all the things doesn't it!
Claire Armstrong
Tuesday 19th of December 2017
Thanks Julie. The marbling is a really quick and effective way to decorate, great results for very little effort.
Ivory
Saturday 16th of December 2017
On my, you are so creative. I would have never thought of doing something like this. I guess I have absolutely no creativity in me at all. ??
Claire Armstrong
Saturday 16th of December 2017
Thank you, Ivory. I'm sure your creative it just takes a bit of practice, the more creative things you do the more ideas you have.